

FireKillerGR
-
Posts
1756 -
Joined
-
Last visited
-
Days Won
26
Content Type
Profiles
Forums
Events
Blogs
Posts posted by FireKillerGR
-
-
"but would like to see it under overclocked conditions.Thats why I will continue the test and post results to analyze them."
forgot to mention the chips which are Cfr.
Will post results as soon as possible
-
haha actually I post more photos than ussual because some people said that I do not include what I have to so on them(on an other forum).So I wanted to be safety this time

-
Hey again,
I got a kit from Avexir a couple of weeks ago for overclocking purposes

Haven't managed to test them with cold IMC but would like to post some Aida scores from running them on my daily pc.
Here are some photos of their box:


Backside:


And now lets open it.Shall we?


Now the System Setup:
Intel i7 3770K@4.5Ghz
Msi Z77A-GD80
Avexir 4x4Gb 2400Mhz Cl10
Evga 660Ti
Thermaltake Toughpower Xt 1350W
Dimastech Benchatble Easy White
Os:Windows 7 64Bit Eng

A memory kit with my name


Aida tests:
Read

Copy

Write

Latency

Conclusion:
The Avexir is a brand new vendor in memory industry.They are willing with their experience to produce well performing products.Anyway the kit is good enough for its performance but would like to see it under overclocked conditions.Thats why I will continue the test and post results to analyze them.
Thank you.
Ps. sorry for the pictures.They could be better but I haven't my camera available due to lack of battery

-
Hey guys,just received my new graphics card and thought it would be nice to post some benchmarking scores from my daily pc.
Some words about the card:
The card itself is an option made from Msi.It uses the dual slot cooler called Twin Frozr.
The custom pcb and the aftermarket cooler are there for anything a user can require from the card.
But anyway you are not here to read specifications and long texts.
I assume you are here to see the results of the card in combination of my 3770K.Right?
So just for the record what I used for the review:
Hardware:
Intel i7 3770K
Evga Z77 FTW
Avexir 4x4Gb 2400MhzCl10
ThermalTake ToughtPower Xt 1350W
Dimastech Easy White
Software:
OS:Windows7 64bit
Drivers:Nvidia 301.42
First lets check what card can do on stock settings:
3DMark03:

3DMark Vantage:

3DMark11:

Now I overclocked the card at 1150mhz which has as a result 1315mhz~ due to the Boost technology.
I found out the Gpux max frequency but for memory had to do more tests because it could run stable at 1800Mhz without additional voltage needed!
3DMark Vantage Overclocked:

3DMark 11 Overclocked:

Final Words:
The performance of this card is great but what surprised me was the memory overclocking part.
Have tested a 660Ti before(with the same type of memory chips I think) and didnt manage to pass 1650-1675mhz.
As for the cooling it kept the core under 61C on stock settings and auto fan speed and under 57C while overclocked on 100% fan speed.
Thanks for reading
-
I got inspired from Hipro5.
Still remember when I bought a local magazine to get some advices to build my first pc.
Then I saw George's scores with blacko7
I will never sell his gpu pot
-
haha
maybe I beet you
Burnt a 8800gt by applying As5 on vrm.
Killed a P55a ud5 when soldering.(60watt solder -ouch-).
The good 480gtx lightning of Hipro.(was his fault but anyway).Its core got broken from the pot.
And killed a 4870 aa month ago.

I think I have more,will add soon.
-
haha

I use kitchenpaper around the pot
-
thanks bro
yeah you are right.Actually I sent all of my eraser.I think too that I have to make it thicker and add more around the first pci express.
Also armaflex is easier to use than vaseline.Its a sticker actually. +its easy removable.
-
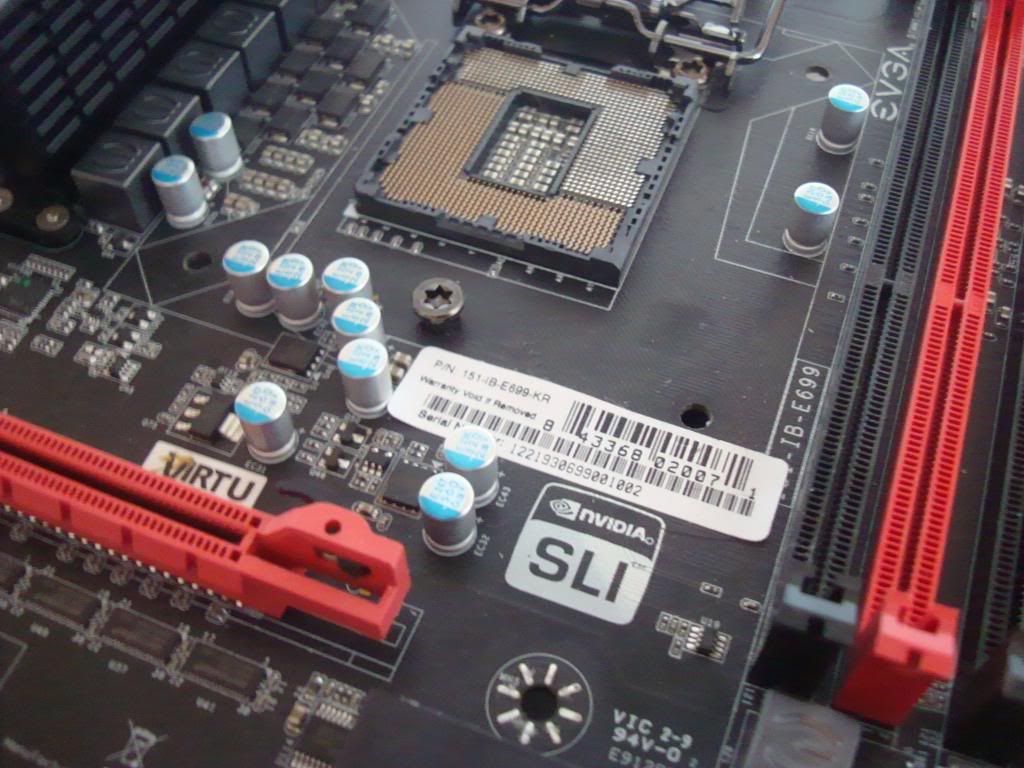
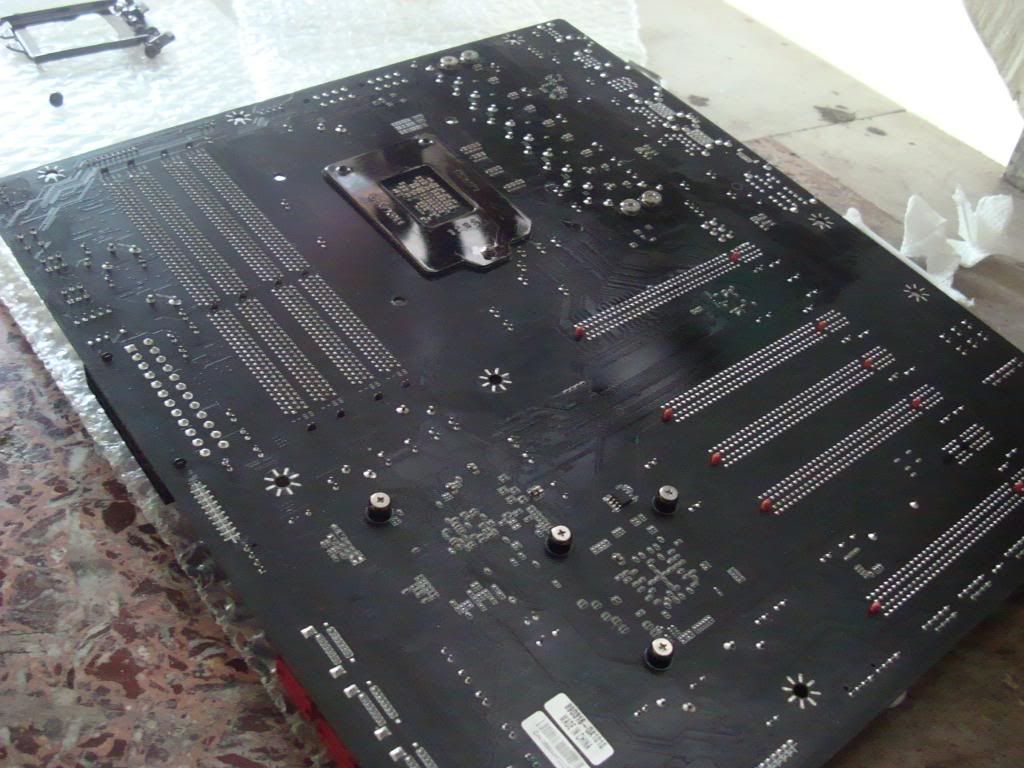
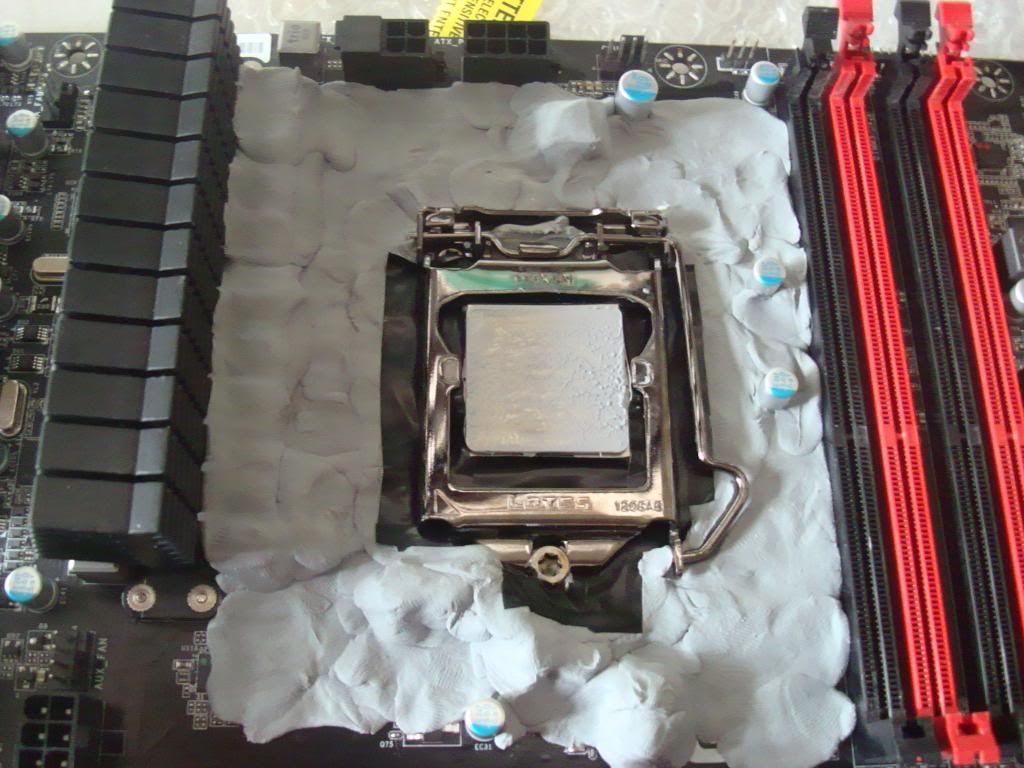
Hey,this is my guide for insulating a motherboard.
I thought it would be a nice idea to make one for new users.
The ginny pig will be my favourite Evga Z77 Ftw
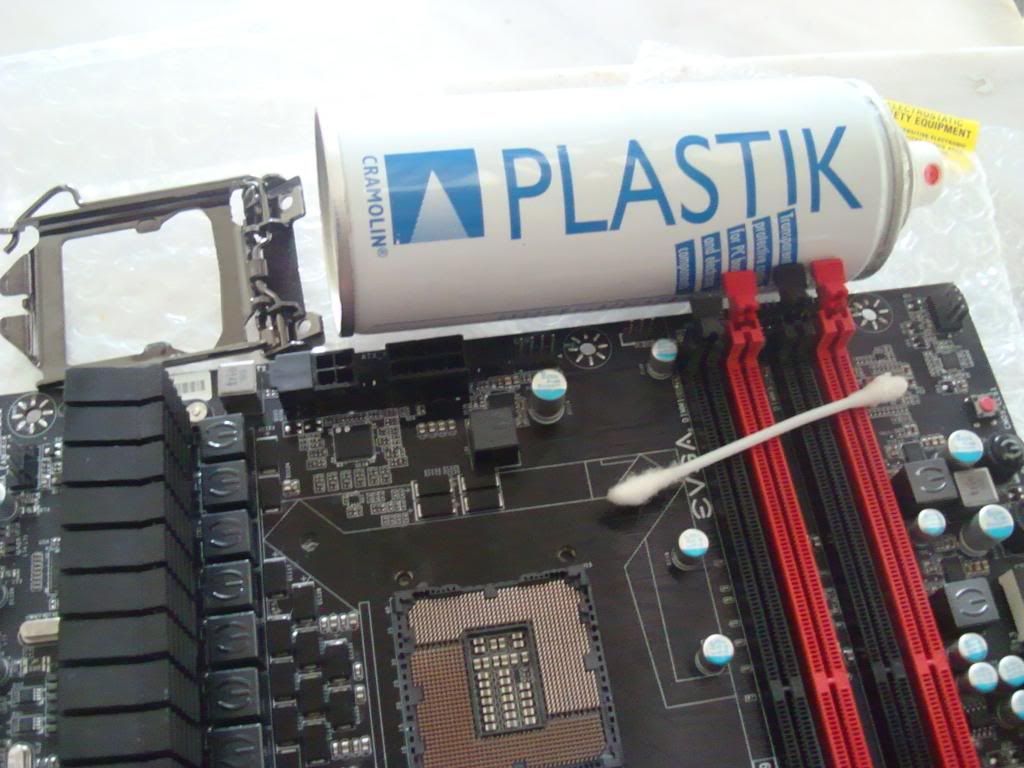
What you will need to insulate a motherboard:
Plastik Spray for PCBs.I am using the following:
http://www.conrad-uk.com/medias/global/ce/8000_8999/8200/8200/8205/820560_BB_00_FB.EPS_400.jpg
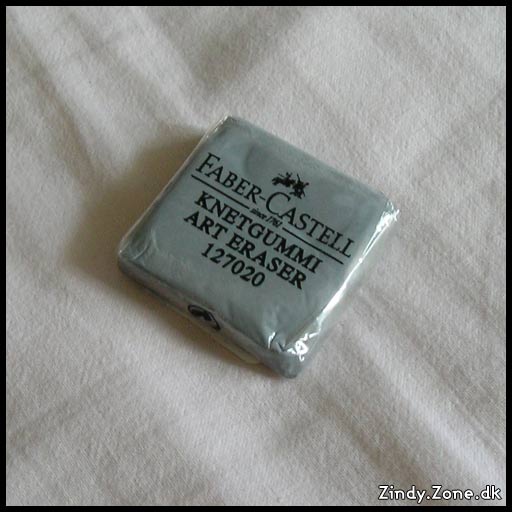
Some packs of "Art Eraser" (around 8 packets):
http://zindy-zone.dk/images/drawings/tutorial/materials/art_eraser.jpg
Insulation Tape:
http://www.tapes-direct.co.uk/images/s026.jpg
and Vaseline:
http://upload.wikimedia.org/wikipedia/commons/thumb/d/d5/Vaseline.jpg/220px-Vaseline.jpg
So lets start:
Firstly,we have to remove all the stickers.To do that,an easy way is to increase the temperature with a hairdryer and remove them.
After cleaning the motherboard and removing the stickers we can move on insulating it.
Step 1a:Use a swab to spread it all over the cpu's area.Try not to come n touch with socket's pins,fan connectors,cpu power connectors,etc.
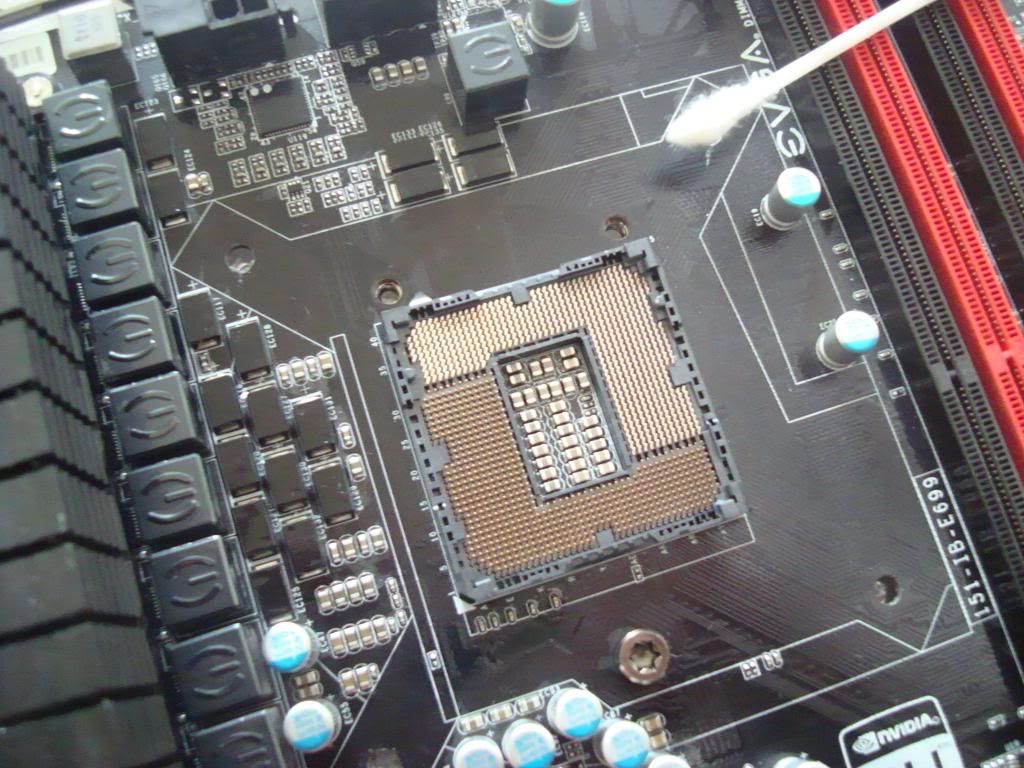
here is the result:
Now its become glossy lets move on to "Step 1b"
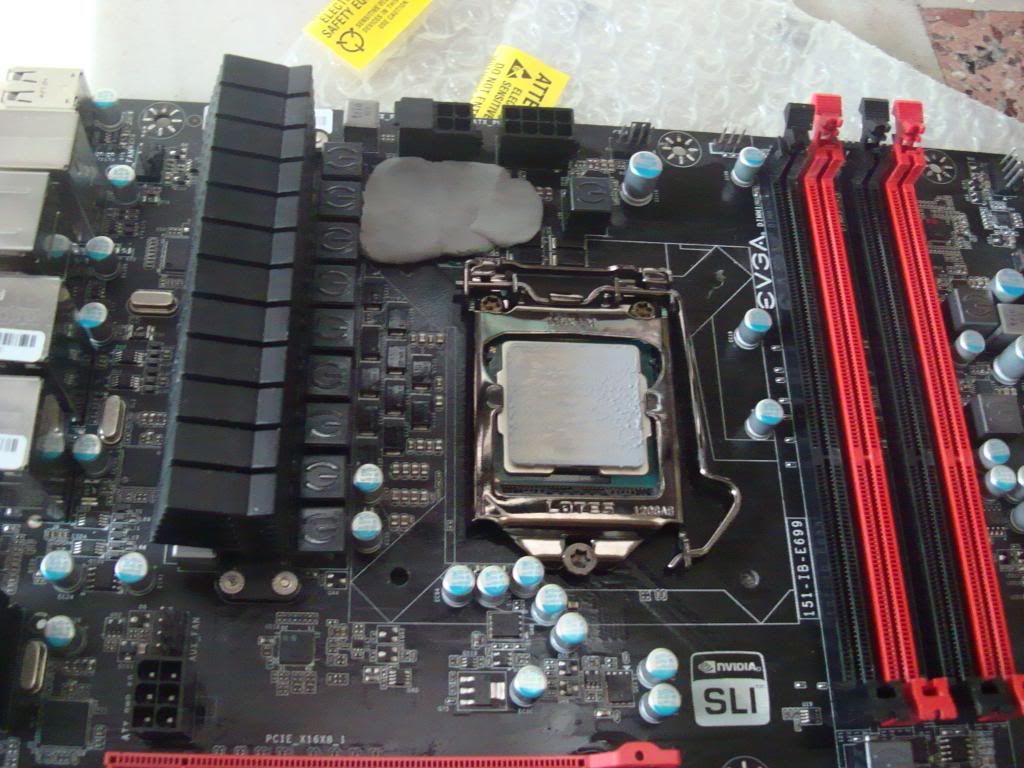
Step 1b:
and do the same on the backside of the motherboard:
Step 2: Fron tside
Now lets use the eraser:
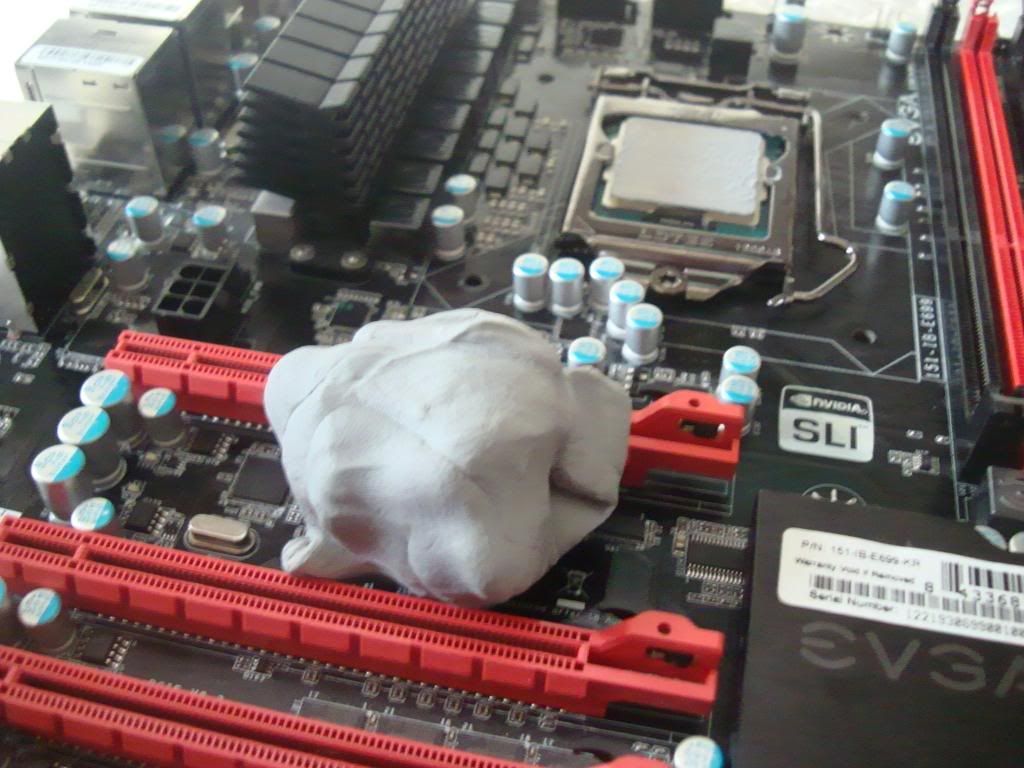
Make small pieces of it and starting insulating the are around the cpu and pci express:
Right before we end with the cpu area:
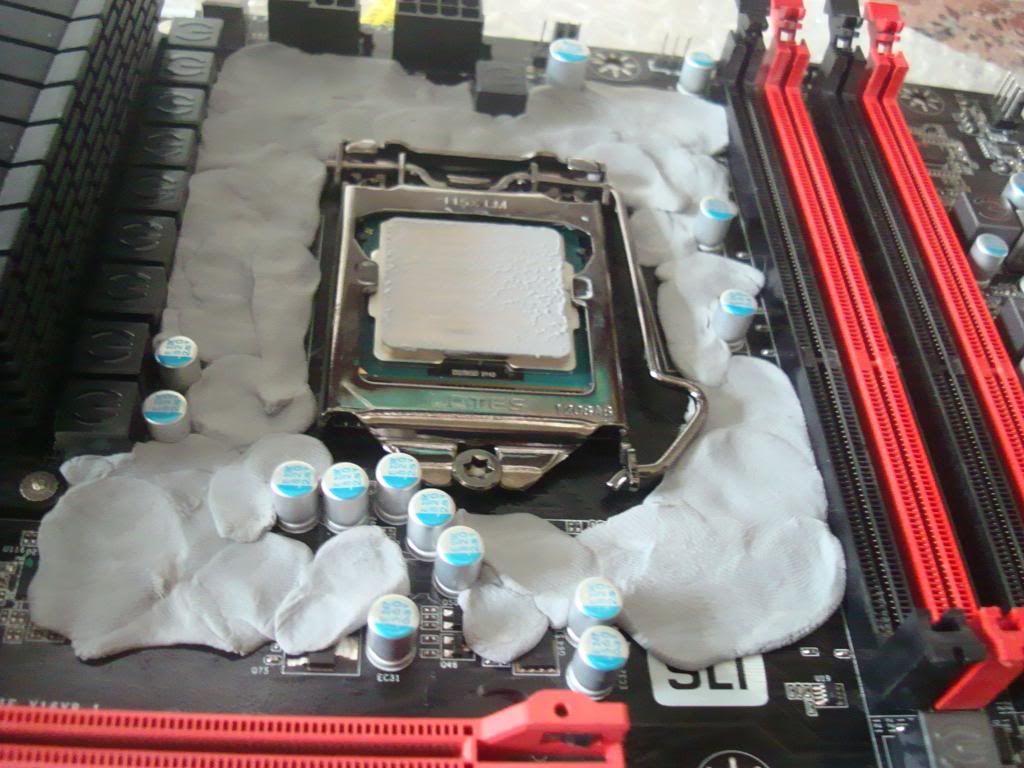
***Good tip to know.I always use insulation tape to keep the cpu in possition.In that way we are sure that eraser will not damage socket's pins!!!

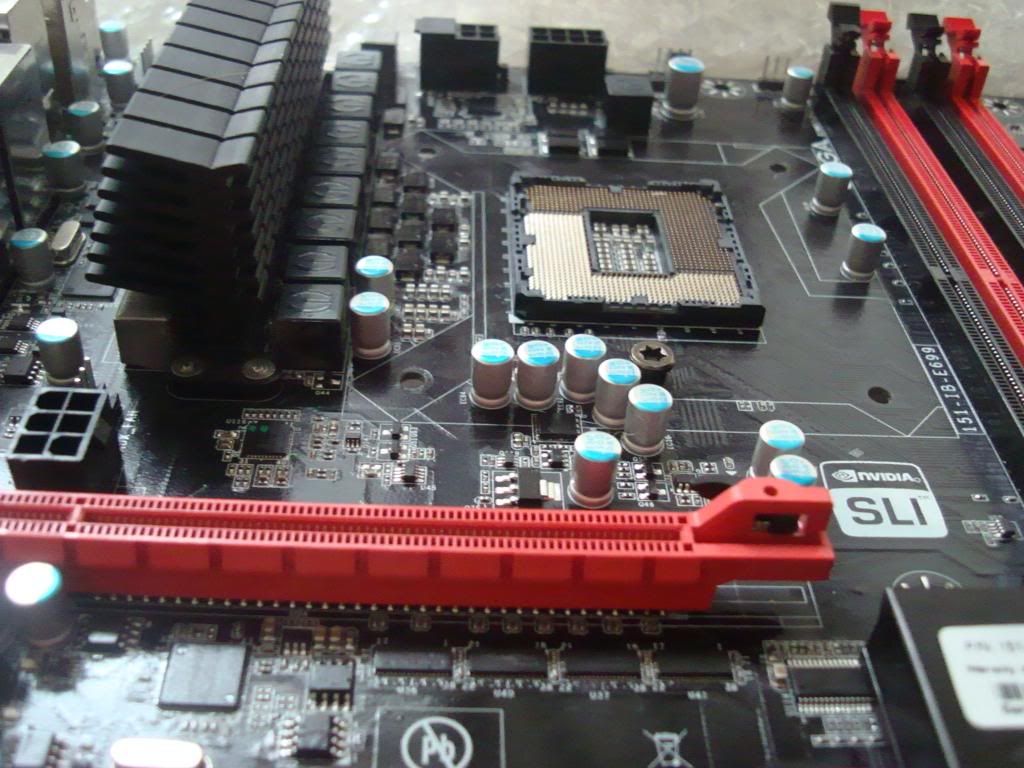
Cpu's Socket area completed:
Step 3: Front side
Move on and insulate the pci express area.
Do what you did for the cpu area.Be careful again with pci express pins.
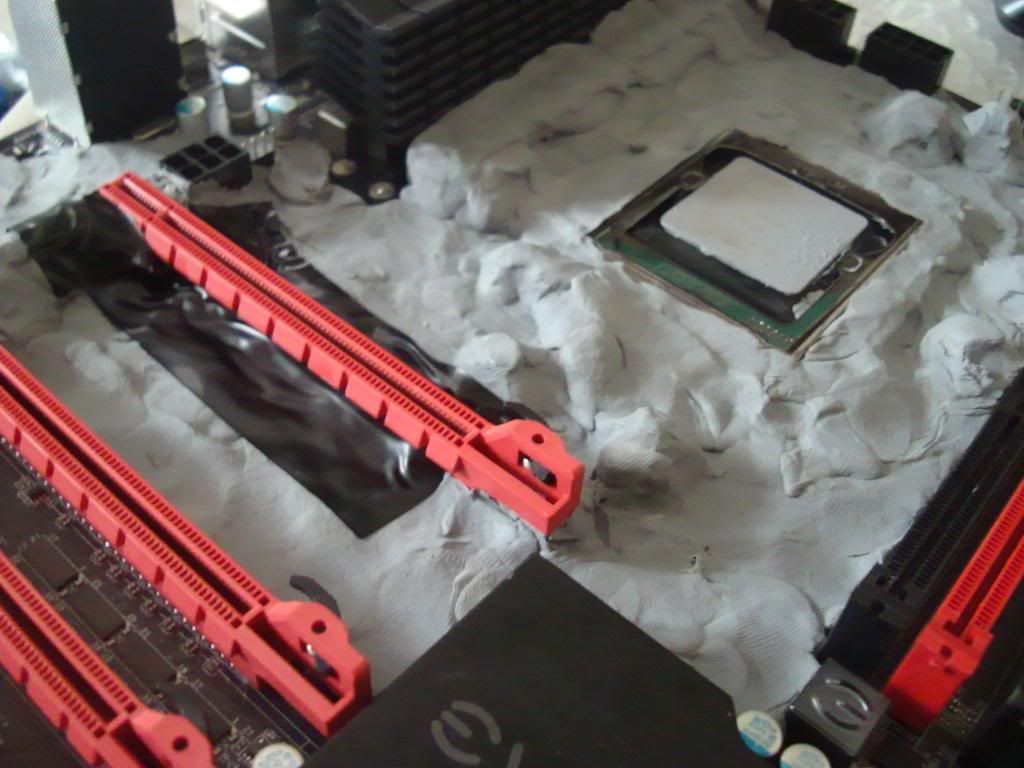
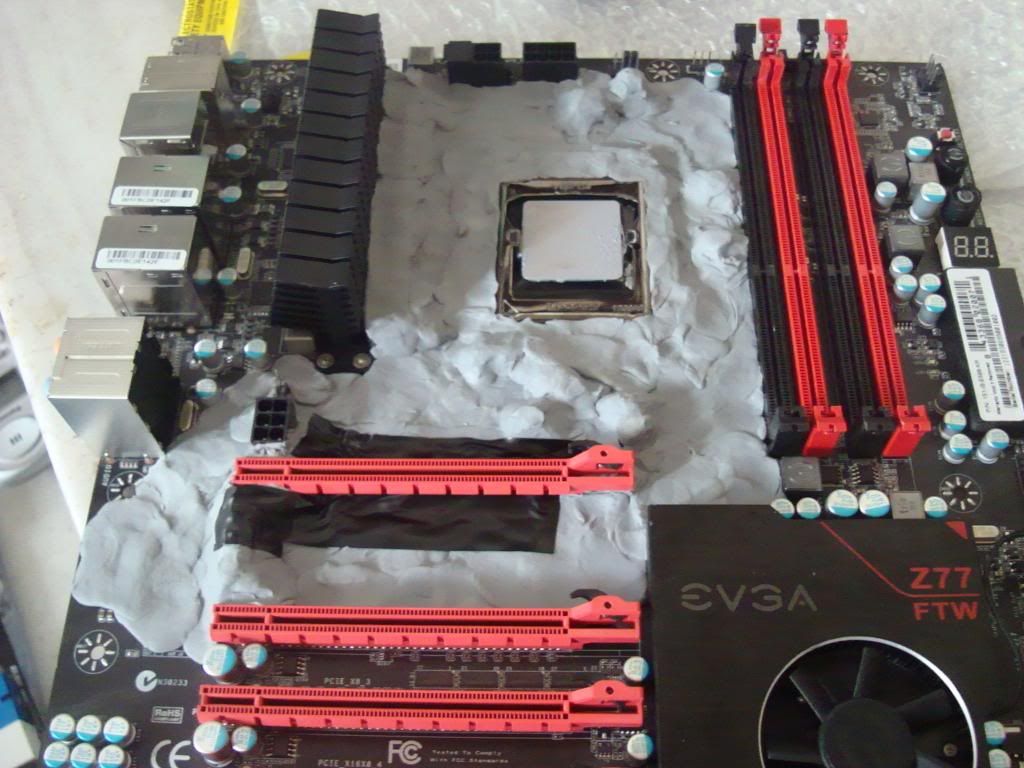
As you can see I am using insulation tape around the pci express in order to prevent vaseline(I use vaseline when insulating a graphics card)come in touch with eraser.That will make the eraser to melt and have a horrible result.
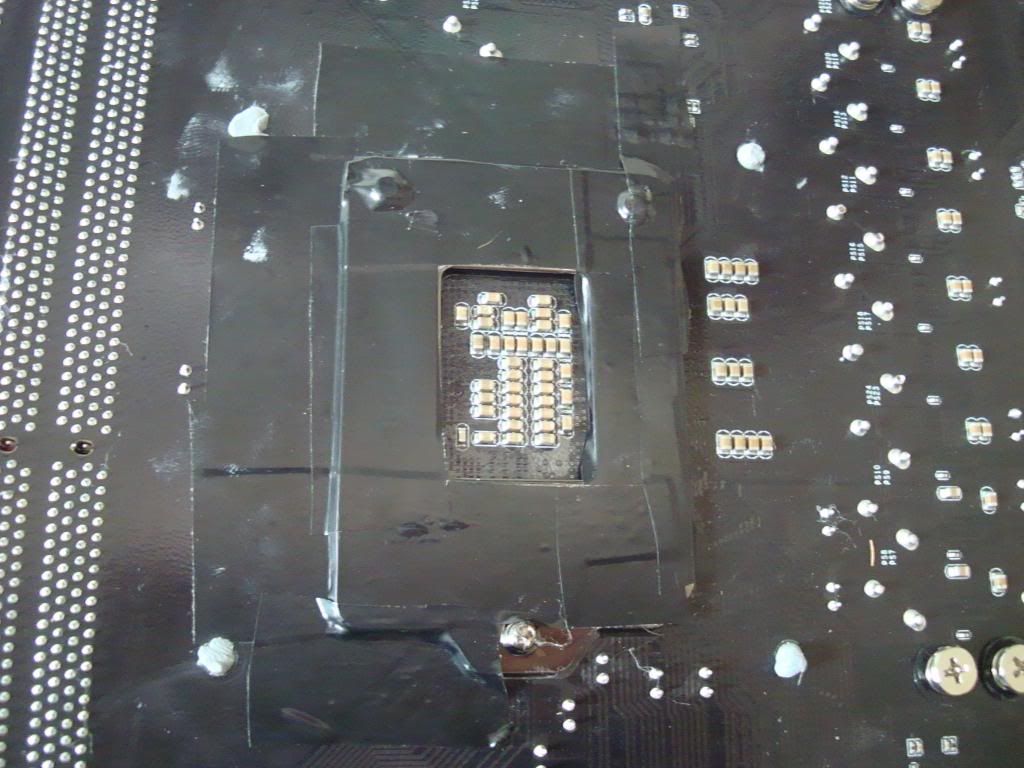
Step 4: Back side
Here I use insulation tape for the backplate as it gets really cold.
Then I fill it with eraser and cover the eraser with insulation tape,in order to prevent ot getting in touch with the vaseline.
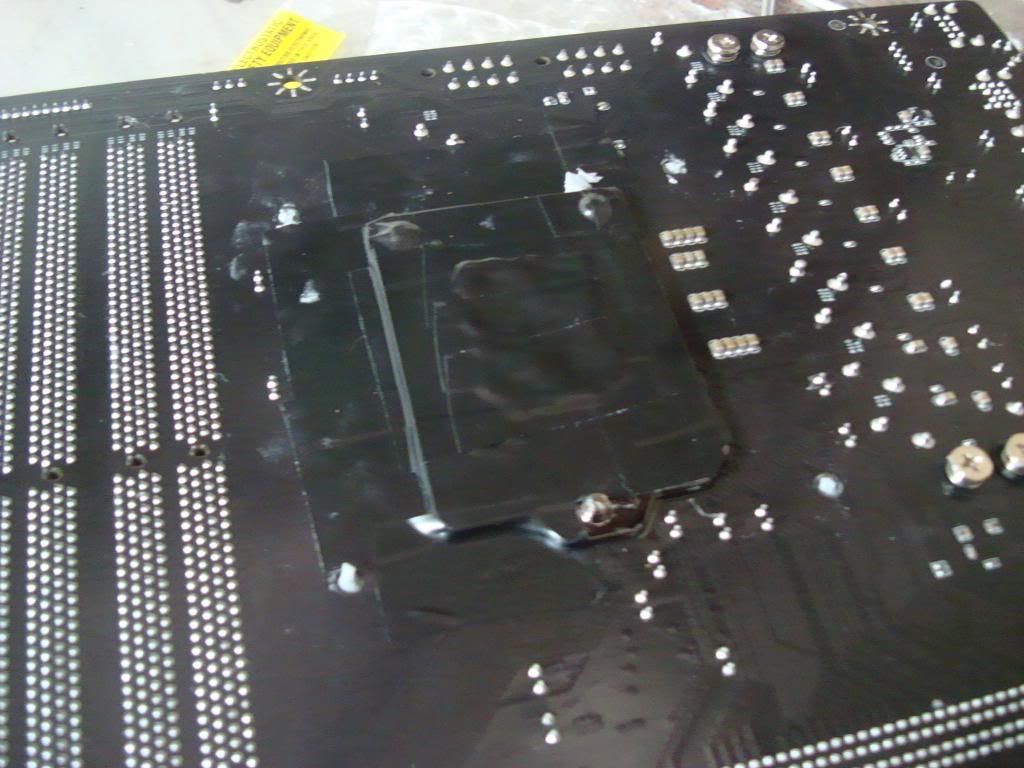
Step 5: Vaseline
Spread vaseline on the back side of the motherboard.I have not done this on the Ftw as I still using it as my 24/7 system,will add photos soon.
Additional Tips and tricks:
1)Use armaflex tape instead of vaseline for the backside of the motherboard.
2)Use paper in order to create an additional level of insulation around the pci express area
annnnnnddd third and most important enjoy your session
Any possible mistakes will be corrected as soon as possible!
Thanks,
Stavros
PS. forgot to mention that removing the socket will make your job easier!
-
damn

just wish mine will scale with voltage
-
if it can go 6.7-6.8 3d benchable I am ok
-
update:
5.1ghz spi32m @1.36v
-
Splave's method:
45x106@1.25v 4c/8t run 2x Spi32m
now will test for 5ghz
100x50 4c/8t @1.285v spi32m stable
-
just bought a L224C371
 lets wish its good enough.
 -
just for the record it cannot boot @5ghz 2c/2t with 1.5vcore
-
just picked my new 3700k
batch:3229B896
lets find out what voltage is needed for 5Ghz
edit: its totally crap
what can I do now?will buy a Malay
-
found a 3229
lets see what it can do!
-
yeah forgot to check it,just didnt see it anywhere and got confused.
anyway,do u have any ideas for these?
just looked the thread,the results are not good
-
any info for 3223 and 3232?
Didnt know 3232 was out
-
Any idea which batch from the last batches seems to be good?
-
haha so it works
-
hahaha ok
btw ofcourse all Eist,C,etc. are disabled
also will the battery leave marks?
-
what I used:
1.65vcore on wprime.5 tries
1.60vcore 2v pll and 1.3vccio Intel burn test and prime 3x times
on stock heatsink
and now without cooler au 4.5g let it boot the shutdown after while.Turned it on again,shutdown after while again.
did this about 10+TIMES AND STILL WORKING

Ps. I play with cpu's contacts with a t-shirt to create static electr. but still alive
-
haha lol
I am trying to kill one but after many tries its still ok damn


Ivy Bridge 3570K/3770K Batch and Serial Numbers
in Ivy Bridge (Z77) OC
Posted
L224C371 Air 4C/8T 50x100 SPI32M 1.286v...4C/8T 51x100 SPI32M 1.365v
IMC 2975MHz