I.nfraR.ed
-
Posts
2473 -
Joined
-
Last visited
-
Days Won
36
Content Type
Profiles
Forums
Events
Blogs
Everything posted by I.nfraR.ed
-
 Very good score, could not catch that.
 -
Got a decent score, but there's room for improvement, since I had better runs. Spent a whole evening trying to get 4066 running reliably, but it seems my CPU can't handle it for some reason. The better 2x16 kit just doesn't want to run GDM off, so opted for an old 2x8 A0 kit. PS: Top 3 scores are all in our team :p I guess the internal mini-competition helps.
-
B550 Unify-X Bios and Tools
I.nfraR.ed replied to SparkysAdventure's topic in Ryzen | Bristol Ridge AM4
Doesn't seem to make a difference for me. / RANT mode on VTT still doesn't work, anything set manually gets ignored. Or so it seems. 4133/20166 still works at low DRAM voltage, but restarts with higher (I suspect it's the CPU to blame, don't have a spare one). Still WHEA even at 3933. Do these "MemTry It" presets do anything except setting main timings and voltage? They seem to be pointless to me, if that's the only function (in addition to pre-selecting correct DRAM and IF multipliers). I also miss the "Safe boot/MemOK" buttons from Asus. When settings are really wrong, the mem oc recovery mechanism doesn't work and I have to clear cmos. Overall, it doesn't seem faster than my previous board (Asrock B350 K4 flashed to B450 Pro4), just manages more stable voltages and one step on the mem multi up. PS: On a positive note, it might be faster in Pi 32M, but will have to test more. Edit: I've tried very low VTT (0.3V with VDIMM 2v) and it didn't POST, so it probably works. -
This is a nice CPU, low FSB hurting the score, though. Keep pushing!
-
To switch between different channels you need a newer build of ZenTimings where I've enabled that. Just select the corresponding DIMM from the dropdown and it should reload the timings. You can get the latest "public" beta build from my Google Drive https://drive.google.com/drive/folders/108Ux5tv2fMz9OC9SeHR22DmJvfwiNg1Q?usp=sharing
-
All old dropbox share links are not working anymore. I've shared the folder again (no individual links): https://www.dropbox.com/sh/b702d3y6guzdzyy/AAAq_b0WcaF1fIiQNrUdTjB5a
-
He has a better one. I literally have no idea about tweaks yet.
-
Yes, that's because of the hw prefetchers, but on XP and Zen3 haven't experienced the same. Granted my bios lacks those options. Most of the times 3rd run is very slow already and have to restart the system.
-
I've tried all the tweaks from the old Bulldozer Conditioner (yes, I've disassembled it some time ago and know exactly what it does), also some of my own test tweaks I was working on for the previous zen generations. If anything, one of the registers makes it extremely slow and the whole system gets laggy. Most of the registers are undocumented, the BKDG for 15h has more information than the document for 17h, but there's probably no parity between all the features and a specific bit in a register on 15h might be something else on 17h. Also Zen doesn't support Trailing Bit Manipulation (TBM) instruction set or at least the matching bit is marked as "Reserved" and that's one of the significant tweaks from BDC. Others don't really improve the performance in SuperPi. They had some positive effect on Gen1 last time I tried, but it seems all performance bias tweaks aren't applicable on Vermeer, perhaps nothing significant to tweak anymore with this gen. My modded XP is still working with Vermeer, but is slower than untuned Windows 10. Wazza doesn't help either, so I guess it is game over for XP. I've noticed it was slow with 3000G. It was fine with first gen though, perhaps with Zen+, too. Back on Windows 10 now. PS: Untweaked Windows 7 is also slower for me. PS2: At least now I know which register kills the performance completely and will try to tune the old perf bias options.
-
@TerraRaptorI don't think so. I will take another look on Zen3, but I could not improve performance on Zen2 much. It had some effect on Zen1 though. The Conditioner uses some MSRs which are also used by the Performance Bias on Ryzen platform, which has no significant effect on the newest gen. Zen doesn't support Trailing Bit Manipulation anyway. I will try to boost performance in SuperPi, but I doubt there's anything significant to gain.
-
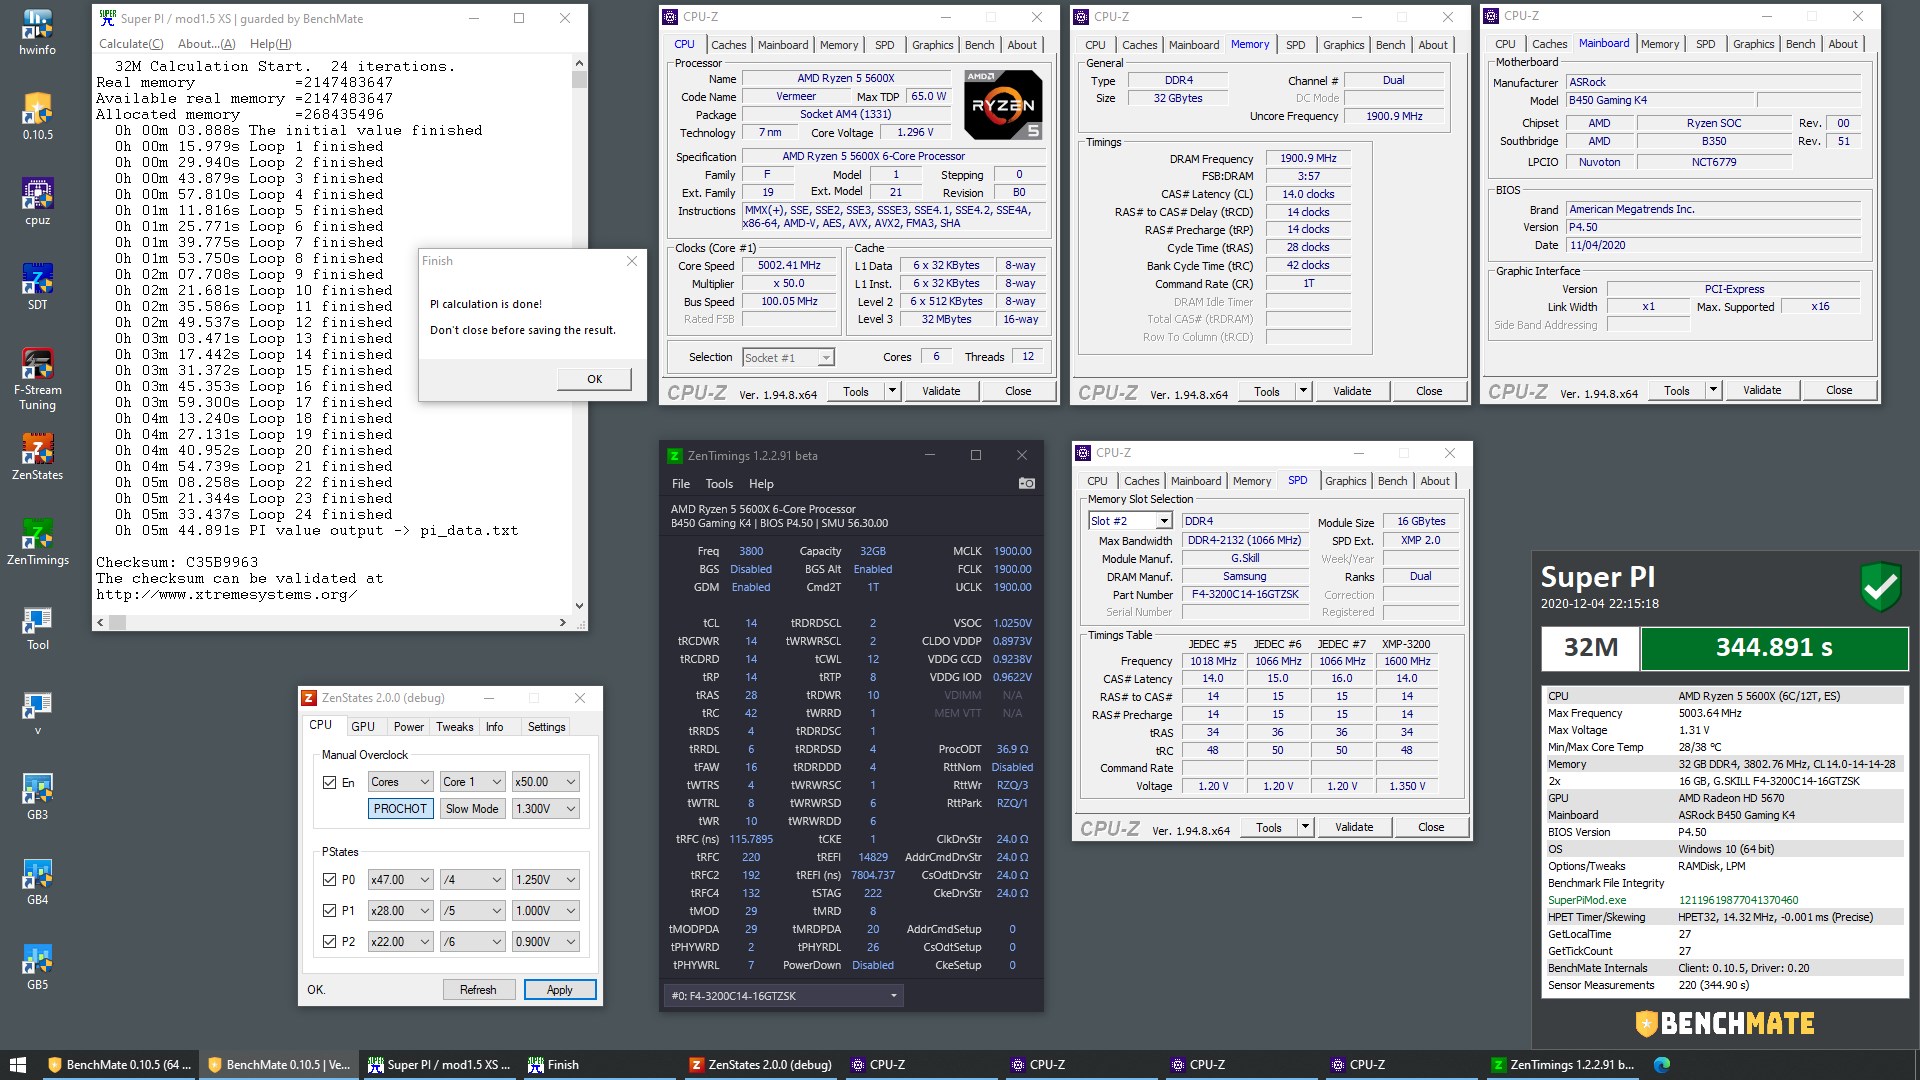
First tries with 5600X, currently on Win 10. Not bad for this board, I think. I can't boot XP anymore with this gen and bios.
-
GRIFF - DDR SD-RAM @ 445MHz - 445 MHz Memory Frequency
I.nfraR.ed replied to meiyo's topic in Result Discussions
Great one. My stick died at similar voltage IIRC. -
True, you can't get the real CPU name, it's not fused on the CPU, but is matched to a table depending on the detected features, core, FSB and multiplier. That's why if cache is damaged (or unlocked) it gets detected as something else. Anything running out of stock invalidates the detected model and "stock" sometimes means completely different on different motherboards. It's really easy to cheat with model numbers, but I hope people benching those CPUs are honest. You can basically submit all XP-M Bartons with just one CPU. Even a photo of the CPU doesn't prove anything, except that you have the model, but doesn't guarantee it's the one used for the submission
-
B350 motherboard running with B450 bios. Wraith Prism cooler.
-
Oh, you finally did it! Missed that submission. Congrats I will come back for it some day, promise!
-
Wait, 2033 is much faster than 2100? Is that the slow down some people talk about? I guess you don't want to disclose your timings, but if you run latest beta of ZenTimings, could you spot some differences in non user-configurable timings? I don't have 5000 series to check myself. Is it strap related? For example, is it the same if you use the lower strap and clock the bclk up or is it just some internal strap that makes things waaay slacker?
-
Possibly yes, I don't recommend it. It was a suicide and I was aware of potential loss of hardware. Especially on non-ceramic Athlons. Just for reference - I don't have it noted, but if I have to assume, knowing how they scale on cold, probably 2600-2700 valid with ~2V.
-
TAGG - Xeon L3014 @ 5580MHz - 350 marks Cinebench - R20
I.nfraR.ed replied to cnzdrn's topic in Result Discussions
I benched it before it was cool :p -
The "official" 1.2.1 is available on the site and has Vermeer support fixed.
-
New beta with Vermeer support somewhat fixed. You might have some readings missing though. Don't have a CPU to properly debug. ZenTimings v1.2.1.65 beta2 https://drive.google.com/file/d/1dC12pYM2qyY8D9aoEd192NtAeVh7m9uJ/view?usp=sharing
-
New v1.2.0 is up on the official site: ZenTimings I have verified it to work on my system, but there aren't much reports from users, so if there's some serious issue will have to hotfix it. There are now 2 versions of the app, but they both include the major and important fixes, since they share the same common code. The difference is in the UI. People were asking about dark theme, which is not really possible with the old Windows Forms the app was based on. Or at least not in a satisfactory way. Not all controls can be styled or at least not easily. So, the UI was completely rewritten to use Windows Presentation Foundation framework, which allows easier theming. This comes at a cost though. In order to support the themes, I had to up the minimum required version of .NET framework from 4.0 to 4.5, which means no XP support (not that most people need it). It's also a little more memory consuming, but I have tried to minimize RAM usage as much as possible. Due to that change, I have decided to still support the legacy version (it's basically the same old UI, but with updated core functions, so nothing is missing, except dark mode). I will still support it in the future, unless some breaking change is needed in the common module. It's a major release, thus the version is now 1.2.0. You can read the changelog on the site. I don't have a Zen3 system, but there's some preliminary support for Vermeer and Genesis (based more on assumptions). Will definitely need user input once it gets available in stores. It would be quite some time until I get one. I would need a new motherboard for that, unless Crosshair VI Hero actually gets some beta/unofficial bios. v1.1.0 hit more than 5400 downloads! Thank you all. Not that it benefits me in any way, but it's encouraging at least. Last, but not least, I will make sure to find time and finally update the OP with some info. CPUs tested: 1800X, 1600AF, 3000G, 240GE, 3900X on Crosshair VI Hero running latest bios 7803. Note: This is a direct copy from the overclock.net forums post.
-
On the back of the board, top corner, closest to I/O side.
-
TAGG - Sempron 150 @ 6525MHz - 11min 52sec 796ms wPrime - 1024m
I.nfraR.ed replied to cnzdrn's topic in Result Discussions
Using Sempron 150 vs 145 is cheating ? Great job! Is that with a changed dll? -
Nothing new, unfortunately. Have to quit my job if I want to support all the apps in a timely manner Which I might do, since I can't stand it anymore. I wanted to release the next ZenTimings version before switching to ZenStates again.
-
I have created a Discord channel/server/whatever: https://discord.gg/8cfR3UZ If you have problems with it, let me know.