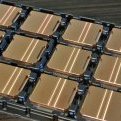
bartx Posted February 12, 2017 Share Posted February 12, 2017 Working lately on improved Kaby Lake IHS. Ended up with this. In comparison to original one it has some advantages: - 20% bigger contact area - top surface is perfectly flat, not "almost flat" after sanding - design is optimized for more rigidity - I made couple of different depths of core pocket on the bottom, to test which one is the best, original one has 0,35mm, I've got 0,35, 0,40 and 0,45mm (plus I want to use adhesive on the bottom to protect pcb), glue thickness is 0,15mm, glue needs to be removed completely in this case. Actually they're going to be tested, hopefully some feedback will be posted very soon in this thread. It's just a preparation for making it from silver. Quote Link to comment Share on other sites More sharing options...
nachtfalke Posted February 12, 2017 Share Posted February 12, 2017 really nice waiting mine HS Quote Link to comment Share on other sites More sharing options...
Nik Posted February 12, 2017 Share Posted February 12, 2017 will buy it, send me PM Quote Link to comment Share on other sites More sharing options...
Gunslinger Posted February 12, 2017 Share Posted February 12, 2017 Interested in one if you ship to the US. Quote Link to comment Share on other sites More sharing options...
suzuki Posted February 12, 2017 Share Posted February 12, 2017 Waiting for the test and price. Interested in one if any difference in temps on air/water . Sent from my iPhone using Tapatalk Pro Quote Link to comment Share on other sites More sharing options...
zeropluszero Posted February 12, 2017 Share Posted February 12, 2017 interested... Quote Link to comment Share on other sites More sharing options...
Guest Bullant Posted February 12, 2017 Share Posted February 12, 2017 Very nice Quote Link to comment Share on other sites More sharing options...
delly Posted February 13, 2017 Share Posted February 13, 2017 very nice!! price for this? Quote Link to comment Share on other sites More sharing options...
MetalRacer Posted February 14, 2017 Share Posted February 14, 2017 Very interesting! Please keep us updated with your results. Quote Link to comment Share on other sites More sharing options...
bartx Posted February 14, 2017 Author Share Posted February 14, 2017 If you have some questions for me, send me a PM. I'd like to make some improvements in design in this week hopefully and send it for testing, so update will be soon. Quote Link to comment Share on other sites More sharing options...
Doug2507 Posted February 14, 2017 Share Posted February 14, 2017 I'll join the waiting list also for final product! Quote Link to comment Share on other sites More sharing options...
Elkim Posted February 14, 2017 Share Posted February 14, 2017 1 for me pls Quote Link to comment Share on other sites More sharing options...
subaruwrc Posted February 15, 2017 Share Posted February 15, 2017 will buy one if possible Quote Link to comment Share on other sites More sharing options...
Achill3uS Posted February 15, 2017 Share Posted February 15, 2017 +1 interested Quote Link to comment Share on other sites More sharing options...
bartx Posted February 15, 2017 Author Share Posted February 15, 2017 Silver one Quote Link to comment Share on other sites More sharing options...
duniek Posted February 15, 2017 Share Posted February 15, 2017 i want silver one Quote Link to comment Share on other sites More sharing options...
Gunslinger Posted February 15, 2017 Share Posted February 15, 2017 beautiful Quote Link to comment Share on other sites More sharing options...
aerotracks Posted February 15, 2017 Share Posted February 15, 2017 In for one, I just can't resist shiny things Quote Link to comment Share on other sites More sharing options...
coolhand411 Posted March 4, 2017 Share Posted March 4, 2017 Looking good ,copper will do just fine for me Cheers Quote Link to comment Share on other sites More sharing options...
Gunslinger Posted March 4, 2017 Share Posted March 4, 2017 so did these designs lead to higher clocks? Inquiring minds want to know. Quote Link to comment Share on other sites More sharing options...
nachtfalke Posted March 5, 2017 Share Posted March 5, 2017 test yesterday intel stock IHS vs this copper IHS ...for me both perform near the same, using custom watercooling, ofcourse difference can be using extreme condition , in theory this copper HS should perform better because his top surface are 20% larger than stock intel , so using an LN2 pot with big base surface heat transfer should be improve! using those HS , intel glue need to be removed and use as spacer(0.15mm) adhesive sheet! i use that glued directly to HS bottom side! Quote Link to comment Share on other sites More sharing options...
bartx Posted March 10, 2017 Author Share Posted March 10, 2017 Silver one is still in testing, but I've made some copper ones. From last time, I've got also results from single stage, clock was still the same as before, but it was just one test. For now I can confirm that it works at least as good as original one and won't crack your cpu in a second, if you mount it properly Probably you're the most interested in ln2 results, which I don't have right now. There is also an "user factor", what means that probably everybody has it own method to mount the pot, choose the spacer or remove the glue or whatever. Some of them will be shipped right now, some are still left. Hopefully some more results will be shown in this thread. by users, who receive those. You may give it a try I did my best, when designing and machining them. As you may notice, I also finished inner pocket with sandpaper to remove the toolmarks. Quote Link to comment Share on other sites More sharing options...
xpower Posted March 15, 2017 Share Posted March 15, 2017 (edited) so did these designs lead to higher clocks? Inquiring minds want to know. No. But more headroom for overclocking Edited March 16, 2017 by xpower Quote Link to comment Share on other sites More sharing options...
bartx Posted April 16, 2017 Author Share Posted April 16, 2017 Please put some comments here if possible how it works compared to standard one. Silver IHS is abandoned due to very high price and most likely worse results than copper. Quote Link to comment Share on other sites More sharing options...
subaruwrc Posted April 18, 2017 Share Posted April 18, 2017 gave me 6600mhz 3d05 and 3d03 benchable,in spite of 6300mhz with my shitty intel IHS which cracked all the time .. Quote Link to comment Share on other sites More sharing options...
Recommended Posts
Join the conversation
You can post now and register later. If you have an account, sign in now to post with your account.