Leaderboard


Popular Content
Showing content with the highest reputation since 08/03/15 in all areas
-
Hey there First of all I hope everybody out there is healty and safe during this difficult time we have all over the world! I read some strange rumours in some forums out there and received messages about the future of HWBOT. I'm wondering where some of this stuff comes from so I want to clarify things. I don't have to tell you that HWBOT is the niche inside the niche and therefore possible income and cooperations are difficult. In times where YouTube is such an easy marketing tool for companies and the reach is much higher than any website banners, websites such as HWBOT have a difficult time. The hosting costs of HWBOT with about 800-1000 EUR per month are exceeding the income from few competitions by far. After several years and I don't know how many thousand hours of work, Frederik had to make a cut to protect his own IT company. Offers were made to different companies such as ASUS or G.Skill but when I saw that I was worried about this plattform. This plattform turned me into who I am today and allowed me to do things I would've never imagined 10 or 15 years ago. So many awesome experiences of my life were linked to HWBOT. Starting from the first moments of extreme overclocking and the thrill of breaking records to events in Taiwan such as MOA or AOOC in Moscow. Once I heard about that this plattform might go in hands of the hardware industry I was worried about how it would turn out. Imagine how this website would look like if a mainboard vendor would own it? That's why I had a discussion with Eike (my business partner at Thermal Grizzly) to aquire HWBOT. We both are totally aware that we might never see the money back we "invested" in HWBOT which is absolutely fine and not our goal. Eike and me are luckily in a position where we can afford to keep HWBOT the way it is (yea yea and fix some bugs) without worrying about the money. We will try to do some cooperations such as the well known G.Skill competition to cover some of the hosting costs but that's it. HWBOT will be a completely independent company (HWBOT GmbH) and in no way linked to Thermal Grizzly. Honestly if we want exposure I can just book another video at Linus Tech Tips on YouTube and reach 1 Mio views in one week. As much as I love this website for the geeky place it is but marketing wise we have different strategies. The current state is that we applied for the company registration papers in Germany to start the HWBOT GmbH. However, due to Corona I have no idea when we can finish the company papers and when HWBOT will be fully transfered to us. Currently we have a kind of "hybrid mode" where we cover all running costs to keep HWBOT alive but Frederik still has full access. Only once we have the HWBOT GmbH (Ltd) registered and all data is transfered we will fully take over. You should not notice a difference when this happens. Things we will do: Keep the page almost (for changes see down below) the way it is Try to pay the core stuff or at least give compensation for hardware/LN2 (details will be discussed) Cooperation with Benchmate. It looks like a great software to us and makes it easy to validate scores. If it improves things we don't see why we should not cooperate with mat. I already spent few hours with him on the phone to discuss how we can make it as smooth as possible. We have the same opinion and goals and will try to find the best solution for the community HWBOT will stay free to use We have a coder who also did some stuff for Thermal Grizzly previously and he will spend about 1-2 working days per week on improving HWBOT. We plan to fix bugs which occur and improve some functions (admin panel for moderation for example) There are few things I want to change such as going back to reward all submissions with points so newcomers have more motivation. We might also change to a scheduled recalculation every 6-12h instead of instant recalculations to further reduce server load and costs. Otherwise we don't plan to have major changes. We just want to keep this website alive because it can really be an awesome place. If you have any concerns, ideas or whatever don't hesitat to ask or post. But I will ask you to act like adults. I'm not sure how Massman could deal with the insults of some over the years.... Thanks and stay safe! Roman66 points
-
Thans to many for the kids words, seems some others still don't understand how this site/hobby & community functions. I think Scotties post is spot on, it's not about me, but to all those hat invested lots of time and effort to keep the site up and running. Trying to make it as fun as it could be. Similar to daily live, we have to impose rules and regulations to keep things structurized and fair to everyone. There are always problems and learning moments, like now. Does the site have issues, ofcourse! I'm the first to admit that, but again this is mainly because we are constantly evolving and the lack of manpower or manhours makes things on the coding side even harder. It's like a new bios, fix one thing break two other things. Patience is a virtue people! Just to burst your bubble, this site tries to run break even and is currently based on two main income/event sources: G.Skill and Galax competitions. I don't need to tell you that due to Galax not hosting an event due to regional tensions, we will not even achieve break even this year. So a big hand to Frederik who invest his own money in this site to pay for the server and other costs. We have seen other times with big sponsorship, but the ROI ( Return of Investment ) is always killed by our own community. Leading to sponsors to drop out or just not even adhering to the agreed deals. I have no clue why but no matter which generation of OCers I look at, I can always label ourselves as being Self Destructive. In the golden times when I was still as young and sexy as many are now, we had numerous world wide competitions. Most vendors didn't have in house benchers so they relied on the knowledge and feedback of the community. Nowadays they have in-house benchers, because these selected people will not turn into the super greedy species some companies had to deal with before. Some examples: I have witnessed big shot OCers claiming all the samples that they used during an event or even what the fluck just touched. In a dedicated OC lab I even saw sports bags open and a few OCers just putting in binned graphics cards, without even asking for the samples. And there are tons more examples how, WE, the community just keep on shooting in our own feet. Usually it is just a few individuals that mess things up for all the rest. Bussines as usual, year after year, leading to the vendors dropping out one by one. Biggest loss on the previous was when Massman decided to leave, he was the main contact with all the major companies. Companies we needed, to provide samples to the moderators to check out the new hardware BEFORE it hit the shelves, providing site sponsorship and the already mentioned prizes for the hosted events at HWBot. Ney, Websmile, Strunkenbold kept it running but the numerous encountered frustrations with the members all made them to leave. If something is wrong or not up to our own likings, the blaming finger immediately points straight at HWbot or the moderator that apparently doesn't like your latest brilliant idea. Question: do you as an employee will do the same with your boss? Probably not as he provides your income. So why do this on a site which is free of charge and which allows us to have fun? Beats me, I can only label this an act of lack of respect. If I'm overlooking this particular thread you can clearly distinct the different interest and understandings of some of our users. We always spot the same types and characters: the all knowing, the sensible, the smartass ake -, the I-want-to-have-the-last-word and other types. I guess most of us are grown ups, but why act so childish or even turn into a freaking spoiled brat? Too bad the thread was already moderated as it might have been very educational to read some of the removed content. It is time we all look in the mirror and ask ourselves the question: am I doing it right? What do people actually think of me? Am I the next big thing? Why is OC going backwards? Why can't we just press run the benchmark, why do we feel the need to tinker with the free software to get a better score? Self reflection might help with many, some are just lost cases that will never grasp it. Anyway to sum up, I decided to stay as I don't want the kill this site. The current and old HWBot team has devoted way too much to just allow it to go down. But I hope everybody understands now that some will need to tone down, no matter how convinced you are that you are right, a simple No is a No. Stop acting like a 10 year old! Can we please everybody? Nope but we got for the community , not just you, the individual!!! The Moderation Team will be reinforced with Matthew Bush and hopefully the integration of BenchMate will still be done before end of year. Leeghoofd out37 points
-
Hi guys. Thought to make a guide for the new Maximus XII Apex to help some people have a base to work on. Disclaimers: Anything that is mentioned in this guide is meant to help you have a starting point. I am not responsible for any damages you do to your hardware by overclocking, modding, (extreme) cooling it or whatever else. You are responsible for your own actions assuming you know what you are doing. The “Come on I wanna bench my new hardware” tl;dr guide: Step 1: LN2 jumper -> enable Step 2: Cool down, apply your settings (4095W, LLC 6 - 8 depending on the benchmark, 200% etc) and enable RSVD1 Step 3: Auto pll term should be 1.7 and usually works but can increase it if you see cb/cbb (1.8 might give booting issues so you might want to set it after boot) SA and IO around 1.4v Step 4: cool down to full pot (figure cb/cbb), go to OS and apply clocks and voltages If you need to run superpi32m or anything that is affected by uCode then you got to spend time and read below.. OC Pack: !!!Gdrive folder that includes everything since dropbox links seem to have issues!!!: https://drive.google.com/drive/folders/1DjnhLFpKA_-aORnt1gKOyD7w5SXGA7gj?usp=sharing ----------------------------------- 0508 Bios (uCode and no uCode included ready to go): https://www.dropbox.com/s/lp9giyr6fct2ni6/m12a0508.rar?dl=0 0069 Bios (uCode and no uCode included and ready to go) - mini improvements and fixes: https://www.dropbox.com/s/ufntk2d4yxf88ii/ROG-MAXIMUS-XII-APEX-ASUS-0069.zip?dl=0 0062 bios - another beta bios which according to ASUS it improves dram tuning - to confirm if 2v+ needs ln2 jumper or not. No ucode version included as well: https://www.dropbox.com/s/bv0qqclcwrmmnt1/ROG-MAXIMUS-XII-APEX-ASUS-0062.zip?dl=0 0055 bios allows for 2+V without the need for ln2 mode + noucode version: https://www.dropbox.com/s/7pc91xn7ksxkucc/ROG-MAXIMUS-XII-APEX-ASUS-0055.zip?dl=0 VRM tool - run exe on boot. New tool that might help push a bit more on the cpu side / run same freq with a bit less volts (15~mv less): https://www.dropbox.com/s/hkoydak1vm0zgpb/vrm2.zip?dl=0 TurboV: https://www.dropbox.com/s/wzyzlf9cjneul9p/TurboV_Core_1.10.07.zip?dl=0 Mem TweakIt: https://www.dropbox.com/s/s7azeckt1f2s4yt/Mem TweakIt-V2.02.46.7z?dl=0 Ratio Tool (thanks to @elmor for the tool -> use ratio_tool_cml.exe for ratios -> patch_cml_ifnoucode.exe if using a bios without ucode to get it patched/fixed) : https://www.dropbox.com/s/7kf6wqwtyu3erqj/Tool.zip?dl=0 Ratio Tool with Vcore: https://www.dropbox.com/s/1en7v8q11i14yx0/Ratio_Hotkey_with_V.zip?dl=0 Z490 AHCI Drivers for XP: https://www.dropbox.com/s/wh306qzlgg6z6gg/xp ahci drivers test.zip?dl=0 USB drivers for Win7: https://www.dropbox.com/s/dco21mn01fez26c/z490_usb.zip?dl=0 Backup USB drivers for XP: https://mega.nz/file/KBIzxSAB#nZYWTcAC0v3wThuq0lFKUKarnv7Nh73655zFE2mJ7to BIOS Flashback (USB port below Ethernet): Some insight: Main differences based on previous cpus/gens is that we got extra cores, better IMC and OC being a bit easier when it comes to CBB/CB (always depends on the CPU). Now, Intel to compensate the increased heat due to the extra cores, decreased the die height and replaced that with additional copper to keep the backwards compatibility on the cooler side. Here is a nice paint image someone at Intel made for our convenience: Left = last gen vs Right = new gen Believe this made a big difference on the temps as we got a 10C consuming 260W on water (R15 at 5.3G) and temps hitting 72~C. Our 180W oc’d 9900K would hit around that (leakage plays a big factor here as well - can't compare 1:1 but still). This eventually means that you can transfer the load from the cores (substrate) to the pot much more efficiently = MHz. Now, 2nd part of the changes is how easy it is to overclock these. Explanation of voltages and differences vs previous gens: Based on our previous “go-to settings” on Z390 (and prior) we would have to adjust vcore, core pll, dmi, sa, io, standby, pll term and internal pll. Instead, on Z490 all you got to play with is vcore, sa, io and pll term. Good to go voltages for our CPU was 1.6~ vcore, 1.4~ sa/io (similar depending imc and clocks) and 1.7-1.8v pll term. 1.7 (which is what LN2 jumper does) pll term was enough to kill any cb/cbb on our cpu. That was for both 2d and 3d. If you see you got an issue and 1.8v pll term isn’t enough (again - note that this might cause booting issues so you might want to use eventual voltage here), then you can give rsvd 1 switch a try and IO at 1.45+ as this is tied to the old known DMI. There is the option to mod the mobo and solder the DMI pin which is tied to RSVD 2 but thats still work in progress. Will check back on this but not sure its needed to be honest. VRMs are OP and could run x265 back to back with cpu fullpot and just a fan hitting them (no heatsink). Of course I can’t tell what happens if you do xyz so always be cautious !!!Note if you wanna go LN2 mode on water for 2+v on mems!!! Set pll term to 1.3~ as having it above 1.35 makes the sensor read high temps = over-temp messages etc. ME Patches and performance: Now that we touched the basics to voltages and differences vs previous generations, it's a good point to analyze another one and that's the ME patches Intel applied for the famous security holes. With new gen, we get new patches that are tied to the bios. These affect the performance on a lot of benchmarks (ie. spi32m) and for that we got to find a workaround. Thankfully ASUS has figured this out already. With MMTool you can load the .CAP bios and remove all the uCode patches. Simply select a patch at a time, select delete patch data and hit apply. Then save the new .cap file and flash it via bios flashback. !It is recommended that you flash the original bios first and then the modded one via flashback.! Personally, we keep Bios 2 for no uCode bios so we can easily switch between the two. Removing uCode raises a new issue which is memory oc as it gets heavily limited + a couple other minor things. Initial (training) bclock will have to be 100MHz. !In OS this is easy to adjust without issues! If you need to train higher than 100MHz for whatever reason you can do so with OC Panel when you see 4C on the debug post. Additionally, it will be good to set all ratios and main voltages to manual to avoid freezing issues. Consider setting internal core and ring pll’s to 0.9v in tweakers’ paradise and it is advised to avoid setting dllbwen as well. Now, when it comes to memory oc, all you have to do is enable Legacy OC on the bottom of the memory tab and set everything as you would before. First time it might act weird but hitting the retry will get it to work fine. One last note, run patch_cml_ifnoucode.exe on startup to get high multipliers to work (tool.zip). Per Core Hyperthreading: This is super easy to understand and one of the new features that come with this gen. You can enable/disable the HT of each core which makes it handy for some cases like 3DMark06, Vantage etc. Windows XP: Well, thats one of the best parts for this gen as it will be working day 1. Z490 compatible ISO (stock SP3 pretty much): https://drive.google.com/open?id=1od79PuR0O29mIwKNKqfCqbZAv0JCp_mJ Firahelp for installing XP via USB same as Z170 days (thanks @elmor): https://1drv.ms/u/s!Atmpv-6qHr_6vcIGjGDDdVQjURrIcA?e=JTDLyq Intel USB Drivers (thanks to whoever made these + @noizemaker for sharing/testing) work with XP and Win7 https://www.dropbox.com/s/dco21mn01fez26c/z490_usb.zip?dl=0 Backup USB for XP: https://mega.nz/file/KBIzxSAB#nZYWTcAC0v3wThuq0lFKUKarnv7Nh73655zFE2mJ7to Barbonenet’s acronis image that was posted here should also work fine without issues (thanks @antome for saving people’s time ) https://community.hwbot.org/topic/192682-windows-xp-on-asus-z390-motherboards-and-others/ If you get any errors, let me know as there is a small chance that you need to install the AHCI drivers of Z490 prior to moving from older mobo (ie Z390). Here you can find some suggestions for different scenarios. It's some kind of direction we suggest after testing different benchmarks/cases for maximum performance. These are mostly tied to memories and you are encouraged to test your own kit(s) for best optimization. For all these A2 memories are a must. You won’t be able to do any of these with A0/A1 kits. Also, while we generally try to help, we believe that not everything should be plug n play. So considering that the new gen has stronger IMC you should be having fun doing a bit of tweaking here and there instead of copy pasting settings that might not work and then seek additional assistance. Geekbench 3 suggested approach: Old profiles here should work much easier than before considering that the IMC on the new gen is quite stronger. For example, our go-to 9900K that could do 6.95 R15 couldn't boot above 4700C14 on air. Now, all chips we tested could boot above 4.8Ghz C14 without issues. Interesting suggestion would be to try and tighten tWL and tCWL (if your IMC and kit allows) as a Geek memory score of almost 10k (with all cores/ht enabled) should be doable at 4.8 GHz (instead of 9.6-9.7k). This might help in cases you cant push frequency higher with the standard settings, so this should give you a nice boost on top. PS. you can try 14-13 over 14-14 (small increase of like 20~ points at best) or 1t over 2t (tested but need to check to confirm) but not sure these will help you much To update with screenshots. Superpi32m suggested approach: We haven’t spent much time into this but a similar approach applies here - we were able to run Geek settings with 1T (even 14-13 on air) without issues and this has been faster than 4133 12-11-1t to begin with. Can try Dancop’s preset for now and we will add stuff on the way as we proceed with testing this throughout. To update with screenshots. X265 4K suggested approach: Was doing some testing for reliable performing settings on Z390 last year. For this, the best approach is no maxmem (or about 7-8GB as this gives a small boost on stability but I think it has a very small impact on the score as the memory usage peak drops about 100~MB vs no maxmem ) overkill + x2. Note that the X2 instances might not be the best and everything eventually depends on your findings/platform so don’t take this (or anything) for granted. Anyhow, no maxmem + bdie = need for low volts. This is another approach that has nothing to do with your kit doing 4933 with 2v or 2.1 or whatever. Some kits that can do almost 5G 14-14 geek at 2.09v cant pass that so keep that in mind. Easiest way to get going is to load a geek profile, ignore RTLs and CR as these have no impact on x265 and loose timings a bit (14-14-28-240 -> 16-16-28-280 etc). If this works at low volts (aka sub 1.7) you might avoid the maxmem need that high voltages cause and should be already way better than anything tight with 2-4gb maxmem. Additionally, please keep in mind that you want the two instances to be as in sync as possible as eventually you have an efficiency multiplier that affects your score (or not show one at all if out of sync for like 5sec) with the best being x1 (1:1 render). Also, might be wrong for some but Server2012 has been the best OS so far. To update with screenshots. Water/air user max out suggested approach: Since X265 is as close to daily settings as doable (compared to the rest), you can start from the above and adjust timings to decrease voltages to what you consider safe. Will provide a profile that works for us as a guideline if requested/needed.32 points
-
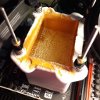
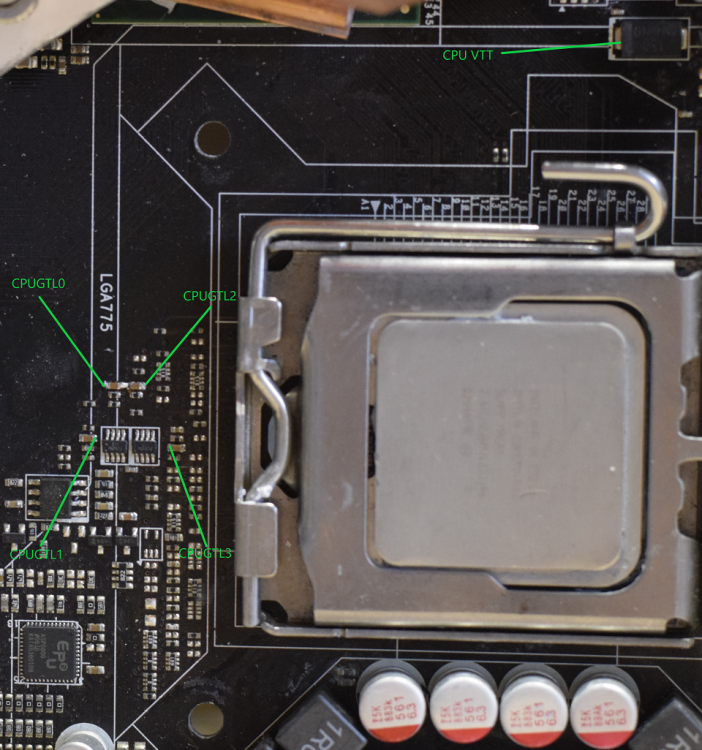
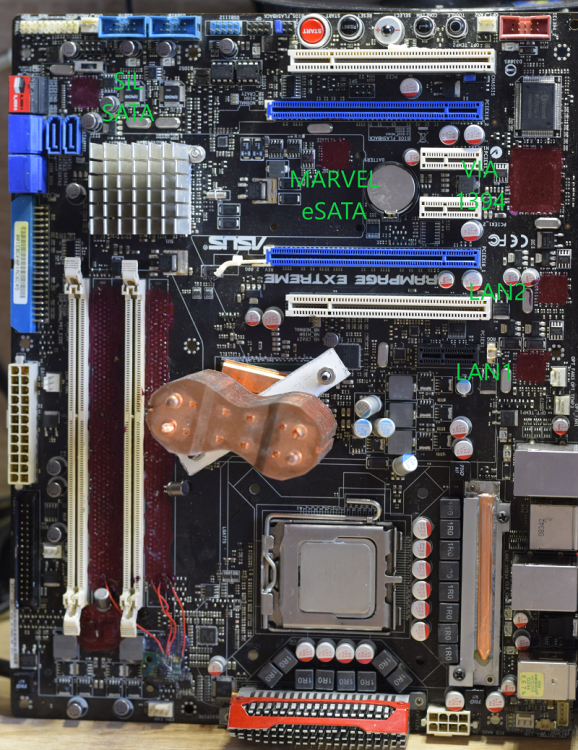
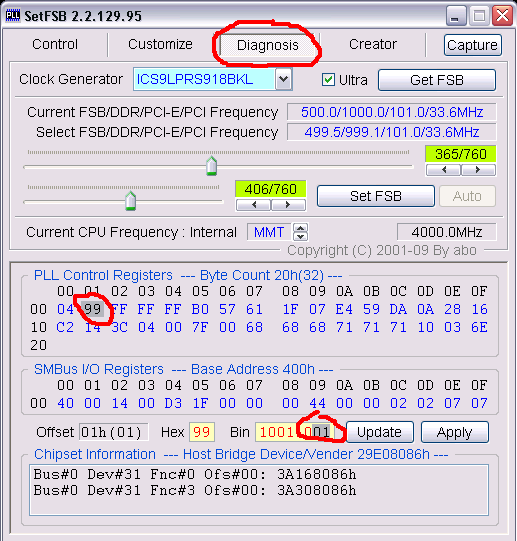
Disclaimer: all information here is my experience, I will be not responsible for any damage that may be there if you follow any instructions here. Environment and general settings · Replace stock/old TIM on NB – many OCers report that replacing stock TIM on NB helped them a lot. I would aim for <50C NB temperature in BIOS for any settings. Some stock coolers may have issues and may require dremel works to get good contact between NB IHS and cooler. Try software named MCHTemp to control overheating of NB – if too hot, NB may throttle and/or have limited FSB overclocks. Another point to consider – when measuring dc resistance, NB is 8Ohm @30C and 4Ohm @50C – so thermals should rise dramatically the hotter NB is. · Disable most CPU features (EIST, TM2, etc), disable jMicron etc. To enhance boot time, you can disable unused sata ports etc. To get very slight performance boost in SuperPi 1M, use modded bios with 45nm microcodes removed (it cuts 0.200-0.250 seconds off bios with ucodes included with E8xxx @4GHz). · Pay attention to capacitors. REX is known to have issues with aged Fujitsu caps – there are 3 pcs (one each for CPU, DRAM, NB). Seems like the higher voltage is, the faster these fujitsu caps die – so most affected cap is DRAM cap, if you go hard with LN2 then CPU cap is next candidate to die (I had one blown during LN2 session when I pushed 1.95v into cpu). I had no issues with NB caps yet but saw other people having troubles with it. I suggest that DRAM cap should be preventatively replaced with 2*470uF tantalum caps – do not use long wires to connect classic type capacitors. Not sure about the other two should be replaced before they fail – though cap running into short circuit may lead to VRM misbehavior that will kill the chip. I had also issue with 16V caps near USB headers – these were getting really hot. So you should probably check temperature of all solid caps with finger while running the board at stock settings for 5-10 minutes (note – not a single capacitor should be hot). Here is a photo of all the secondary controllers that are connected to ICH9R and may be removed to minimize chances that one day it would damage SB. Getting higher FSB If you want really high FSB, make sure you pump enough Vcore. It means that if your cpu needs 1.25v for 500x8, you will probably need same 1.25v for 533x7.5 but closer you get to and beyond 600Mhz the higher Vcore is needed –I used 1.700-1.725v during my attempts to break 700MHz FSB (it was balance of temperature and voltage). Again, cpu voltage is necessary for FSB so if your CPU needs 1.25v for 500x9, it will likely need 1.5v for 625x6 (although core is 750MHz lower). Another important thing to consider are CPU and NB skews. It is core dependant, yet here is some empiric data I have with my CPUs (it varies a bit but still may give you an idea): · Core 2 Quad Q8xxx/Q9xxx needs these to be manually adjusted to 200/0 or 200/100 at 500Mhz and probably further adjustment the higher you go. · Core 2 Duo e8xxx seems to need adjustments after 600Mhz. 600MHz is 200/0, 625 is 300/0, 643 is 400/100 etc. Also, a thing that may help you to run tests higher are GTLREF settings. REX has 4 lanes for CPU, gtlref is derived as a factor of VTT. It is important to note the following coefficients are used when these are “auto” in bios: CPU GTLREF 0 – 0.65xxx of VTT CPU GTLREF 1 – 0.67xxx of VTT CPU GTLREF 2 – 0.65xxx of VTT CPU GTLREF 3 – 0.67xxx of VTT You can get a more precise value of these numbers by measurements. All you need is to start the board after CMOS reset, enter bios and run measurements one after another – Vtt and GTL lanes. Now divide measured GTL by VTT and you will get the precise value your board has by default. During OC, the task is to keep a pair of GTL0>L1 (cores 0+1) and a pair of GTL2>L3 (cores 2+3) as close as possible within a given pair. The easiest way to estimate what difference should you set in bios is the following equation: (0.67xxx-0.65xxx)xVTT – that is why measurement of your board sample may be helpful. I have 0.003v deviation between GTL1 & GTL3 for example @1.1v VTT. Roughly, it makes the difference of as 0.02xVTT. So if you run 1.55v VTT, you are recommended to make you GTL0 1.55*0.02=0.031V higher to match GTL1. It translates into closest BIOS value +30/auto setting if you aim x0.67 GTL, +80/+50 will translate into x0.70GTL etc. As a side note, P45 boards seem to benefit from x0.61-0.63 CPUGTL but it still requires tests with x48 (though I was pretty good with -10/-40 when pushing E8200 - translating into x0.65 multi). Things that still need to be discovered voltage-wise are NBGTL (should affect FSB), dram reference voltages, NBDDRref (should affect dram oc). No serious tests from me, usually trials&errors only. Tricks that may be of help sometimes The trick that gave me the last 2MHz over 700MHz valid – setting clock overcharge voltage (in terms of asus p45) higher. This setting is a function of clock generator and defines an amplitude of clock that is being fed into CPU. As this setting is missing in bios of REX, you can change it in windows with SETFSB. Go to diagnose tab, read clocks and then select byte 01. The last (see image for reference) 2 bits seem to be responsible for cpu clock amplitude setting: 00 – 600mV 01 – 700 mV 10 – 800mV 11 – 900/1000 mV Set 2 bits, click update, click apply. This is nothing critical, but if you check DFI P45 threads you will see some people have gains with it (setting is available for DFI by default). vPLL mod – described DRAM skews – these will affect stability closer and over to 2000MHz. Some information will follow in next chapter. My experience with different DRAM IC for 4GHz low clock challenge Well, most REX boards should be able to overclock 2x2GB dual-sided RAM to 2000MHz – the only difference between boards is how tight it can go with a given set of RAM (if RAM is not limiting factor). Key factor is a so called performance level (which is strap/fsb/CL dependant – so if you change one, PL should be adjusted accordingly). Please note that you should use white slots to get best OC results in most cases. Here are my tests with different DRAM ICs that were done within the limits of 4GHz low clock challenge (so the choice of settings for FSB were 500x8, 533x7.5, 572x7). I was aiming for the highest possible dram frequency for each IC type. Elpida BBSE, SS-cooling: https://hwbot.org/submission/4489967_terraraptor_superpi___32m_core_2_duo_e8200_10min_50sec_688ms These are pretty good performers although will have limited voltage tolerance. I have tested 12 different sticks, most won’t post if dram voltage is over 1.75-1.775v. It was important to adjust dram skew latencies to make it work with that high frequency – the difference was 25ps B2 delay was allowing me to pass 32M without errors multiple times after boot while 0ps/75ps B2 delay wasn’t able to just boot into WinXP. NBDDRref of -10mV also helped a bit. Note: BBSE used is pretty strong, one of the highest bins from G.Skill. Micron D9GTS, ss-cooling: hwbot.org/submission/4489977_terraraptor_superpi___32m_core_2_duo_e8200_10min_52sec_188ms These won’t go even 1000MHz being dual-ranked microns. Still performance is acceptable. As the frequency is low, no special adjustments necessary to skews or secondary voltages – pretty easy in use. Samsung G-die, air-cooling (seems have poor temperature scaling anyway): hwbot.org/submission/4489990_terraraptor_superpi___32m_core_2_duo_e8200_11min_3sec_937ms These are pretty easy too, although performance is not stellar. Scale from voltage, not hot even with 2.3V. I would recommend these for debugging purposes but performance-wise these are much weaker than hypers/bbse/micron. Elpida Hyper, ss-cooling: https://hwbot.org/submission/4490001_terraraptor_superpi___32m_core_2_duo_e8200_10min_47sec_546ms Wasn’t able to make it stable over 1000MHz, although it posts 1066/1144 and I was able to run pifast @1144 before. The best choice for X48 anyway. Allows low tRCD, tRFC, PL. Scales with volts. PSC X-sreies, ss-cooling: https://hwbot.org/submission/4490004_terraraptor_superpi___32m_core_2_duo_e8200_10min_53sec_187ms Absolute nightmare in my tests. Voltage intolerant, won’t accept anything over 1.65v (confirmed by Mythical Tech although he was happy with cold PSC in REX). Too difficult to manage these work properly, I would go with bbse/micron instead.
 28 points
 -
Start date will be the 5th of August till the 31st of October. Frederik is adding the stages in the competition pages Hardware list will be available soon, so you can start scamming Ebay and co, we tried to keep it as cheap and accessible as possible. Verification rules will be expanded versus the regular standard offical HWBot rules: CPU-Z tabs for CPU, Mainboard and Memory (+SPD for the memory stage) Verification Screenshots are always full screen, no removal of taskbar, no clipping,... Retail hardware only (also for motherboards) Competition Background must be visible To avoid the drama of last year, picture(s) of the RUNNING OC setup has to be added with each submission For all 3DMark benchmarks the latest Systeminfo has to be installed (have verification files at hand) Competition will be split in DDR, DDR2, DDR3 and DDR4 based platforms: DDR Stage 1: Pifast socket A (3 CPU submissions) STAGE 2: Wprime 32 Socket 754 Venice Core (3 CPU submissions) STAGE 3: GPUPI 100M Socket 478 Prescott 1024 core (3 CPU submissions) STAGE 4: SuperPi 32M Socket 939 (3 CPU submissions) STAGE 5: 3DMARK01 S939 & Radeon HD 2000 series (3 GPU submissions) STAGE 6: 3DMARK99 S478 & Geforce2 series (3 GPU submissions) STAGE 7: Aquamark3 AGP only (3 GPU submissions) STAGE 8: CPU-Z Memory Frequency Dual dimm (3 Mem submissions) DDR2 Stage 1: Superpi 1M AM2 (3 x CPU submissions) STAGE 2: Wprime 1024 Socket 775 (3 x CPU submissions) STAGE 3: CBR11.5 AM3 (3 x CPU submissions) STAGE 4: X265 1080P LGA775 (3 x CPU submissions) STAGE 5: 3DMark2001 Geforce 6 (3 x GPU submissions) STAGE 6: 3DMARK05 AMD CPU & Radeon HD 3000 series (3 x GPU submissions) STAGE 7: Unigene Heaven Basic (3 x Geforce9 submissions) STAGE 8: 3DMARK11 PHYSX TEST (3 x CPU submissions) DDR3 Stage 1: CB R15 S1366 (3 x CPU submissions) STAGE 2: SuperPi 32M AM3 (3 x CPU submissions) STAGE 3: X265 4K LGA2011 X79 (3 x CPU submissions) STAGE 4: GPU Pi 100M socket FM1 (3 x CPU submissions) STAGE 5: 3DMark03 Geforce 600 series (3 x GPU submissions) STAGE 6: 3DMark Vantage Geforce 700 series (3 x GPU submissions) STAGE 7: 3DMark11 HawaI/Tahiti cores (3 x GPU submissions) STAGE 8: 3DMark Firestrike APU FM2(+) (3 x iGPU submissions) DDR4 Stage 1: Geekbench 3 MULTI for dual core CPUs (3 x CPU submissions) STAGE 2: Y-Cruncher pi-1B Quad CORE CPUS (3 x CPU submissions) STAGE 3: CBR15 divided per core (3 x CPU submissions) STAGE 4: PCMARK7 (3 x CPU submissions) STAGE 5: Aquamark3 AMD only (3 x GPU submissions) STAGE 6: 3DMark Vantage GPU Performance (3 x GPU submissions needed) STAGE 7: 3DMark 11 Extreme Dual GPU (3 x GPU submissions needed) STAGE 8: 3DMark Firestrike APU/IGP (3 x iGPU submissions needed) Remarks, feedback other thoughts are as always welcome25 points
-
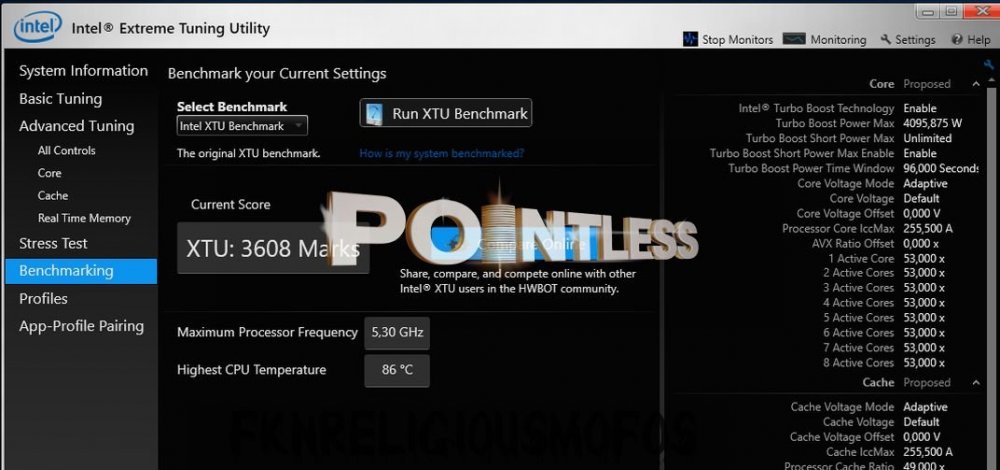
lo all, I did some testing yesterday to confirm the findings regarding XTU as there are way too many bugged outputs on the Bot. I tested a dozen of versions yesterday with the 9700K on H20 and Cascade on Windows 10 Findings: XTU performance is very inconsistent. Scoring 2900 one run, a rerun goes up to 3150. XTU performance output is too depending on the installed versions, as we already knew the 64Bit version 6.5.1.321 is easily outperforming any older versions. Till now no way to seperate them, Intel is working on it, but we loose too much time as 10K subs chime in weekly... The mix of 32 and 64 OS version requirements doesn't make things any easier It seems XTU loves Heat iso Cold, not being able to replicate a score done on H20 versus the setup under the cascade. Put the fans on low on the H20 setup and score even higher… sure... Especially the temperature issue is the last drop for me as headmoderator, Seriously if one overclocks and runs colder one achieves a lower score for the same processor speed. The Efficiency/MHz gets totally lost the colder one runs... I feel this point withdrawal is a thing that should have been done earlier, Sorry for those that will loose a heap of points but the current ranking doesn't reflect the true spirit of Overclocking. Fingers crossed that XTU 2.0 will be the next big thing… I've been a fan of XTU for quick stability testing, but the many bugs that slipped in over the years made it as one of the most unstable benchmarks we have implemented at HWBot.
 24 points
 -
Benefits of ASRock motherboards is continued support and with coffee this is no different. This mod and bios will actually will help them lose money. So make sure to thank Nick Mod point is below, connect both pads with tin/silver ink etc. Flash bios http://picx.xfastest.com/nickshih/asrock/Z17MOCF751A.rar with kabylake CPU, shut down insert coffee and go. XP working fine ASRock nor I take any liability for HW damage, perform at your own risk. Enjoy! (pic courtesy of HKEPC)23 points
-
If I personally had the skill to work on this it would be different already but I simply don't. We hired a coder who has been trying the last weeks and months to work himself into what we have here. It's not easy but we're getting there. I can absolutely understand everyones frustration but I can promise you that I'm trying everything to make sure HWBOT 2021 will be much better than the previous years.23 points
-
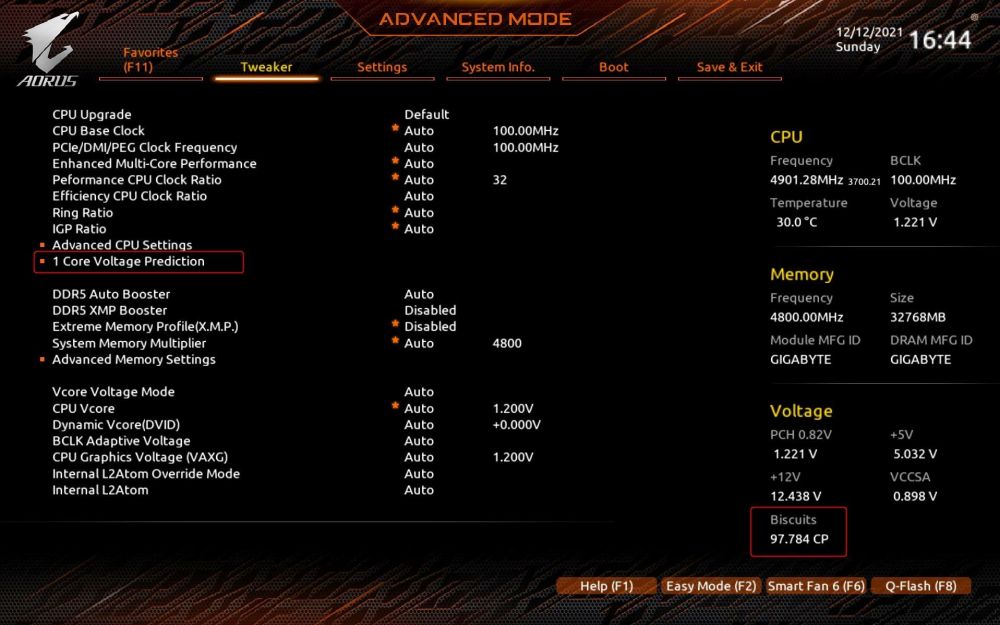
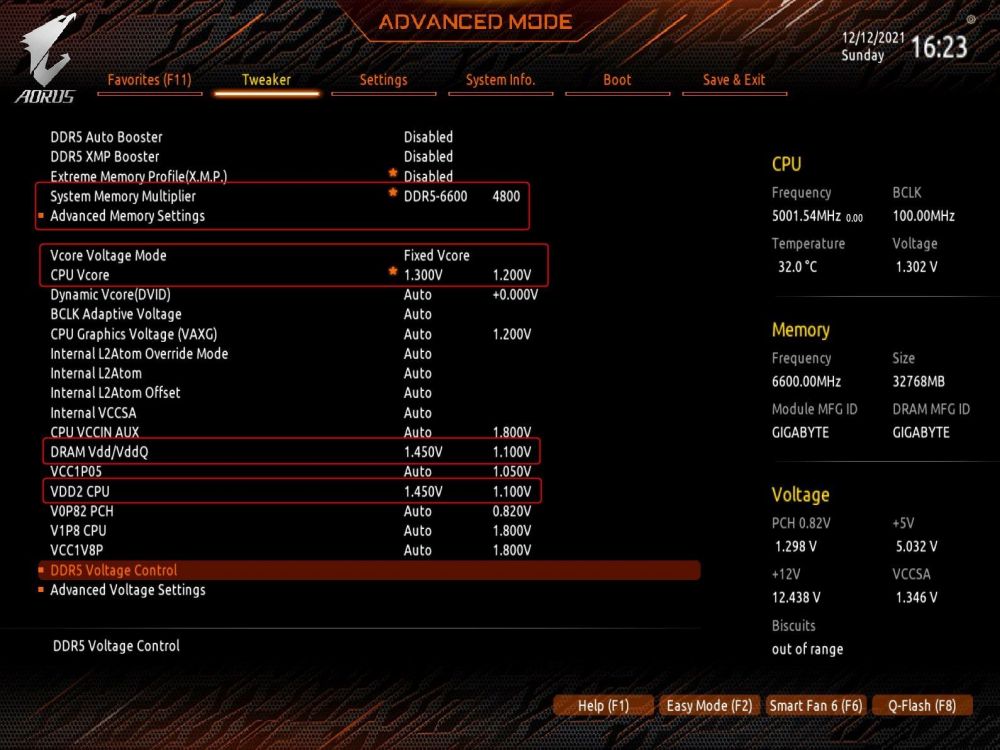
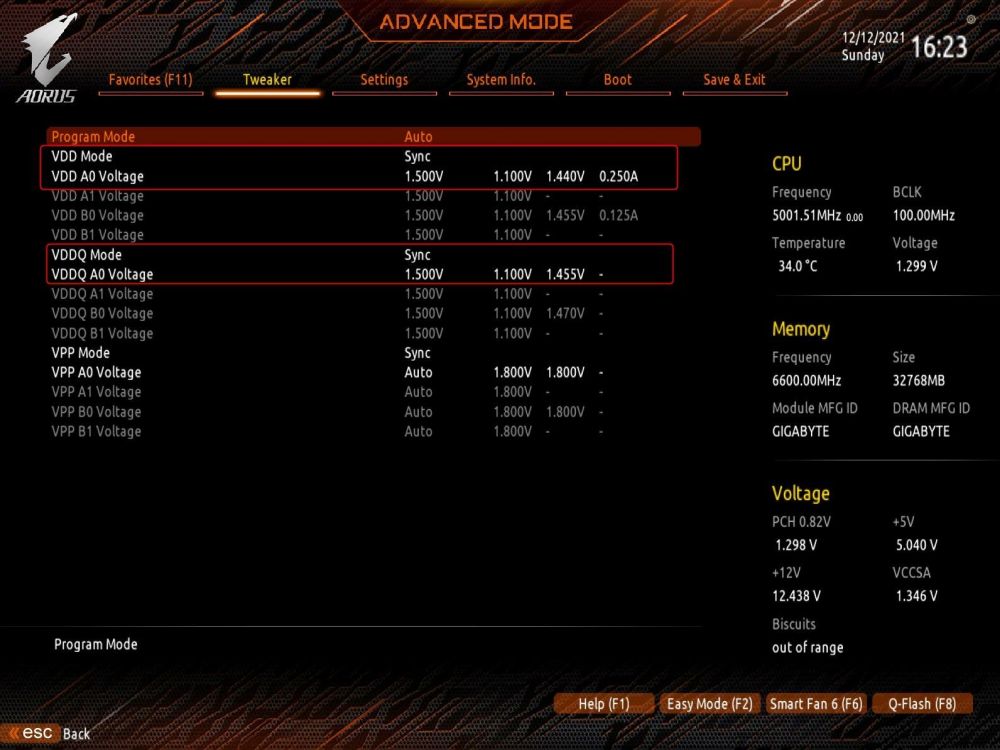
For everyone who gets a Gigabyte Z690 Tachyon, here is some information including bios. As applies everywhere else in the OC area, the settings shown here are NOT suitable for 24/7 Systems! Therefore, please do this at your own risk. The settings vary depending on the CPU and memory; here, as is so often the case, you have to find the right settings for yourself. With the X2d Bios it is possible to read out "Biscuits" or as it is called by Asus “SP”, ATTENTION, these do not match the values from Asus, as the readout method is different. Thus, an SP90 at Asus can be Biscuits 93 at Gigabyte. In the "1 Core Voltage Prediction" area you can read out the default Vcore for individual cores. The lower this is, the better this core is suitable for single-core benchmarks;). c 1 CPUs with Biscuit from 93 are suitable for Extreme-OC. However, it is also possible that these CPUs (12900k) only achieve 6.6 GHz in Cinebench R20. For OC not many settings are necessary with the Z690 Tachyon;). First the most important, CPU menu. Here it is very important to select "Nomial" in Full OC Mode. This prevents false results and helps with Extreme OC to prevent CB. The E-Cores of the new CPUs can be deactivated in the "CPU Cores Enabling Mode". For this it is necessary to select "Selectable Mode" and deactivate the unnecessary E-Cores. Of course, C-States and CPU EIST should be deactivated for OC. As usual, you can select the X.M.P profile for the memory or work with the XMP Booster. I like to work with fixed values, so switch off everything that is not necessary and set it by hand. In the picture below my "default" settings for 6600 are attached. Important values are DRAM VDD / VDDQ and VDD2 CPU. DRAM VDD / VDDQ are sufficient at 1.45V for both Air and Extreme-OC. VDD2 CPU is dependent on the mem clock. Guide value here at 6600-6800 Mhz (Hynix) 1.45V - 1.50V. The individual voltages for Mem-VDD and Mem-VDDQ are to be set in the DDR5 Voltage Control area. Here as a guide value 1.50V for 6600. Here, too, it is my memory, I know what it needs, you have to find out for yours If your voltage or timing settings do not match, the board will restart several times. To get into the BIOS faster without losing the settings, you can use the LIMP-Mod button. The timings I have set can be used on air with 6666 Mhz without any problems. With a cold CPU, up to 6900+ are possible. As soon as the CPU and memory are cold, over 7000 are no problem either. Only 5 voltages are important for Extreme OC: Vcore: 1.60V - 1.65V DRAM Vdd / VddQ: 1.55V VDD2 CPU: 1.60V DDR5 voltage control VDD A0 Voltage: 1.60V VDDQ A0 Voltage: 1.60V With Extreme-OC it is important: Only set the voltages at around -120 and only then boot into the OS. In the OS, the temperature can be lowered to full pot. Should you get a blue screen, please press the "Reset" button. After a restart, full pot is possible without any problems. In this case it is not necessary to lower the temperature and a restart with full pot is possible. If you don't do that, the board may start without a postcode, then you have to heat up to about -145 °, depending on the CPU, before the board starts normally. After such a start, your settings can be lost, so a look in the BIOS after a restart is not wrong. One more thing about the GTL tool, this tool currently only works under Windows 10! If this does not show anything when you start it for the first time, create a shortcut on the desktop and start GTL in admin mode. Links: Gigabyte Z690 Aorus Tachyon X2d Bios Gigabyte Z690 Aorus Tachyon X2e Bios Gigabyte Z690 Aorus Tachyon X2g Bios x2i removed becouse of some bugs!!! Gigabyte Z690 Aorus Tachyon X3b Bios Gigabyte Z690 Aorus Tachyon X3c Bios with GTL Fix Gigabyte Z690 Aorus Tachyon X3g Bios Gigabyte Z690 Aorus Tachyon X3h Bios Gigabyte Z690 Aorus Tachyon X3i Bios (With 12900ks Support) Gigabyte Z690 Aorus Tachyon X3k Bios Gigabyte Z690 Aorus Tachyon X4b without AVX512 Patch Bios Gigabyte Z690 Aorus Tachyon X4b with AVX512 Patch Bios Gigabyte Z690 Aorus Tachyon X5d Bios Gigabyte Z690 Aorus Tachyon X6d Bios with AVX512 Support for 12th Gen (AVX512 Version) Gigabyte Z690 Aorus Tachyon X6f Bios with AVX512 Support for 12th Gen (AVX51)+profiles 12900k Gigabyte Z690 Aorus Tachyon X6h Bios with Fixed A9 code when CSM is enabled Gigabyte Z690 Aorus Tachyon X6o (Fix code "11" during memory training) Gigabyte Z690 Aorus Tachyon X6u (gear4 enable) Gigabyte Z690 Aorus Tachyon X7p M-Die profile Air serg X4b Bios (13900k) A-Die profile Air serg X4b Bios (13900k) 8k A-Die profile Air serg x4b AVX patched bios (13900k) X6h profiles for 12th and 13th gen X6h A-die 8k profile GTL Tools don`t works with X3b-Bios at the moment new version will be uploaded asap! GTL-Tool New GTL-Tool works also with non K CPU`s GTL-Tool 21.03.2022 (X3g) GTL-Tool Vers.B22.1122.1 27.11.2022


 22 points
 -
Short story 2nd time this month we experience lousy photoshopping. This member got reported numerous times for not respecting the new 2020 rules, meaning cpuz 1.91 version or newer, no clipping, etc.... On top of that his reputation did not help and many were watching his every move. I moderated all the reported scores yesterday , to my big surprise to see some of them popping up today with guess what: Added taskbar, CPUZ version visible and reworked GPUZ.... I admit though a few scores were neatly (re)done, too bad for him many had flaws that even my kid detected. Though I asked one respected member to pull one screenie through his photoshop to have 200% confirmation that the verification screenshot was messed with. The original remastered: (obvious better font in the 3rd CPUZ and top GPUZ) The photshop analysis: light pink means added to the existing screenshot Now I don't get it as he has the save file and could have redone the scores/screenshots as he's on chilled water. Yet he got sloppy while remastering the originals... Well it was fun having you around, but it is time to say goodbye..
 22 points
 -
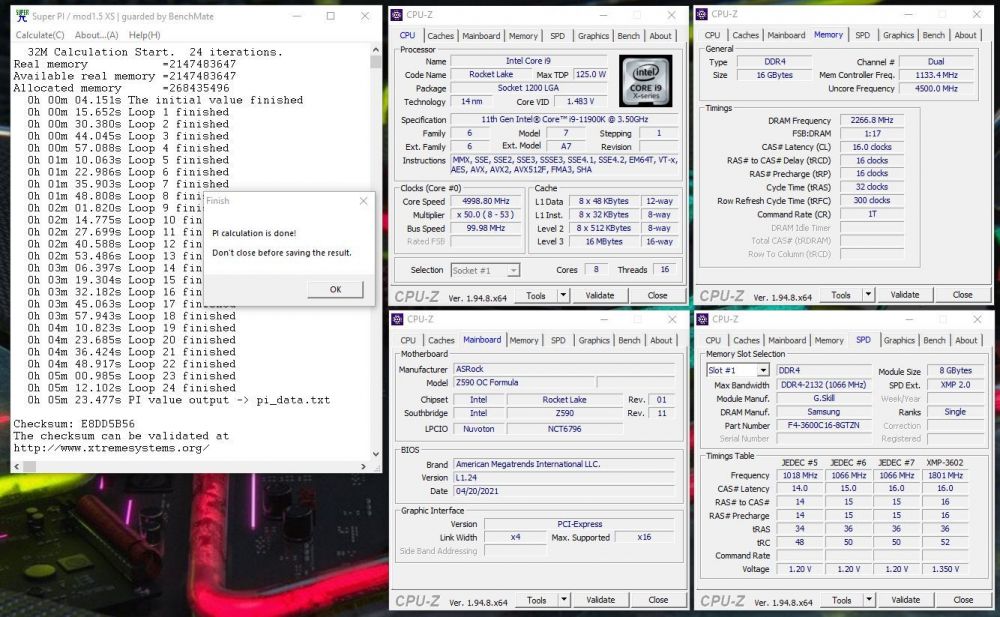
32M is a blast on rocket lake! Thought we could compile some tips to get everyone started. Feel free to add yours and I will quote you in the OP Gear 1 Mode necessary duh TRAS no longer limited to 28 go as low as you can. 16-17 should be ok to 4k mhz You need blast the SA voltage 1.55-1.65 all day VCCIO_M on the other hand doesn't need Z490 levels 1.35/1.45 has not limited in any way. wazza doesnt help much, maybe 1 second. unlike other gens you can pretty much just torque each timing as low as it will go and see a benefit RTL you can try Relaxing channel A and running them at the same timings IE 53/53 54/54 has netted some solid scores BCLK is king, run as high a bclk as you can. It will allow you to lower the multiplier of the CPU to a level that you can run at exactly 5005 for the entire run Binning for Gear 1 is a thing. The same setup I have cpus that wont boot 3900 and ones that run 4060 on air. a0 might be better than a2 dimms. I wouldnt call this a fact yet but it seems to be leaning this way. IMC needs cold to max out (obvious) take advantage of training lower and raising bclk in OS (usually 2-3bclk is fine) leaving cache freq very low on training may help (needs more science) Certain microcode version may be more efficient (needs more science) per core OC needed for highest clock. Try to change only core 02 as high as it will go. usually gains 50-100mhz depending on the cpu. Also makes it fail less after the bench completes and or when opening cpuz. Right click CPUz to select the high core. Updated as of 04/29/202121 points
-
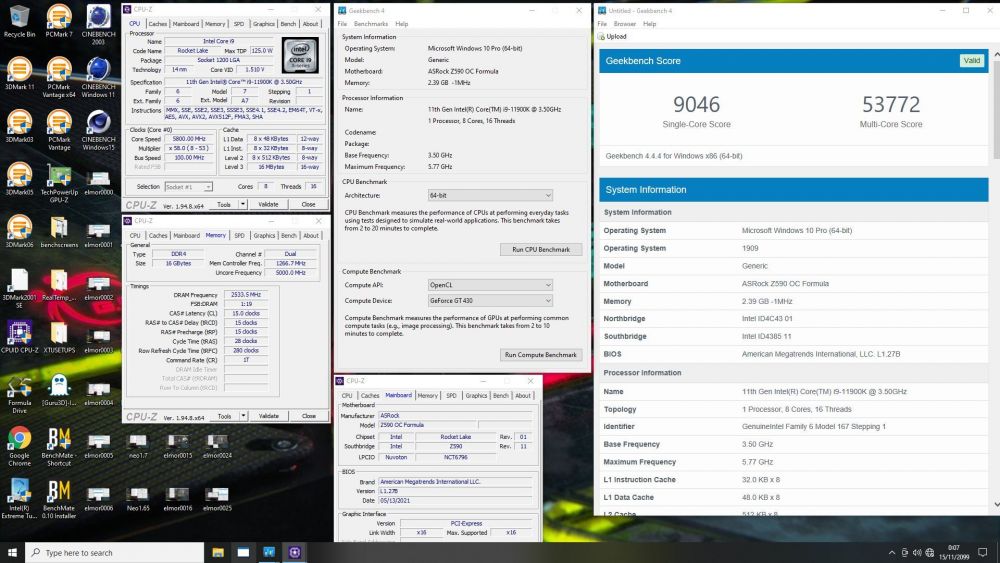
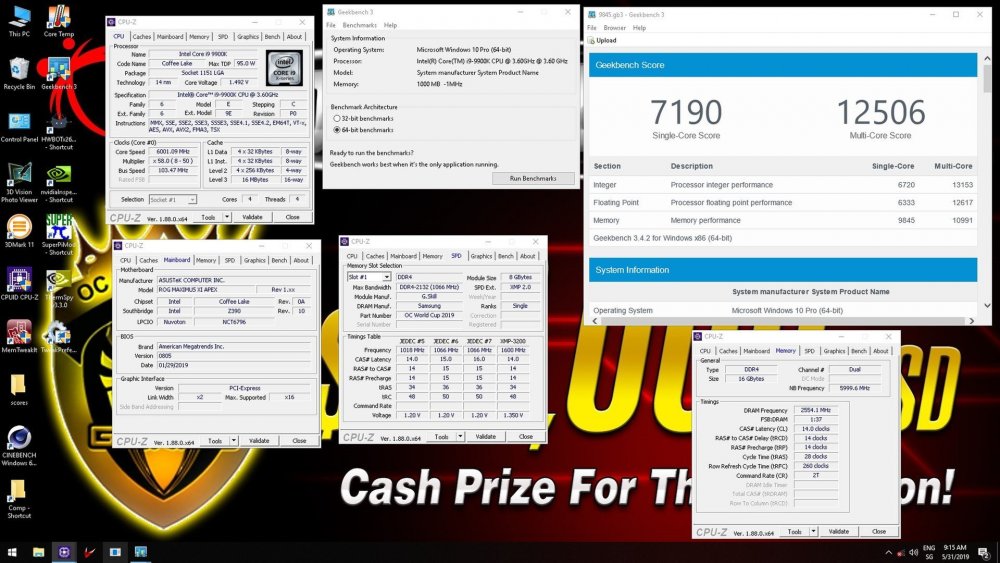
Let's spill some beans. Here is all I know about geekbench3 feel free to join in. 1. The best scoring versions for intel CPU's with 16 cores or less is 3.1.5 get it here https://www.dropbox.com/s/4q0xuvioq8opx30/Geekbench-3.1.5-WindowsSetup.exe?dl= (New version 3.4.3B3 here has potential. Need more testing. https://geekbench.s3.amazonaws.com/Geekbench-3.4.3b3-WindowsSetup.exe ) 2. Best scores are with no microcode bios on z490. You will see e-penis scores with microcode because its boosts the mem sub-score but the total score is around 300 points less at 5.3ghz on 10900k. 53600 with MC, 53900 without MC. 10k mem score doesn't matter when you are losing so much total score. Obviously not calling anyone out, have fun if you want to play mem score. It is fun for sure. 3. For intel HEDT make sure to disable Spectre and Meltdown when possible. (No need on AMD it actually scores worse when you mess with it for some reason.) 4. In most cases uses the newest version of windows 10 available. Every consecutive version of windows has incrementally increased my scores especially the AES tests scores. 5. Pros are changing their clocks during the run. DJ/LUA are difficult as well as DFFT on current gen intel, as well as raytrace on AMD so, dropping clocks during those sections can help you get much higher scores. Say for example 10900k I can run 7ghz for the entire run maxed out highest that will pass DJ/LUA, I can also run the first section of tests at 7.125ghz and the end even higher 7.2ghz+ For example start geek at 7.1ghz run to 13s drop to 7.0 for DJ/LUA wait for the 18s mark and clock back to 7.1ghz If you want even more performance the last 2 seconds are the memory tests which have no load on the cpu and pass very high 7.2 seems fine here. You will only be limited by your mem stability and the limit of bclk you can move in OS usually around 3 bclk. This also makes the "CPU mhz" field on ln2 subs irrelevant as they are changing during the test. Is it 7ghz because thats what I ran lua at? or is it 7.2ghz because I clocked the mem tests there for 2 seconds? Do I have special needs? Yes, I dont think so, and most definitely just to answer those for you. 6. 2x16gb at 4400 14-14 seems to be equivalent in score to 2x8gb 4850 14-14 and has less tendency to fail DJ/LUA. Will compare on ln2 this week all out and update. 7. Dont tune your mem for mem score, tune your mem for total score. You will find some timings that boost your mem score but drop your total. Keep that in mind when you are playing with subs. This is very apparent on Ryzen as its ability to train crazy timings is so easy but unfortunately they can be robbing from your total. 8. Most mainstream systems can get away with 1.7-2gb maxmem. Any less and you start to bug sub tests and IMO is a sign that the sub should be scrutinized using geek link comparison with a similar system. 9. On AMD Ryzen use the batfile from asus to boost your score. They say to start the bat file then run the test then run the default bat. I wont start an argument on this just sharing some secrets some people might not know. See Zen Perfboost : https://bit.ly/2kBs15c (After loading CineBench R15 or Geekbench3 bench then run the boost, just click defaults button after benching to prevent bsod) Extra Contributions>>> 3.4.3B3 seems to be the most consistent on Ryzen 3000 atm. Same for TRX40. Haven’t tried the rest yet. ~keeph8n
 20 points
 -
BIOS 1704 modified for Windows XP ACPI support https://1drv.ms/u/s!Atmpv-6qHr_6o9hDCg_c2HDTGFUr7g Rename to M10A.CAP and flash using USB BIOS Flashback. Using EZFlash will not work. Edit: Set Boot Performance Mode = Turbo Performance to be able to change ratio in the OS20 points
-
Within tradition the ROG overclocking series continues with Z390 as well . You can download latest tools here : OC PACK Backup Link OC PACK Bios 0050 for Maximus XI Apex and Gene, can change BCLK with OC PANEL : Maximus XI Apex Maximus XI Gene MAXIMUS XI GENE older bioses : 0057 0044 0043 ( improves oc capability of short-traced dimms such as G.Skill RGB or Galax based A2-pcb) USB Flashback: Few notes: 1. LN2 wise the benching experience with additional voltages is quite same, RSVD switch works most of time for solving CBB issues, some cpu's can scale with up to 1.85V PLL Termination . Typically new cpu's scale up to 1.8V for multi-thread and 1.95+ for single-threaded benchmarks. 2. No more slow-boot with Samsung B-die sticks and tight timings 3. Cofee Lake refresh has a little bit different IMC compared to regular Cofee Lake, meaning you might need to sort your oc-dimms again and also some dimm's are simply not liked by the new IMC. A value of 0.95 vttdram helped few kits in my case but ymmv. 4. Make sure you use a strong PSU otherwise you might run into issue and experience shutdown in heavy-load benchmarks. While using heater and hard benchmarks it is best to use heatspreader on VRM. 5.For Windows 7 use the Asmedia USB ports that are located above the HDMI . You need to install driver which you can find here: Asmedia USB Driver 6.The Maximus XI series use a new way of measuring vcore which is more accurate. elmor explained it here: https://www.overclock.net/forum/27686004-post2664.html?fbclid=IwAR28uwLxzdE6mG7Hya0w17pTYFoPwYTWNpuZw7-9_KJMnHNI3wgR-kN5qpc19 points
-
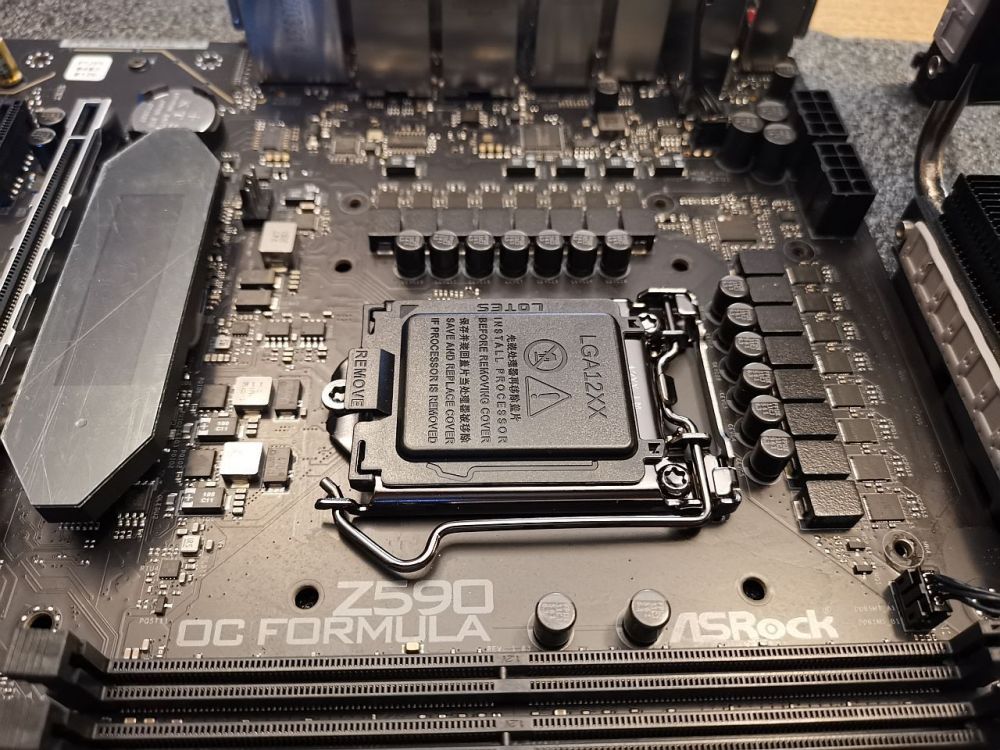
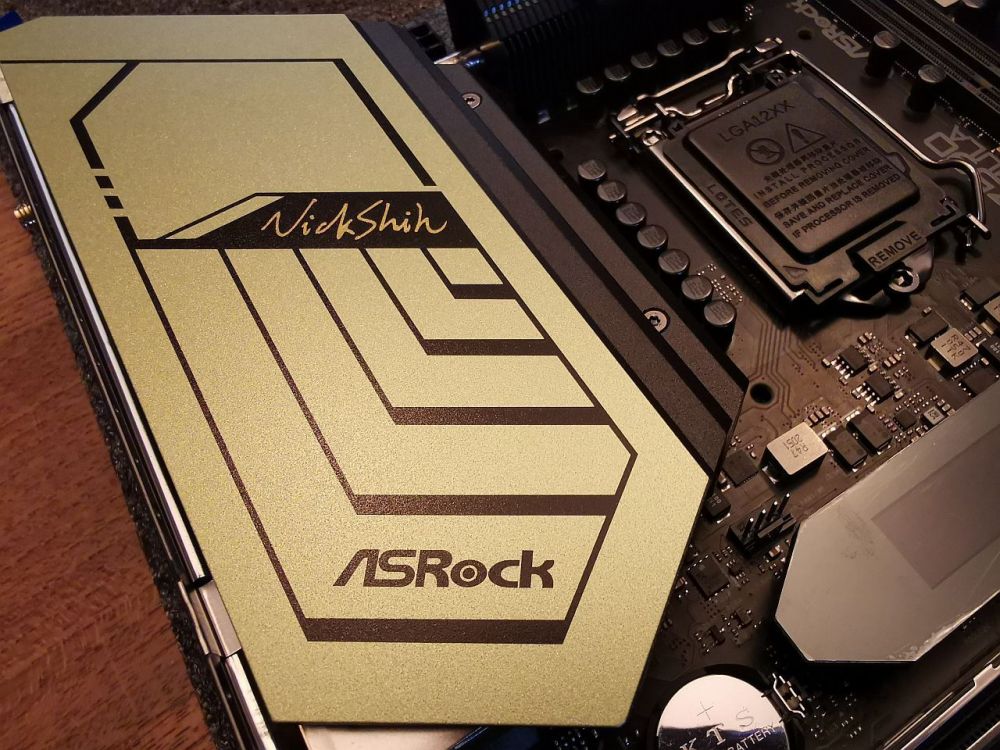
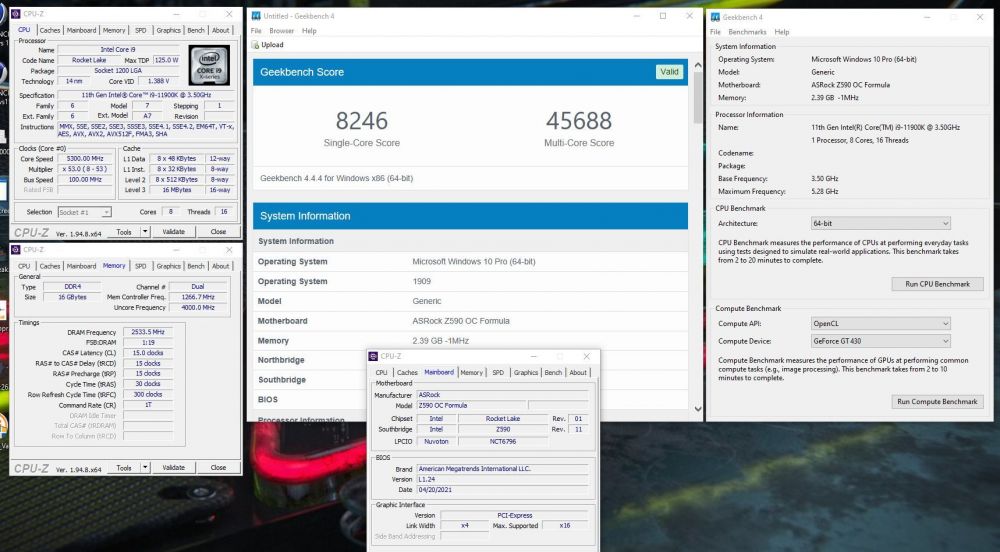
Just freshly arrived on my doorstep, brand new retail Z590 OC Formula. Thanks daddy @NickShih for the board. Some shots of the motherboard. Bios 1.24 Easy 5066C15 at 1.95Vdimm with single rank dimms 4533C16 @ 1.65 with TridentZ Neo 3600c16 (very average B-Die sticks) The latest 1.27 Bios has optimized memory training profiles and tuned LN2 profile. HWBOT member Chispy made a bootable XP for Z590 OC Formula, you can grab it here: https://www.mediafire.com/file/8h55ndgfck10m4j/20CE0A7B83E5F08B-00-00.mrimg/file ( can be slow in download ) Use Macrium Reflect software for the above image. Use ASMedia ports (IDE) - Select XP compatible in Bios Set other SATA ports to IDE or Disable them In case you want to build your own "special XP", here are the ACHI files required to inject. Other software: Formula Drive 3.0.4 (click) OC Formula Motherboard Utility (click) Multi-purpose Bios 1.27A (click) Beta Bios 1.27D (improved Gear1) Latest Beta Bios 1.27H Enjoy! Z59OCF127A.rar Z59OCF127D.zip 1920580306_ASRockMotherboardUtility(v3.0.412).rar 22471576_FormulaDrive_3.0_407.4(portablelite).rar


 19 points
 -
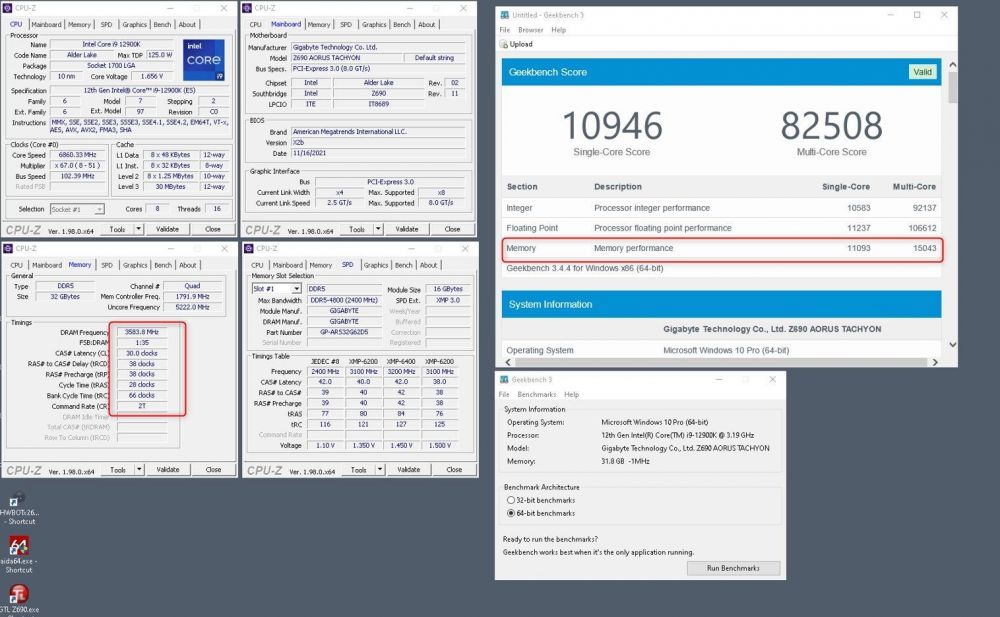
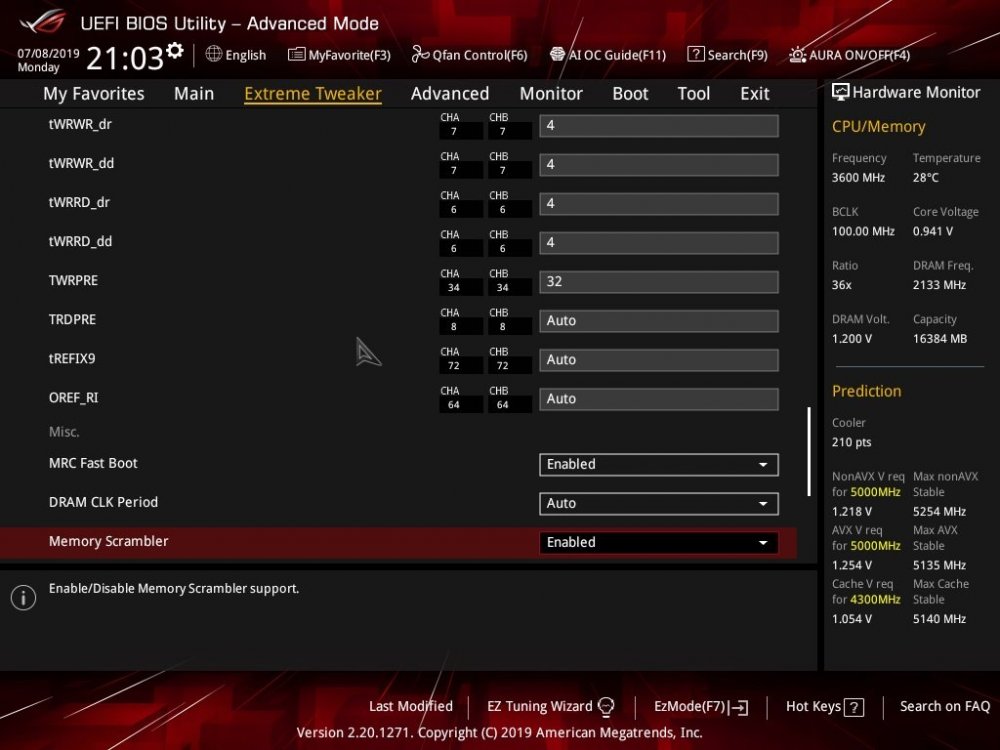
Hey Fellas, Everyone was binning and buying A0 memories with the goal to reach 4200+ c12-11. For a very long time, this was the absolute way to go in all benchmarks, until Alva decided to show us the real magic on A2 during the GOC 2018 in Vietnam. From that moment on, a lot of people tried to reproduce these settings and even improve them. I think the G.Skill OC Worldcup then, showed what’s really possible on A2, where we showed 5100MHz C14-14 and 5000MHz C14-13. It was said, that 4800C14-13 is not really much faster than 4200c12-11 in for example 32m. Yes, that’s not wrong. But keep in mind, that 4200 or in best cases 4240, ist he absolute limit. 4800C14-13 is something that some guys can run on air and not the limit. I’ve tried 4933c14-13 and it was in fact faster and this is still not the limit…look at the screenshot: Due to the fact, many many people start using A2 mem and some high freq & low latency settings, Asus decided to put some further profiles into the upcoming BIOS files. Here ist he first one: ROG-MAXIMUS-XI-APEX-ASUS-0021.7z And here as well: https://filehorst.de/d/cbqoCxgJ And for the gene: ROG-MAXIMUS-XI-GENE-ASUS-0021.7z Now the how-to-apply guide. Keep in mind, that not all A2 mems and/or 9900k can do this due to several, known reasons! Please don’t give up on booting them, once it doesn’t work. DRAM VTT should always be around 0.9V-0.95V. IO/SA depends on your chip, but I figured out on 4 different chips, that too much is not really good! On all my chips, the max I needed was 1.35 IO and 1.4 SA. DRAM Voltage is best around 1.97 to 2V for booting. In OS I was able to raise the voltage up to 2.15 on some sticks. 4800 2V: This is actually the lowest profile. It should run on at least 90% of all Systems with semi good sticks. 4800MHz is quite high for an all air cooled system, this might be the toughest thing here – temperature! If you can’t boot this profile straight, start with 98MHz BCLK. Find your max bootable setting. Then raise the rest in the OS. ALL RTLs are Auto! Some kits require to set the initial value to 79 and both offsets to 20. 4800 1,97V: This profile is by far the toughest one. Only two out of all my A2 dimms did this on air. This is basically a cold profile. With a cold CPU I was able to boot this one with 8 sticks! With cold CPU and cold MEM, all parts did it immediately. The same rule applies to the 4933 profile. Here you have a profile, that gives you at least 8600 points in geek 3 single mem score at 5G CPU! Once you went cold on both, CPU and MEM, you can try booting this profile with 4933. I was able to do so in Taiwan. That made it possible to run this setting at almost 5g: If you can’t boot, with postcode 23 for example, then change the RTLs in this profile to auto. Now they are 62/63/13/13. Keep the initial at 79 and raise the offsets from 19/18 to 20 both. (this is a general rule for all three profiles). If it boots now, try lowering the offsets again to 19 both and keep the RTLs at auto. The offsets 19/18 is the lowest I got working and it really gave me the best performance! Keep in mind, everything higher than 4850MHz with c14 I needed at least 0°C on the MEM to boot! 4933 1,97V: Let’s call it the killing spree profile! With this profile you might be able to boot even with 5g divider! It’s not easy, but doable with the following how-to. 1. CPU and MEM cold 2. CPU is fine from -100°C to fullpot, MEM should be -60°C to -80°C for training. Once it trained, torch your mem to around -20°C to -30°C to enter the OS. 3. Try to keep the mem around that temperature. Unless you changed the bclk, your MEM shouldn’t be trained again and you don’t need to focus the temp. I hope you like this. Maybe there will be a Gene BIOS soon as well…


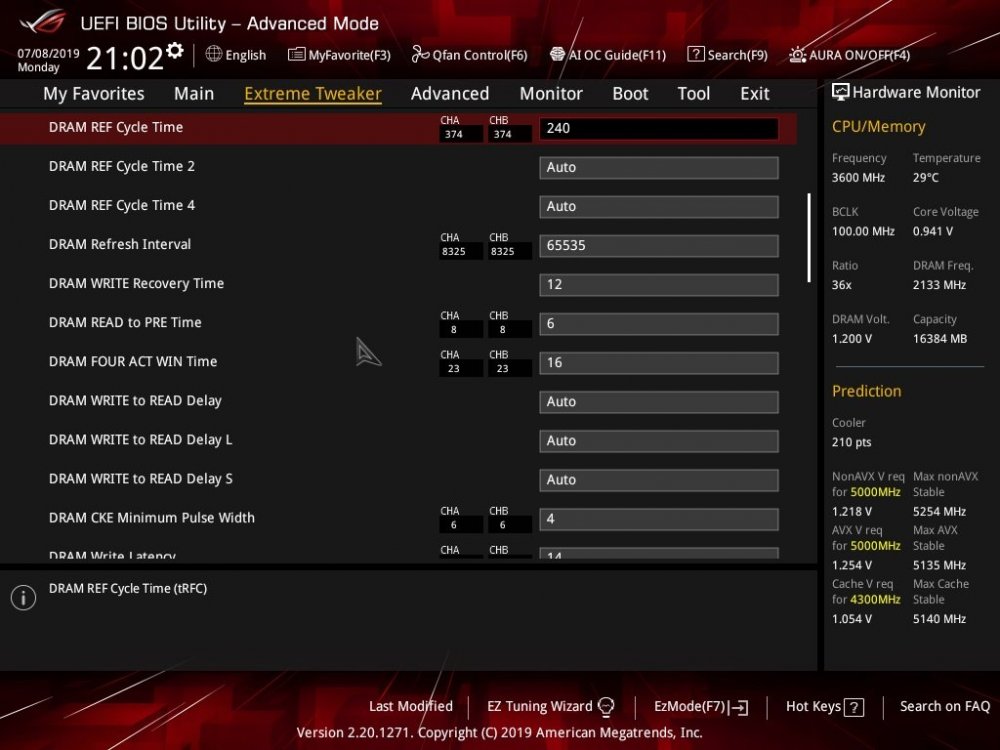
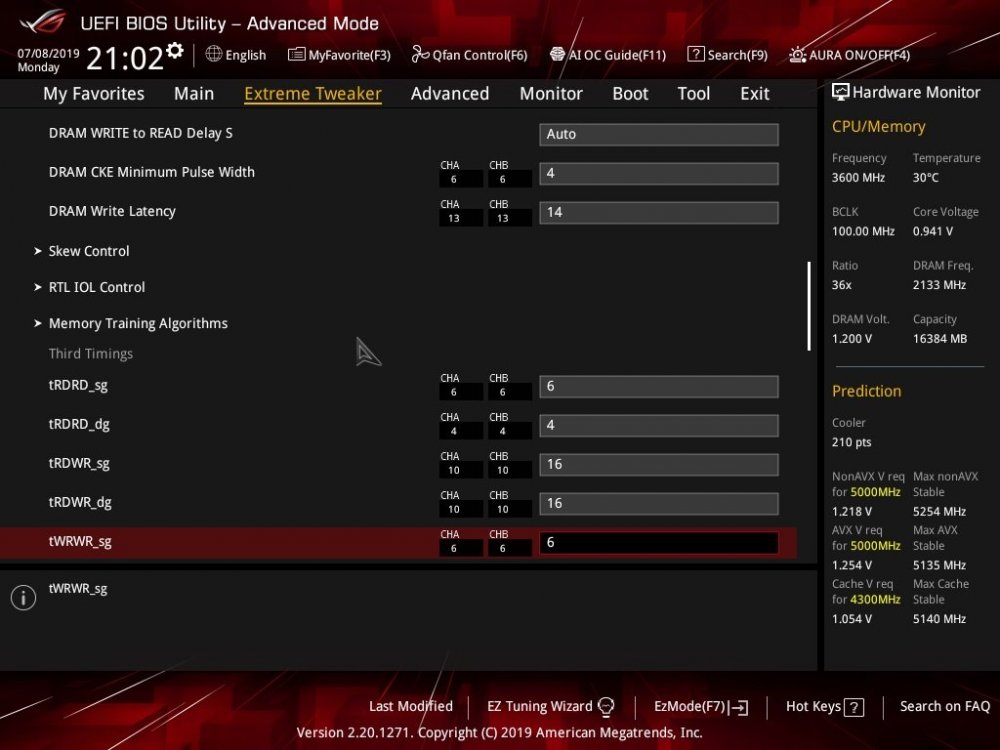
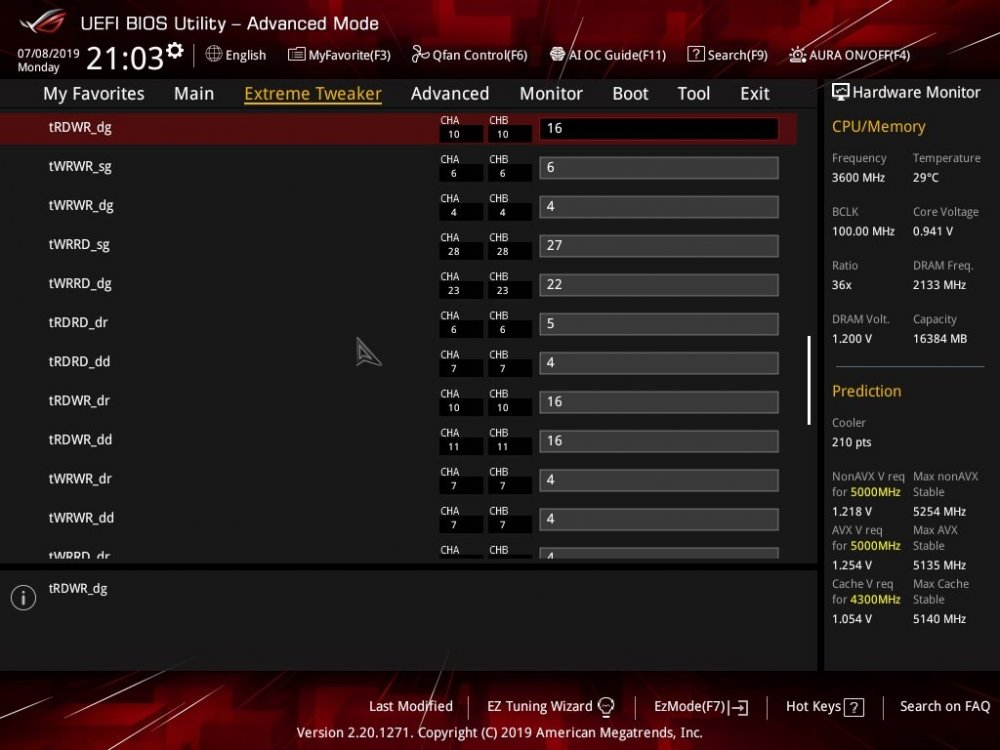


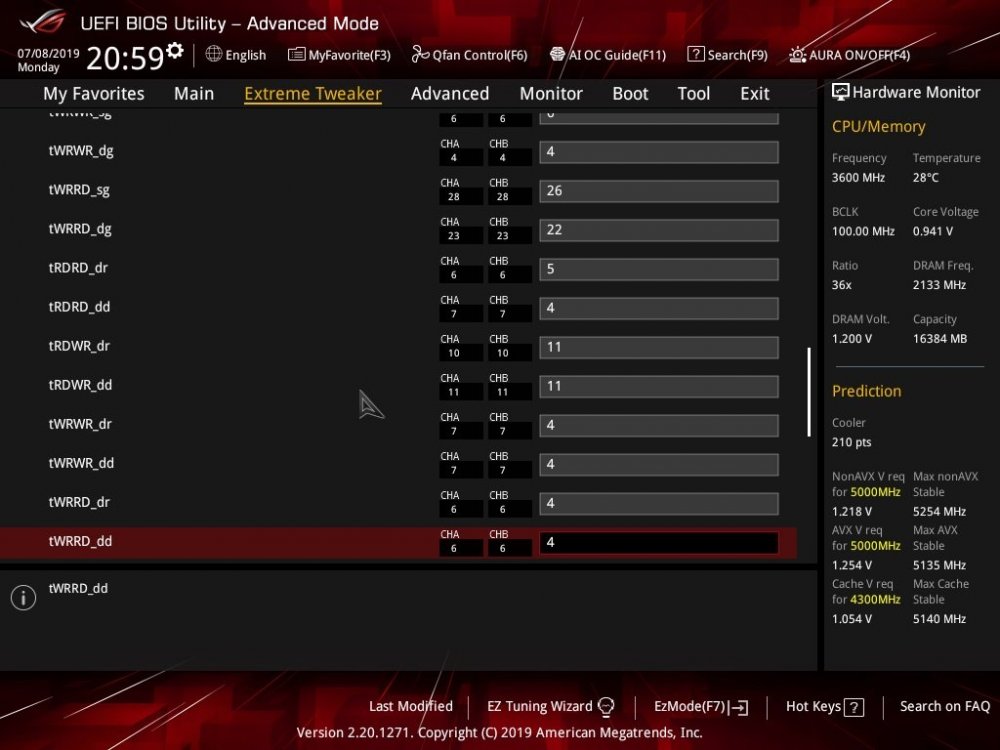
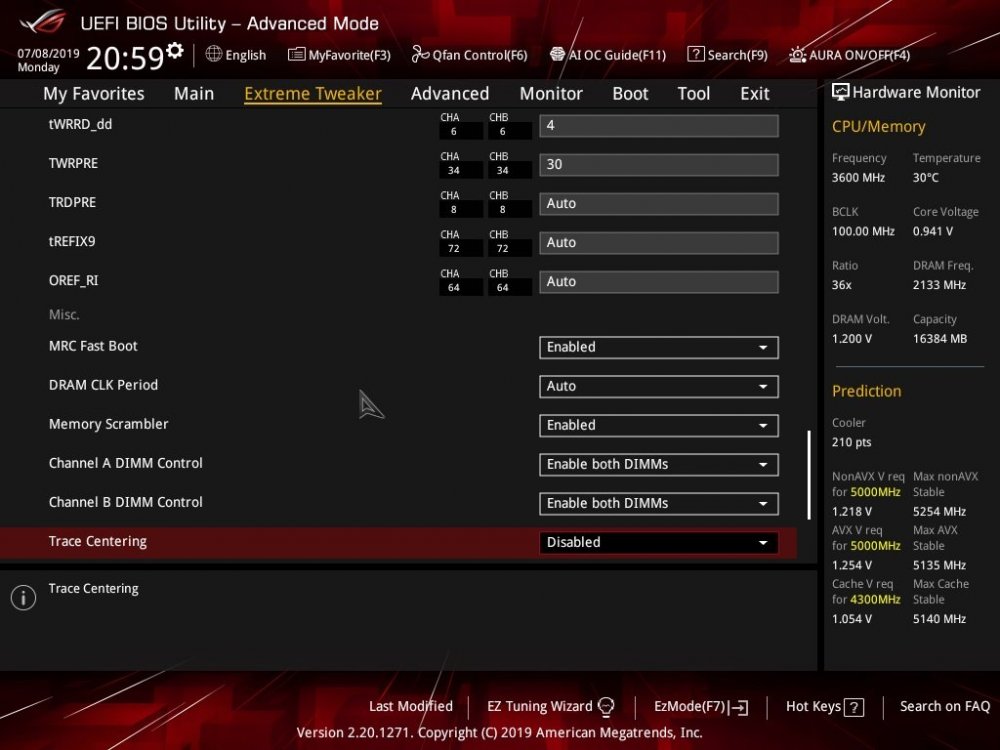
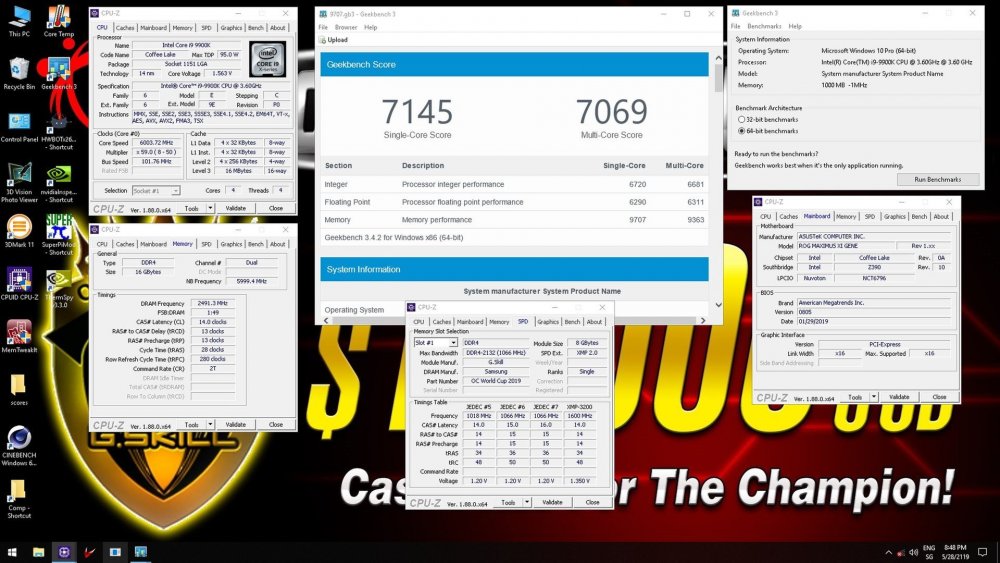
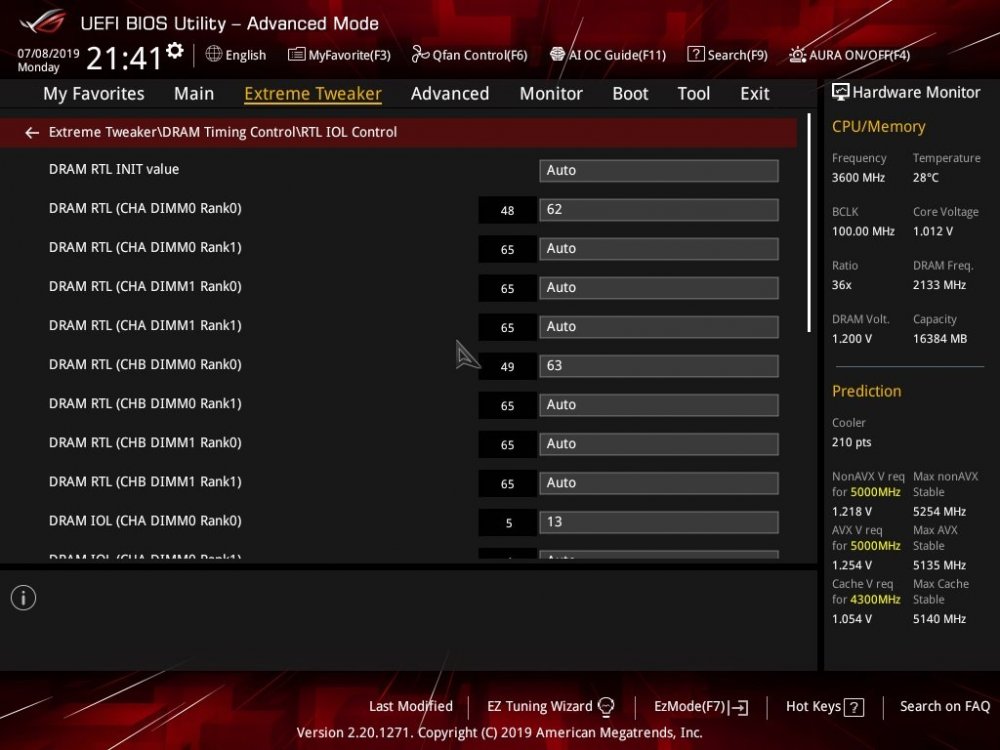
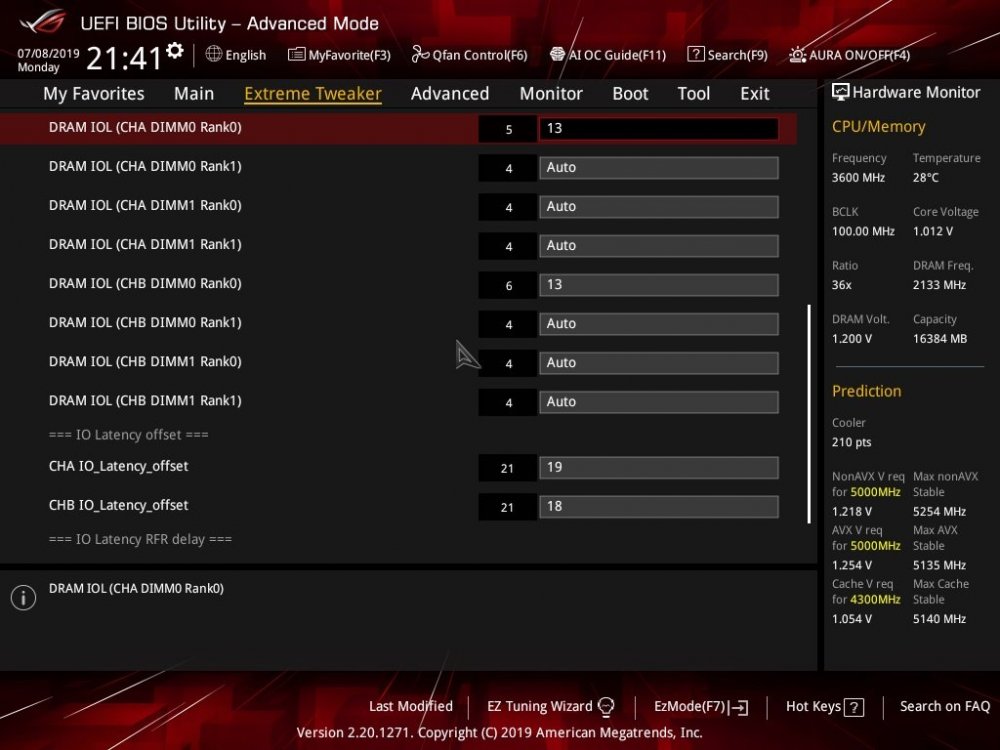


 19 points
 -
Can you simply please shut up? I am tired of your impact for years now but you simply cannot stop posting. On most benchmarks, Linux has been tested long before you bothered to show up here and provide your wisdom to people who forgot more than you will ever learn. For the unlikely case you did not read the thread about macos and Linux, there are uncountable versions of this which can easily be altered because all is open source. Out of line scores... on windows we had people cheating that ran stuff at 5,5 and clocked down to 5g, on linux is will be running 4 and then clock up to 5 maybe and so on. You simply do not get it, normally you would have to ask for video for each score made on Linux. On the topic, Albrecht managed to do a very good job in a partially toxic environment. Organization at comps is good, he usually finds even good solutions for conflicts and his main goal is progress of hwbot and the community. Most of his decisions are reasonable and he always has an open ear to positive input because a healthy discussion is the baseline for this. Like on me, his main weakness is that he is too kind. So the decision he leaves would make sense despite the damage done to hwbot by this, it is either changing yourself, get more strict and simply throw some guys out or leave it seems. History repeating itself, always same pattern19 points
-
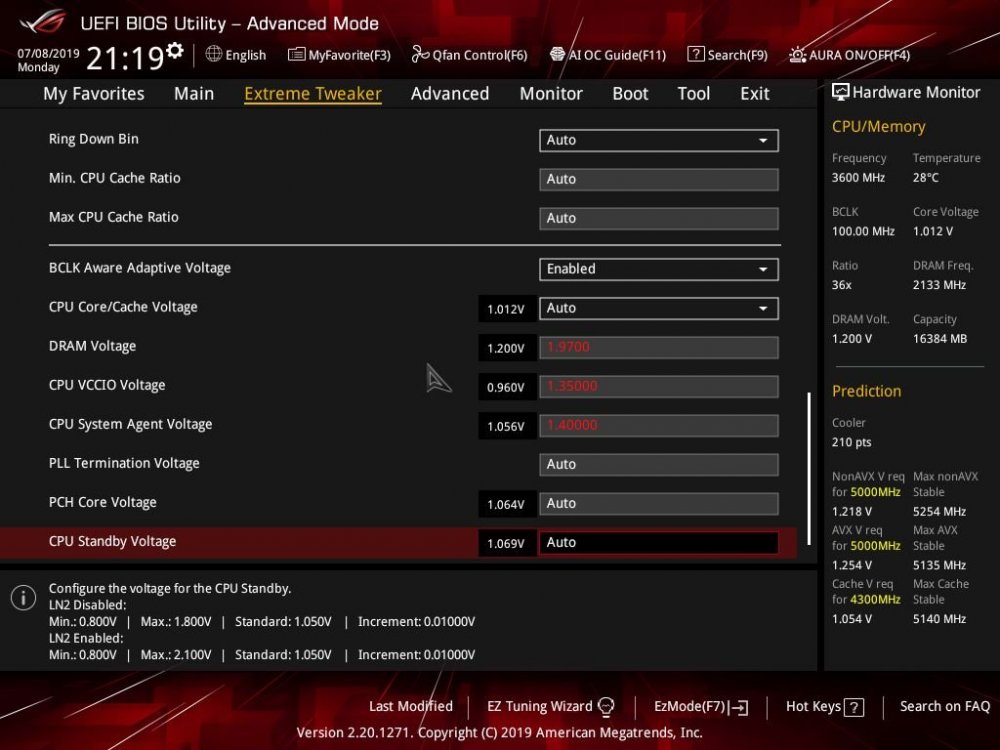
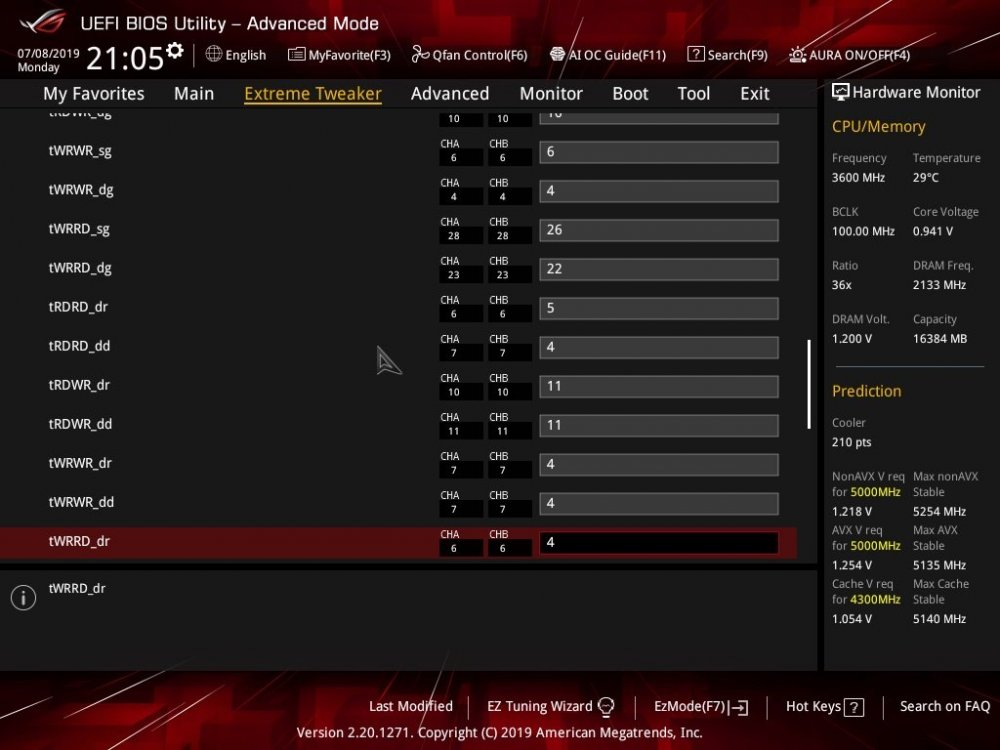
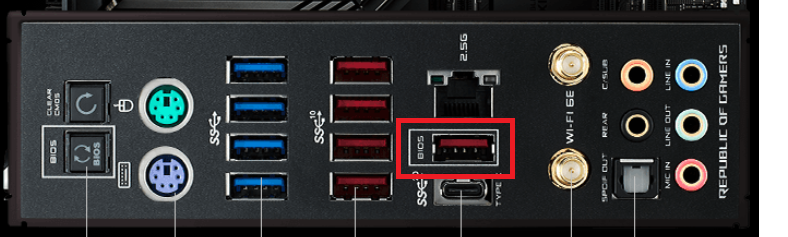
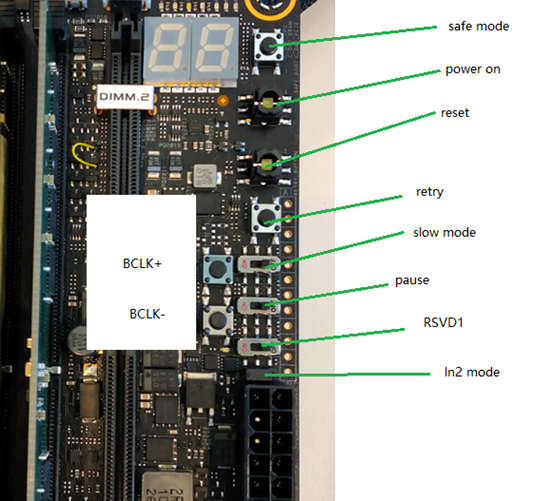
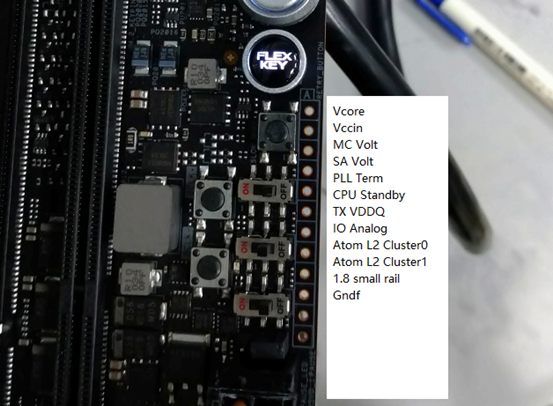
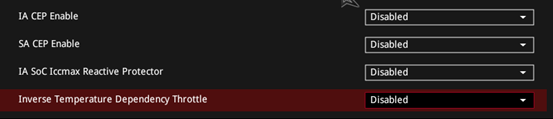
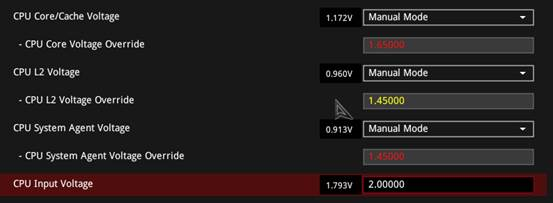
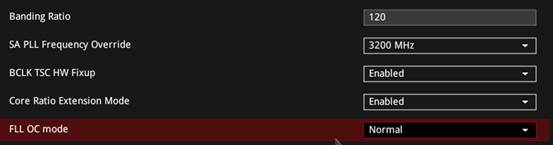
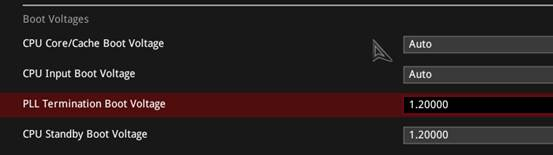
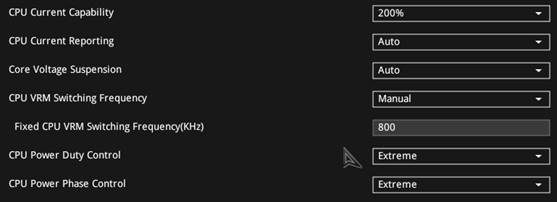
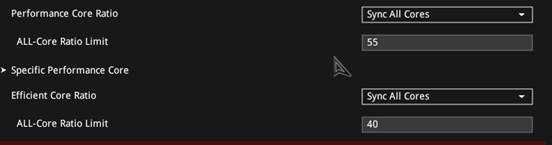
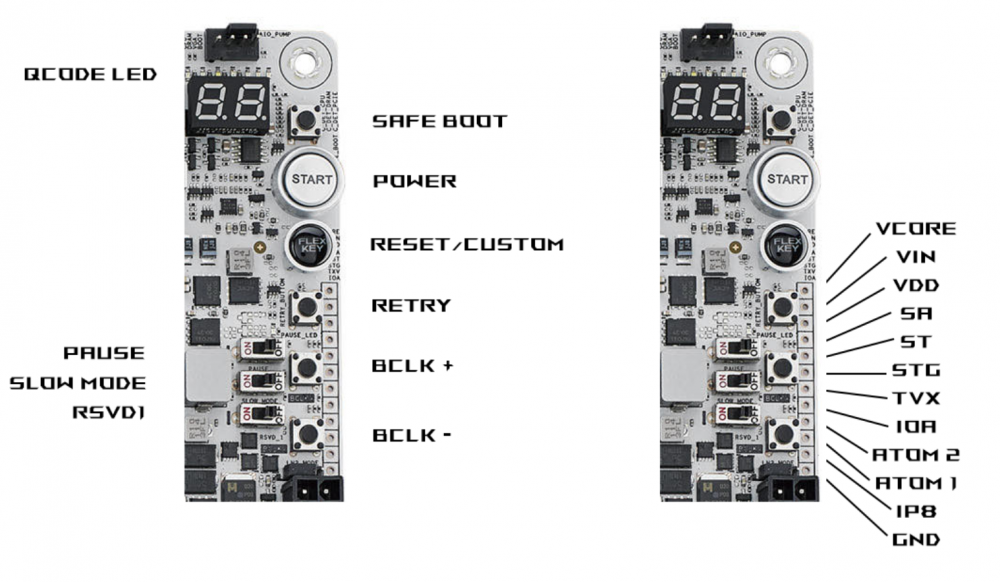
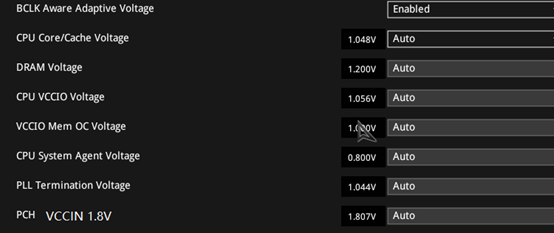
--- For Ambient behavior and DDR5 Voltage Basics there is already a perfect guide by Falkentyne in the ASUS ROG forum -> LINK -- - BCLK Buttons On the new Apex there are BCLK +/- Buttons For the onboard bclk buttons you will need to manually enable them in bios/tweakers paradise - Measurement Points - LN2 CBB -150c to none CB mostly none (no rsvd switch needed) No need to specifically set pll term or cpu standy (don’t seem to help cbb) The cpus must have some kind of pll bug when cold whereby they can all of a sudden keep upping frequency limitlessly, like the pll is capped at a certain freq: To avoid this pls use FLL OC Mode normal! Bear in mind limitations of fivr rail, 1.6v~ before they trip. Set vccin to 2.0v or so for enough input voltage to feed high fivr output rails. Disable all CEP for best perf As starting point set the LN2 Jumper on Mainboard, cool down to -100C Basic LN2 Settings are: Ratio 55 Cache 40 Vcore: 1.65 - 1.75+ CPU Input Voltage: 2.0 Core PLL Voltage 1.00500 Ring PLL Voltage: 1.00500 PLL Termination Voltage: 1.300 CPU Standby Voltage: 1.300 CPU Input Voltage Reset Voltage: 1.8 -- BIOS FLASHBACK PORT Red marked is the BIOS FLASHBACK PORT, Rename your File to MZ690A.CAP before flashing. -- Tools - Worktool ADL 1106 https://www.dropbox.com/s/bvs9qltshctnpct/OCTool_ADL1106.zip?dl=0 - TurboV Core 1.10.19 https://drive.google.com/file/d/1ANYEEvk_785Nn7Sa4Y9dE5KYcBWFVQsW/view?usp=sharing - MemTweakIt https://drive.google.com/file/d/1Rj4Qi2Aas-oG95adOdD1NngYSFvDNzLB/view?usp=sharing - ROG True Voltician 0902 https://drive.google.com/file/d/1nOL9uBRM8Lu64SVZv85qiGAylOrnRQ2R/view?usp=sharing -- Legacy Tools - WinXP Ratio Tool https://drive.google.com/file/d/1tBq4ezPSiXS7rkddwjc6-7A8kg6KG_5m/view?usp=sharing - 590 ACPI Files (work on Z690) (credits go out to OGS) https://www.dropbox.com/s/ixh046p92cc8pwf/winxp_acpi.zip?dl=0 -- BIOS 0096 https://drive.google.com/file/d/1Wo3Vg1EMY3Q_o1iV7QDMYg_UapxTrZ7n/view?usp=sharing 0702 https://www.dropbox.com/s/rf7kdc3pilpyrk8/ROG-MAXIMUS-Z690-APEX-ASUS-0702.rar?dl=0


 18 points
 -
--- For Ambient behavior there is again another guide from Falkentyne in the OCN.NET forum -> LINK --- -- BIOS FLASHBACK PORT Red marked is the BIOS FLASHBACK PORT, Rename your File to MZ790A.CAP before flashing. -- Mainboard Buttons / Measurement -- Microcode Switch There is a new feature for switching the Microcode on the current BIOS, current is default (no need to switch for now) -- Safe Boot Mode If you change the BIOS slot and then restart the motherboard, the first boot will automatically start with the safe boot mode. So if you forget to reset ln2 settings nothing can happen on ambient ? -- MC SP Check Tests the MC solely, without touching the DRAM (you can even remove the dram while its testing) , same mc on different boards/dimms should give similar score Tests the FMax of an MC at a fixed low SA voltage. In the same way you test a core's fmax at a low voltage idling. Since there is an element of luck when testing FMax like you would when running for a cpuz record, the outcome will not be 100% the same everytime and score will shift a little. Temperature affects FMax but the effect is weighted and the maximum package temperature during the training is taken into account to generate an unbiased score. -- LN2 behavior With the new crazy clocks unfortunately comes a problem that about 2/3 of the CPUS have a hard CB. No RSVD switch or another voltage seams to help here. Currently there are some chips that are close to -185C -> Fullpot, there may be something you can try here. Try tightening the socket screws more and before remounting the POT. Put the graphics card into the very last slot. Use the original IHS instead of the custom bracket, we have had better results with high wattage loads. For legacy stuff the bracket is still a choice, maybe the better one for single core loads. Peak load with all Ecores ~ 950W+, so you have to watch out if the paste cracks. Memory IMC uplift is also huge, the same MDIE memory now runs between 7400-7600 memstable under air and up to 8500+ for various benchmarks. For those who have an ADIE kit there is a 7600 profile in the bios that you can use as a starter profile. As starting point set the LN2 Jumper on Mainboard, go into BIOS, load the LN2 Profile and Cool down to -120C Basic LN2 Settings are: Ratio 55 Cache 40 Vcore: 1.60 - 1.70+ SA: 1.35+ CPU Input Voltage: 2.0 Core PLL Voltage 0.915 - 1.00500 Ring PLL Voltage: 1.00500 PLL Termination Voltage: 1.300 CPU Standby Voltage: 1.300 CPU Input Voltage Reset Voltage: 1.8 -- Tools - Worktool RPL 1121 https://www.dropbox.com/s/jf7ob7r5quvri1c/M15_OCPAK1121.zip?dl=0 - MemTweakIt https://www.dropbox.com/s/fee9xkrv54ptb5t/MemTweakIt_20221101.zip?dl=0 - TurboV Core 1.10.20 https://www.dropbox.com/s/ifsr8x0zncxcvyd/TurboV_Core_1.10.20.zip?dl=0 -- BIOS naming rules here are some naming rule that you can identify bios in which status Official bios, it will be 0x0x or xxxx, e.g. 0806, 2204 and can download from official website, but there will have a time delay between it build and release, sometimes you can download it from ASUS RD, but can’t find it from official website becasue bios is on internal testing and need time for approval Test bios, it will be only 00xx, e.g. 0040, 0051, modify for improve compatibility or system stablity Special or meida reivew bios, it will be 9xxx, only offer for specific using to solve issue or for media review before it official release all bioses will based on official bios and modify for improvement -- Bios Archive Test: 0075 - 0088 - 0095 - 0099 - 0031 (MC SP Visible) - 0040 - 0005 - 0078 - 0088 - 0098 Retail: 0605 - 0701 - 0702 - 0703 0802 - 0804 - 0806 - 0809 - 0810 - 0901 - 0902 BIOS Ver. 0018 update ucode to 0x112 update rc version to 0C.00.A2.40 update mrc version to 0.0.4.129 improve memory overclocking compatibility https://www.dropbox.com/s/0by5wtqzats1rmp/ROG-MAXIMUS-Z790-APEX-ASUS-0018.CAP?dl=0 BIOS Ver. 0021 BIOS For G.SKILL OC WORLD CUP 2023 *change to mode2 to use gear4 https://drive.google.com/file/d/1iLQZ-aoTryYU9HUSDgV2ZmLn0kQWSpFW/view?usp=share_link BIOS Ver. 0031 update ucode to 0x113 update rc version to 0C.00.A2.40 update mrc version to 0.0.4.129 before you use this version BIOS, make sure update ME FW 16.1.25.2124 first in windows. Optimized SK Hynix 24Gbit IC overclocking compatibility. Change method to optimized memory timings. tWRPRE = tCWL + tWR + 8 / tWRPDEN = tCWL + tWR + 9 / tRTP not related with tWR, it defined and caculated by speed bin table with tCK. https://www.dropbox.com/s/y3i0iz3nieh2gkm/MEUpdateTool_16.1.25.2124_T.zip?dl=0 https://www.dropbox.com/s/bt9csk7ooe2ia4f/ROG-MAXIMUS-Z790-APEX-ASUS-0031-2023-03-10.CAP?dl=0 -- Legacy Tools For the WINXP Legacy Tools have a look at the old Z690 Thread


 18 points
 -
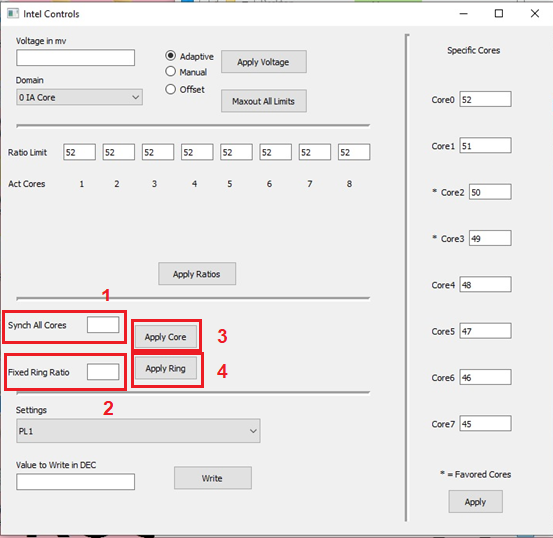
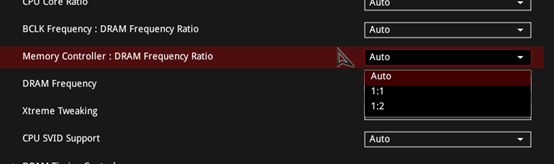
Reserved for more Stuff/Guides. --- There quite a few significant changes, however and below is a list that compares traditional expectations vs actual behavior of RKL: Traditional Expectations Actual RKL Behavior Memory and controller can only run in synch Memory and controller can run 1:1 or 1:2 Both odd and even DRAM ratios work Only DRAM odd ratios work for higher frequencies 100:100MHz base DRAM Ratios work as well as 100:133MHz base DRAM Ratios 100:100MHz base DRAM Ratios are significantly worse than 100:133MHz base DRAM Ratios The cores share the same PLL and thus at any point of time, they share the same frequency The cores have their own PLL and thus at any point of time, they can run different frequencies AVX offset is referenced against the all core active ratio AVX offset is referenced against each individual core's ratio limit The voltage needed to run stress tests is more than sufficient for cache to switch ratios High Cache Frequencies require a much higher voltage to switch to that ratio than to run stress tests Even with ring-down bin enabled, Cache will pretty much run up to it's fused max ratio Due to the above, the VID for cache is so much higher than it's core counterpart that often the Cache VID would exceed core's and induce more down-binning since Cache would regulate its frequency to not exceed core's VID requirement. The Memory controller for Rocketlake is significantly different with new features and new limitations. Firstly, there are 2 “Gear” Modes the Memory controller can run in. 1:1 or Gear 1 means that the Controller and Memory clock is in synch. 1:2 or Gear 2 means that the Controller runs at 1/2 of Memory clock. Typically, the controller can maintain a 1:1 mode till about 3600MHz. After which it can no longer work reliably and needs to switch to Gear 2. Since the controller runs at a higher frequency in Gear 1 even if memory frequency is lower, the SA voltage required is thus higher for the same memory frequency. Our auto-rules try to maintain the 1:1 gear mode frequency until 3600. Related to this, since the controller runs at only 1/2 clock in Gear 2, the command rate by default in Gear 2 is 1T, and all sub timings such as Round Trip Latency and turn-around times are tighter in Gear 2. (btw, IO latency timing option is non-existent on RKL) This tries to make up for the latency associated with 1/2 clock. On top of this, there are 2 limitations in Gear 2 mode. This first one is that there are no odd ratios available in this mode. So for example there is no 41.33 ratio. The second limitation is that ratios based off BCLK:DRAM ratio of 100:100 are more unstable compared to ratios based off BCLK:DRAM ratio of 100:133. We have explained this in the help string and have set the non-recommended ratios in grey font. There are 2 VCCIO voltages for RKL. VCCIO Mem OC Voltage is the rail that would need to be raised during overclocking Memory. Typically in the range of 1.25~1.45v. CPU VCCIO voltage at default of 1.05v powers everything else. Another note is that the PCH is powered by a VCCIN of 1.8v which is used as it’s FIVR input voltage. - LN2 The dual 8 pin power connector on M13A has priority differences, the one towards the left is the primary and has to be plugged in. We experienced no Coldbug or Coldbootbug on RKL, so there is no RSVD switches needed As before on Z490 all you got to play with is vcore, sa, io/io memoc and pll term. As starting point set the LN2 Jumper on Mainboard, cool down to -80C Basic LN2 Settings are: Ratio 55 Cache 45 Vcore: 1.65 - 1.75+ VCCIO: 1.30 VCCIO OC: 1.50 VCCIO SA: 1.40 - 1.50 PLL Term: 1.60 - 1.70 Ring PLL Voltage: 1.05 / Auto Internal PLL Voltage: 1.05 / Auto PLL Bandwidth: 2 (higher blck maybe higher) -- Worktool Usage High Cache Frequencies require a much higher voltage to switch to that ratio than to run stress tests. So for example if you’re dynamically switching the Cache ratio in the OS, whether due to power saving or manual adjustments, to switch to high cache you need to set high VCore first to succeed in the switch. Once the ratio is switched over however, the voltage can be lowered significantly, for example you may only need to use 1.7v for cinebench but need to switch to the high ring ratio with 1.90v. The tool does it for you when you apply Fixed Ring Ratio, it well set high vcore before switching, then switch then lower vcore back to previous value. The cores perform slightly differently as the same frequencies, with the middle cores yielding best performance and the first or last being the slowest. If the processor’s favored cores are at the front or back, the single thread performance maybe slower than a processor with favored cores closer to the middle. 1. Put in your desired Ratio - 55 for example 2. Put in your desired Cache Ratio - 50 for example 3. Apply Core to switch CPU Ratio 4. Apply Ring to switch CPU Cache You can try "Maxout all Limits" after you set everything, this max out the Board/CPU Limits if something in Bios is forgot to set. -- XP Tool For XP and Ratio changes you need the attached XP Tools. -- Tools - Worktool https://www.dropbox.com/s/yo5n36kj3xmb6l5/OCTool1221.zip?dl=0 - TurboV Core 1.10.12 (590 and z490) https://www.dropbox.com/s/qfzmx3uvx7ib2xd/TurboV_Core_1.10.12.7z?dl=0 - MemTweakIt https://www.dropbox.com/s/kjowe9faml7e6xh/MemTweakIt.exe?dl=0 -- Legacy Tools - WinXP Ratio Tool https://www.dropbox.com/s/805ioagux8inbqz/xptools.zip?dl=0 - 590 ACPI Files (credits go out to OGS) https://www.dropbox.com/s/ixh046p92cc8pwf/winxp_acpi.zip?dl=0 -- BIOS 0903 BETA ROG-MAXIMUS-XIII-APEX-ASUS-0903.7z 0902 BETA https://drive.google.com/file/d/1osCYx94vY4vu2en_XFES2xDGOOhEsZLY/view?usp=sharing 0901 BETA ROG-MAXIMUS-XIII-APEX-ASUS-0901.7z RKL OCTVB Preview Bios ROG-MAXIMUS-XIII-APEX-ASUS-0020.rar Guide: rkl_octvb.docx 0801 https://drive.google.com/file/d/1TixpPAyQ1oIom_FNmWOv5qI4ex91hOeX/view?usp=sharing 0705 https://www.dropbox.com/s/qz2dw2r2lxic8iv/ROG-MAXIMUS-XIII-APEX-ASUS-0705.CAP?dl=0 0706 https://drive.google.com/file/d/1C5Bt7CmfgLPt7u3HbyN5MV-nzmIQv5yV/view?usp=sharing -- BIOS FOR SUPERPI 0070 (beta) https://drive.google.com/file/d/1SRhK0Jk0XqZkOjJ2X97VP2UgnOSUzNap/view?usp=sharing This is an old BIOS, so it is recommended to use it only when running SUPERPI. Because the latest BIOS has better performance 0062 (beta) https://www.dropbox.com/s/jul8s6col0ownsp/ROG-MAXIMUS-XIII-APEX-ASUS-0062.rar?dl=0 Some refinements to gear 1 , in particular cmd rate 1t mode , plc check if helps!! I use 1.45v io mem and 1.6v SA for 3866 1t just to rule out voltages -- BIOS FLASHBACK PORT Red marked is the BIOS FLASHBACK PORT, Rename your File to M13A.CAP before flashing. -- SPI HEADER FLASH Set the Jumper(blue) left for Slot 1 or right for Slot 2 .ROM BIOS FOR FLASH This Bios is withouth the UEFI Header so you can flash it only via SPI Programmer. https://www.dropbox.com/s/s53p7opjshbfeij/ROG-MAXIMUS-XIII-APEX-ASUS-0801.rom?dl=0

 18 points
 -
Hello, after a few days of testing/trying here's the final ISO + TIBx for Z490 ISO: https://mega.nz/file/MJZB2CoA#uPgJY8HNq4Y2mCIuNLrk3ApwOsvo437pqvVpOLAn3hE TIBx for Acronis 2020: https://mega.nz/file/gRJ23T4T#iFOmOUa6AansaVL-TwFcFurP484KAw53DB0c6NWhln0 This ISO based on WINDOWS XP PROFESSIONAL SP3 X86 - INTEGRAL EDITION 2020.9.9: http://www.zone94.com/downloads/software/operating-systems/123-windows-xp-professional-sp3-x86-integral-edition includes lots of patches for modern hardware which improves perfomance of modern CPU's and lots of other. Additionaly integrated: - acpi.sys compatible with Z490 - Microsoft USB 3.0 xHCI driver (Backported Win8 driver) - universal USB driver. All ports works without any issues - Samsung NVMe driver (Backported Win7 driver). Driver works during XP install. So you can install XP directly to Samsung Nvme SSD. - PAE 128GB RAM Patch (May have stability issues) - allows XP x86 to use up to 128gb of ram instead of traditional 4gb. May have stability issues with Nvidia drivers versions 332 and higher. Didn't test it though. - Kernel-Mode Driver Framework 1.11 (Backported Win7 driver). Needs for Microsoft Universal USB drivers to work properly - UAS/UASP driver (Improves USB storage device performance) - Intel xHCI driver by Stavros taken from win-raid.com 1. I wasn't able to install this ISO from USB flashdrive no matter what. I've tried lots of different software and methods (WinSetupFromUSB , Easy2Boot, Firadisk + Firahelper, Yumi ) , no luck. Always got errors after F6 and F2 messages during installation like ntkrnlmp.exe, some errors in txtsetup.sif, corrupted files etc. Allthough the same ISO installs perfectly from CD/DVD drive without any issues. This might be somehow related to bios (i'm using 0088) or amount of ram (2x16gb in my case). So i suggest to use CD/DVD drive to istall ISO or direct install to drive from TIBx mount with Acronis for those who has no CD/DVD drive. 2. In case of installing from CD/DVD Drive, plug both HDD/SSD drive and CD/DVD Drive to Asmedia ASM1061 ports on motherboard. In case of APEX XII it's SATA_E1 and SATA_E2 ports, otherwise you'll get 7B BSOD during installation. It's related to INTEL AHCI drivers somehow not detected by Windows XP during installation (although they are integrated into ISO), but working fine after complete system install. You may switc SSD/HDD drive to Intel Sata ports after system install, it'll work fine. 3. As there're NVME Drivers for Samsung integrated into ISO, you may choose to install XP directly to nvme drive even if it's GPT. No problem here. 4. First boot into XP (after 3 reboots during install process) your device manager should look like this: You may install those missing 3 PCI Device and SM Bus with Snappy Driver Installer (SDI), it's Intel LPSS, SPI and SMBus drivers. 5. Final system device manage in my case: Good luck, hopefully this post will help and save your time.
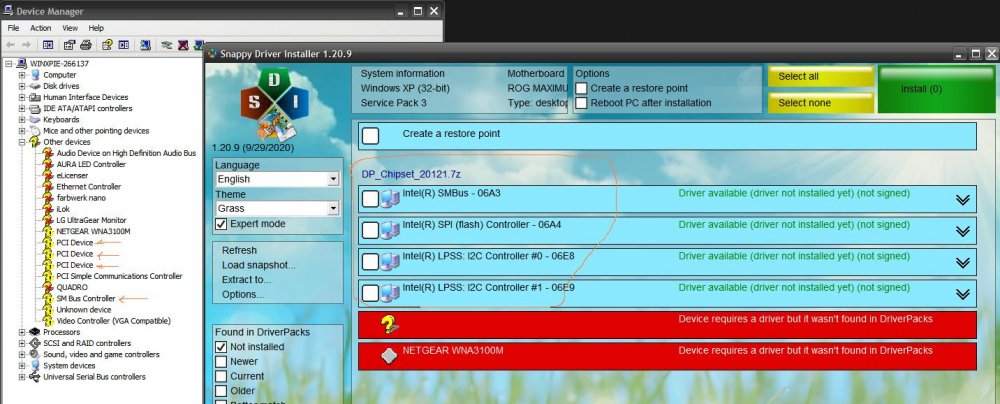
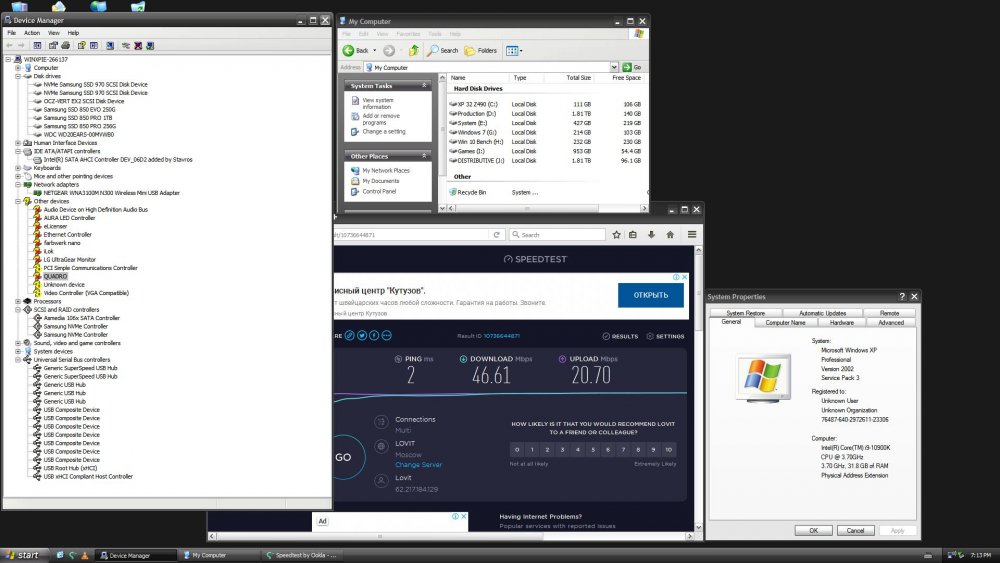 18 points
 -
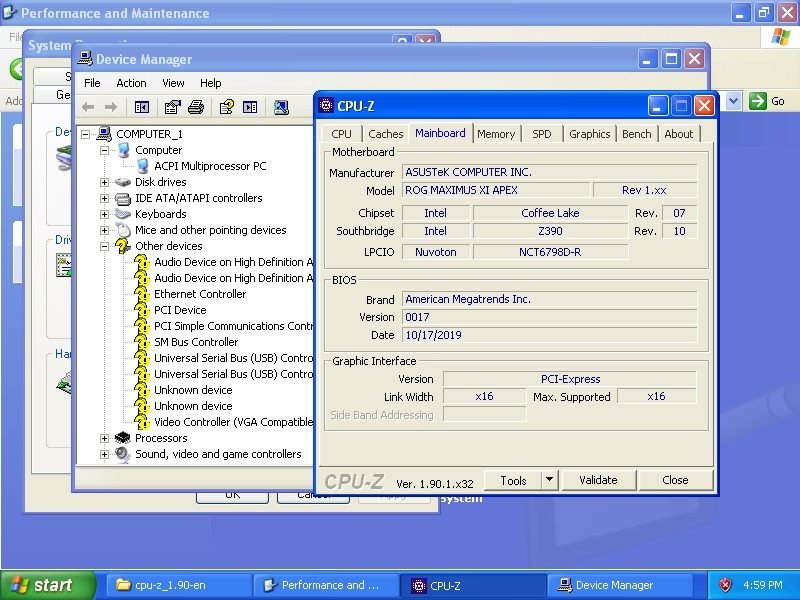
Hi, this is still a work in progress but will be sharing updates as it needs to be tested more till we get to a point that its working 100%. Then (hopefully next 2-3 days) I will gather everything so you can apply this to your own OS/mobo. Anyhow, after a couple of tests, we finally got XP to work on ASUS Z390 motherboards. Special bios is not needed This -for now- has been tested only for fresh installations. Will test later today if we can get old ones to work but might be a bit complicated. More info & credit to those who assisted coming soon UPDATE: So to get windows to work we care about the following files: acpi.sys (exists in SP3.CAB and Driver.cab both under I386 folder of installation) acpi.sy_ (exists under I386 folder of installation) - acpi_sy is the result of makecab.exe command of the acpi.sys syssetup.sy_ (exists under I386 folder of installation) - again result of the syssetup.sys ahci drivers which we import by nLite How I did it is -> get .iso file, decompress -> replace the above files -> nlite to import ahci driver -> make bootable .iso. Attached you can find all the files that are needed and work with Z390 without modding the bios. Will add more about usb etc later. NOTE ABOUT OLDER IMAGES: About older images - still being tested but you will probably need to boot via older mobo, replace acpi.sys, syssetup.sys and install drivers. Then you should be able to get the SSD and boot on z390. UPDATE v2: Ok so - current easy way that worked for us to update older images (z170/z270/z370) to work on Z390 is the following: a) copy acpi.sys (system32/drivers) and syssetup.dll (system32) from Z390 Files.zip b) the two .sys files from AHCI Update.zip to system32/drivers (drivers from Jason but removed the files that arent needed for this process) c) boot on an older working mobo (ie z270) d) run the .reg file (from AHCI Update.zip) and input the entries e) shutdown and boot normally on z390 CREDITS: Credits go to Win-Raid's users Fernando, XPLives, Daniel_k & diderius6. I think the files are from Fernando and @diderius66 (don't remember as I went through tons of them) but all of them contributed over thousands of posts to get this working. Z390 Files.zip AHCI Update.zip
 18 points
 -
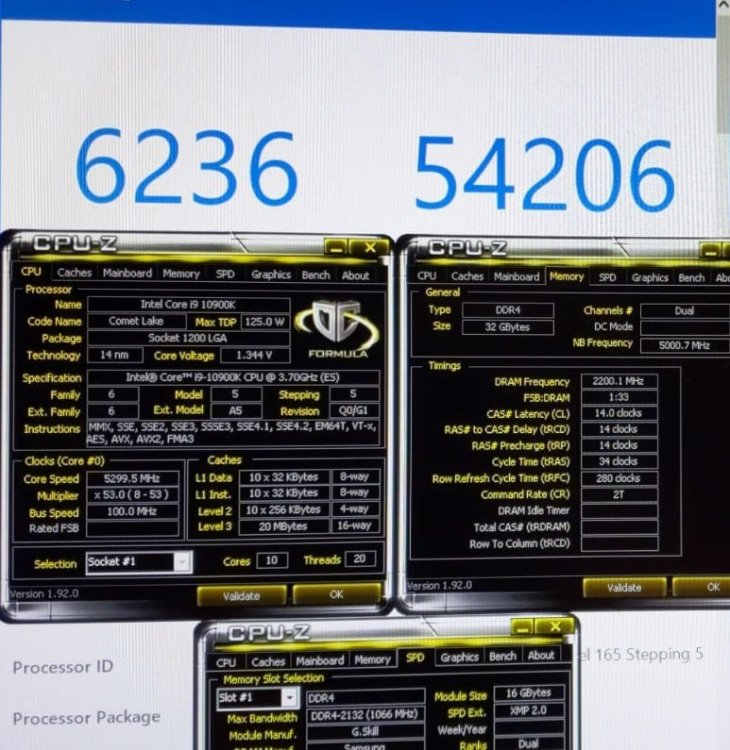
Alright well I have come to the conclusion I want to do a competition once a year. A way to give back to the community and support those who have supported me in my career here at HWBOT. For the first competition I am doing, we are going to say farewell to socket 1151. This comp is completely open to any generation of 1151(Z170-Z390). It will be limited to NON EXOTIC COOLING ONLY(air, water, chilled etc). You must also have never used LHe, LN2, Dice, Cascade, or SS before. We are currently looking at 5 stages and letting this run for 30-60 days. GPUPi for CPU v3.2 - 1B w/ Benchmate, limited to 4 cores, no Hyperthreading ( disabling cores is allowed) Cinebench R15 w/ Benchmate per core wPrime 1024M w/ Benchmate, limited to 4 cores, no Hyperthreading ( disabling cores is allowed) SuperPi 32M w/ Benchmate PiFast w/ Benchmate You will be limited to 15C at idle monitored by Benchmate and scores will be divided on a per core basis for the Cinebench stage and limited to 4 cores for GPUPI and Wprime, this to make it even between different core count CPUs on this socket Prizes! Yes, you heard that right. There will be prizes. They will vary from competition to competition, but I want to help those who are new as a way to get into XOC, as I was helped when I started out. 1st Place: Kingpin Cooling TREX LN2 Container(Winner gets color choice) + $100 USD 2nd Place: Kingpin Cooling Inferno Backplate + $50 USD 3rd Place: Kingpin Cooling 30G KPX Paste + $25 USD Random Drawn prizes will consist of different Kingpin Cooling products and more..... Splave has just offered up some cash prizes as well!!!! Added to original post Sunny from OCN has offered up a NVME SSD as a random giveaway! HP SSD EX900 M.2 120gb. Thank you for the awesome prize! ALL PRIZES NOT CLAIMED AFTER TWO WEEKS WILL BE PUT TOWARDS THE NEXT COMPETITION18 points
-
Sure. 4000€ for 3 sticks and you get the rest for free.18 points
-
Hello Hwbot, I have a really special card that I'd like to give away to one random person. To be included in the random drawing, all you need to do is make a post in this thread. After a month or so after this post I will use https://www.randompicker.com/ to automatically select a winner from all the entries. This freebie open to everyone with an Hwbot account made on or before this posting. Back Story A few months ago I was hunting for some nice DDR1 and @Mr.Scott offered to give me a really sweet kit for free. His generosity inspired me to give back but I didn't know how to do so. Then I was up late drinking while shopping on eBay (terrible idea) and I scored a very special GTX460 SOC. After testing the card I was very impressed because it tied my #1 bin card from 16 samples. I do love this card but I thought it would be a perfect way to give back...once it's nicely modded out of course The Card For most of you it doesn't need any introduction. This is the king of 460's and one of the only cards to come with the high bin Samsung HC04 memory (most are lower spec. HC05 or Hynix). While it's a special card and clocks like a monster, it's also problematic because of PWM protection such as OCP/OVP. After going duking it out in the OCN 460 competition I know exactly what this card needs to fly, so I gave it the royal treatment. Mods: Voltage displays: Core, Memory, PLL Core 6-bit VID do defeat OVP OCP disable via SMT part removal This card suffers from a bad CBB around -60c which can be a royal pain when you are benching at -130c and then crash, so that pesky CBB is now gone via hard mod Core FB voltmod Memory FB voltmod PLL FB voltmod What's the catch? I already invested too much money buying the card so I don't want to get stuck with shipping costs too. If you win this freebie I will ask you to cover the shipping costs via PayPal money sent to me. I can ship priority USA for $16. International is VERY expensive, but if you decide to ditch the stock cooler I can get the cost down to about $27 for no-tracking slow boat or $50 ish for priority. If you want the stock cooler and you live outside USA, prepare your wallet18 points
-
I bench every day and when I'm not I'm thinking about it. Is that sad? Some may think it is but I I'm quite happy with it. When I'm not having fun I'll quit. I think that there used to be more of a wow factor in a way and it wasn't so much for hwbot points. Guess that drove to help each other hit big numbers in Xtreme systems threads etc. For instance the copy wazza thread on Xtreme systems and OCX where everyone collaborated and tested together instead of I found a tweak look how great it is, no I won't tell you it kind of like what we have now. The other angle is manufacturer's kind of stepped in and had their way with the place and once they got us pregnant they hit the road so to speak. I remember if you had an ln2 Dewar you could get free gear as easy as an email and most of the time they found you. Now a lot of elite level guys can't even get their mobo rmad as a favor. The battle changed a bit when it went from user a vs user b in a friendly fight to Asus vs gigabyte. I'm guilty of this also especially lately I've gone down the wrong path a bit. I have had the attitude of here are my six friends f the rest of them. I apologize for that, and going forward will be a better diplomat of overclocking. Helping others won't hurt ourselves as much as we might think. I hope benchmate can maybe spark some new blood that are maybe intimidated by the rules etc to join and once they are on the scoreboard they will get hooked. Here's to the future of OC!18 points
-
Hi and welcome to my short review of the 2x8GB G.Skill TridentZ DDR4-4600 C18-22-22-42 RGB memory kit. 1. Optics and specifications The G.Skill F4-4600C18D-16GTZR come in the classic cardboard box G.Skill uses for its DDR4-premium series, the two 8GB modules are packed in a matching memory tray inside. Apart from a sticker with the part-number and specifications, you can also see that the RGB series won several awards, that this specific kit is optimized for Intel systems and that several software suites like RGB fusion as well as the Asus, Asrock and MSI RGB software tools support ways to customize and control the light effects. These are at the moment the highest rated retail kit available in Europe, cheapest shop price is around 510 Euros. G.Skill DDR4-4600C18D-16GTZR The sticks themselves use classic brushed aluminium heatsinks we all know from the DDR4 TridentZ series, one side is gray and the other one black, the top is white and transparent to let the RGB light effects shine. The PCB is black, a quick look with Taiphoon burner shows us it is 8-layer as well as the fact that the chips used are manufactured by Samsung, the so called B-die ICs, eight pieces used on one side of the PCB which is a standard configuration nowadays of 8GB sticks of higher bin. Visual inspection tells then that a so called short trace PCB, also known as A2-layout, is used, this means that the gap in the middle between chip 4 and 5 is wider than on older classic layout A1 is wider. This is more and more common today and meant to optimize low voltage for high frequency. On the benefits and disadvantages of this we will make a notice later in this test. 2. Tests and overclocking Method and test systems The kit was tested using Geekbench3, Intel XTU benchmark and Superpi 32m in windows, apart from this all settings that are OK for daily use had to pass DOS memtest which shows errors independent from cpu or other hardware or software influences, checks the whole amount of Ram and is first choice to check the memory itself. We used 64bit operating systems, no maxmem (limited use of memory) set. Hardware Asus Maximus Apex X Z370 BIOS 1704 Intel Corei5-8600K 2x8GB G.Skill TridentZ DDR4-4600C18-22-22-42 1,5v (F4-4600C18D-16GTZR) Seasonic Focus 1050W For the low timing pro benchmark tests, we used windows xp 32 for SuperPi 32m with waza and Windows 8 or 10x64 with maxmem set to 4000MB, this is necessary because at higher voltage and low main timings. Hardware2 Asrock Z170M OC Formula BIOS 7.21B Intel Corei5-7600K 2x8GB G.Skill TridentZ DDR4-4600C18-22-22-42 1,5v(F4-4600C18D-16GTZR) Seasonic Focus 1050W Results for the Asus Apex X system First of all, we had to upgrade the BIOS to latest version to make the XMP work, then this was easy. Timings of 18-22-22-42 2T at DDR4-4600 were set, voltage was 1,5v BIOS. We made several check, resulting in the lowest voltage for these settings to be at 1.40v. We then went up with the frequency, but had to accept that 4600c18 was already very close to the limit of our IMC on air, so we had to loosen the timings to run a stable 4700 19-26-26-45 2T at 1,4v, we then were able to boot and go to win at same settings but could not reach stability, with IMC voltages already at 1,4v+ and same for DMI voltage, we accepted the imc limits and went on to fid sweetspot settings for 24/7. With a memory kit rated like the G.Skill TridentZ DDR4-4600, you do not want to gift away performance. Having this in mind, we used one of the predefined memory profiles of our board (Raja 4133 1,4v profile) because there is no need to reinvent the wheel when experts did the job, with tightened secondary and tertiary timings for optimal performance and started to vary this and work our way up. After the profile worked easily, we tightened timings again, went up from 4133 16-16 to 4200 to 4300 17-17-17-42-360 and ended up at DDR4-4300 16-16-16-38 360 rockstable at 1,5v, not minimized. All these results are only values to show the potential, your mileage may vary and please take in that the Apex X for me was unable to run 1T at 4000 and above stable with any memory kit at low voltage daily settings with BIOS 1704. On the second systems, I made crosschecks and there it worked flawless with KBL up to 4133, highest divider. Results for Z170M OC Formula system Now, let´s go to the benchmark tests for competitive use. We had to do all of these on our Test-system #2, for a simple reason. Due to the layout, a well known problem showed up on the Apex X, about which we already have confirmed information that it also hits Apex IX – the memory kit, no matter how good it is, with the A2 PCB layout will not post above DDR4-3866C12, lots of kits already fail 3800, and for our kit 3866c12 was end of the road as well. Of course I was not satisfied with this, for me it was clear that the first tests showed that this kit has a lot of benching potential, so I moved on to the Z170 system. After a quick Post test for DDR4-4000 12-11-11-28 1T, which easily worked, I simply moved on to DDR4-4133 12-11-11-28-220 1T and started to move up with Geekbench 3 and XTU. Finally I opted out, due to imc limit, near DDR4-4220 12-11-11-28 tight settings around 2,05v, not minimized or maxed out, set in BIOS. I also checked the kit for the capability to run the famous copy waza tweak, which creates enormous pressure on the ram, at using old windows xp, and 4133 12-11-11-28 220 tight worked easily, with 2v set, not minimized and lots of headroom left. Conclusion and final thoughts After I finished my test suite, the performance of the G.Skill F4-4600GTZR completely convinced me. These are not only the highest rated retail kit available at the moment in Europe, but also extremely well selected and made an excellent job at various settings I tested for daily overclocking and performance optimization. A small annoyance was the fact, that after the necessary BIOS update on the Asus Apex X, I had problems with RTLs and IOLs being quite loose, but this was tested to be on all kits I used for comparison to confirm this. Might be a price to pay for extremely high frequency now, and we all learned that frequency on new systems is one of the most important performance factors. I saw gains at all benchmarks, especially at Geekbench 3 memory performance when optimizing at 4133-4300 C16 to C18 at below 1.35-1,5v, and stability was excellent. This was extremely important for me because 4600 needed very high memory controller and dmi voltage to work. Second annoyance was the compability problem with the memory layout and the Apex, I will do no fingerpointing here, but the fact that the A2-Layout is used for years now by nearly all leading manufacturers of oc memory and that pro overclocking at 4000c12 works on Z170 boards for example raises some questions for me, especially when influential members of the industry emphasize A2 is becoming more and more of a standard. I will not include this in the pros and cons, this is not a mainboard review. Now let´s see my pros and cons. Pro Excellent performance, IMC is the limit Good capability to run tighter timings at high frequency at daily useable voltage Scalable RGB lighting for modders and performance enthusiasts Awesome pro benching capabilities Limited life long manufacturer warranty Con High price 4600+ needs high board and imc voltages – this is a problem for all kits rated this high Thanks for reading My thanks go to G.Skill and G.Skill Deutschland@FB for the support and the sample. Published first on OCX forums18 points
-
So @Leeghoofd has been having to deal with more BS than usual, exemplified best by someone thinks that it's totally reasonable to expect someone to morph into a full-time paid ten-man team who could actually distinguish between cheating and magical efficiency on linux subs, along with numerous poorly-worded whines about country cup. Quite reasonably, this has led to him getting sick of it all and saying he's going to quit. Alby, I don't blame you for a minute if you go through with that. I can hardly sit here and tell you not to, I quit running a large discord server earlier this year for pretty similar reasons. But I do want to take this moment to say something that should have been said much more, much earlier - thank you. I know how shit it is dealing with a community that sees you not as a person, but as a faceless entity they can yell at and demand things from. I really appreciate all the work that you've put in, with modding and competitions, to keep hwbot and competitive OC alive. I know I haven't always agreed with every call, but what matters at the end of the day is that a call is being made. Regardless of it you quit or stay on, thank you for everything you've put in. I know I'm far, far from the only one who feels this way. I'd encourage everyone to share their thoughts in this thread, not just click a reaction button on a post, but say what they personally think. Let's share the love.17 points
-
This seems to have gone stale and it's been about a month, so I will end it today. Everyone who posted in here had an equal chance of winning, except 'kicsipapucs', as he did not want to be included in the drawing. Please take a look at the project, you should see your name there. The great part about this site is I can only draw once and I have no control over the outcome, it's very official and also free to use. To view the full public record of this drawing please check out the link: https://app.randompicker.com/protocol/660992x60647 You can search your exact forum name (copy/paste) to see if you were included in the drawing. The winner is: l0ud_sil3nc3 PM Incoming
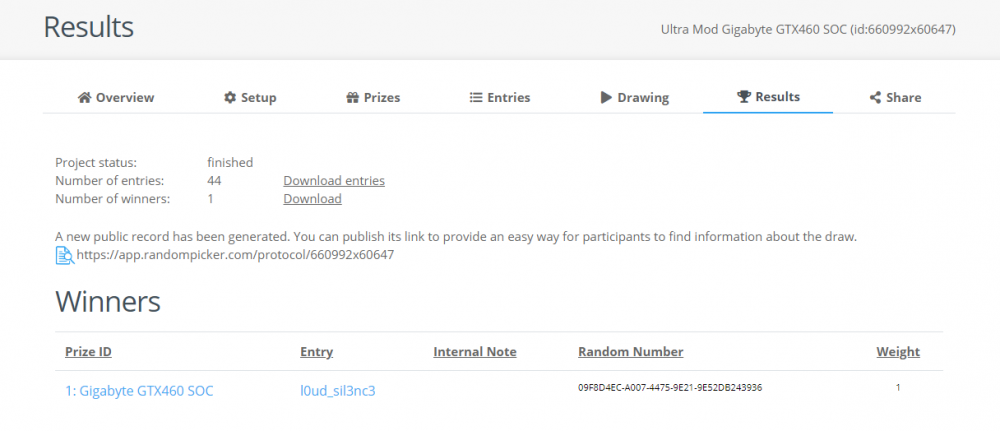 17 points
 -
Albrecht is one of the few people I can call a close friend in overclocking. Absolute legend of a human being, rock solid character and always a team player. Couldn't be praised enough! Beers on me when we see each other! ? (found a picture from when we got 2nd on the Gigabyte tweaking event many many many kilograms years ago) (
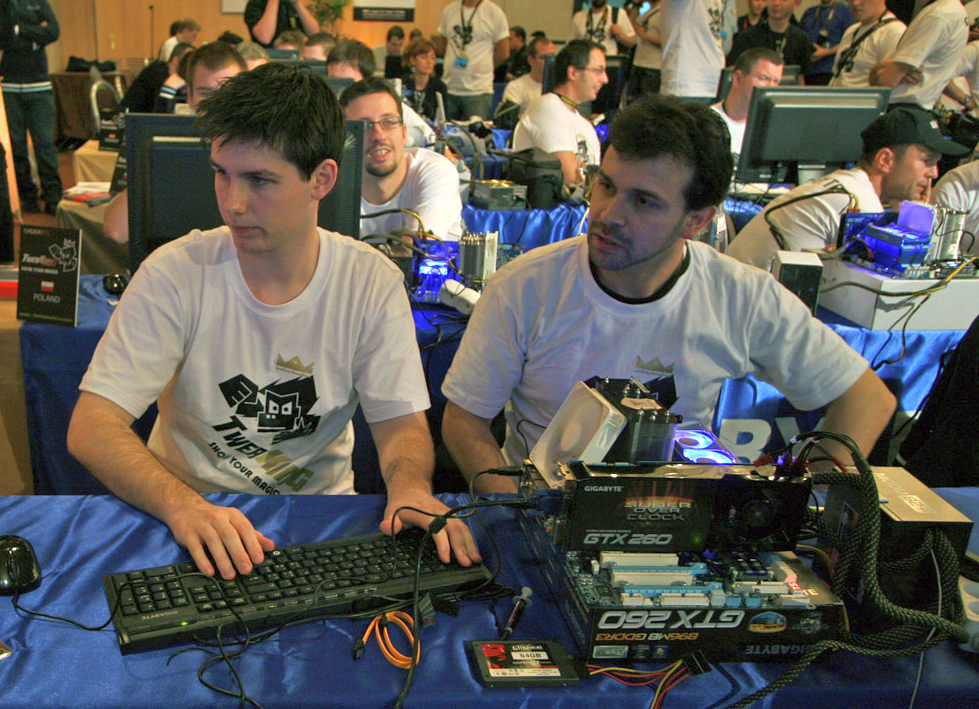 17 points
 -
Yes, sorry things are going slowly. A very limited number of samples have gone out for development testing. Also got the first pictures from the factory where I've ordered an initial batch. Unfortunately they messed some things up and will delay this another week or so while they produce a new PCB. Here it is in action: https://youtu.be/Fbw1CZp-GNE?t=381 Quick specs: - 3x I2C headers working at 3.3-5.0V - 1x UART header, TX 3.3V RX 3.3-5.0V - 1x SPI header 0.8-3.6V with on-board controllable LDO for feeding power - VMOD header which is essentially the same as ROG Hotwire (sense and modify the feedback circuit of a voltage controller) - Built-in USB bootloader for firmware upgrades (essentially unbrickable) - Micro-USB cable for connecting to the PC Bundled: - 3-pin 2.54mm to 3-pin 2.54mm 40cm cable (I2C/UART) - 2x 3-pin 2.54mm to open end cable (I2C/UART) - 2x 2-pin 2.54mm to open end cable (VMOD) - 1x 1-pin 2.54mm to open end cable (Ground) - SPI cable for Asus motherboards - SPI cable for MSI motherboards - SPI cable for Asrock motherboards (SOIC8 test clip can be bought separately for Gigabyte boards, they don't have headers for flashing) Additional info: - I2C1 supports I2C listening/sniffing to figure out what's being sent on the bus it's connected to, which is very useful for figuring out how to talk to undocumented ICs - I2C3 supports SSD1306 128x64px I2C OLED displays as seen in Roman's video for displaying various information (optional add-on) - The SPI header is targeted for external BIOS flashing. Can be very useful for flashing mod-BIOSes or recovery. Can also be used to update the EC firmware on some boards.
 17 points
 -
Thought I'd let it go wild. A benchBIOS made by Hardware Hackers (me in particular). Been known by some for about 10 years. The thing is, I didn't add any features, it was all there done by Asus, I've just unlocked them and made some bench-related changes. List of changes: Based on latest 1024 beta Set by CMOS default: 1) No logo screen 2) Floppy disabled 3) IDE timeout = 0 4) Overclocking mode = manual 5) MPS 1.4 6) Timings set manually 7) Spread spectrum disabled ? Onboard devices = disabled 9) Speech POST reporter = disabled 10) USB timeout = 10sec 11) USB Highspeed = enable Moved following menus: 1) Hyperthreading moved to jumperfree (it's the only option needed in CPU configuration so moving in jumperfree saves some time) 2) Moved PCI Latency to chipset settings (it's the only option in PnP that is useful for changing for PCMark for example, so moved to a more popular section) 3) Moved memory timings to jumperfree except burst length (from previous investigations this menu doesn't do anything and I don't like useless things). 4) New memory divider menu has replaced the old one 5) DRAM Command Rate placed in Jumperfree under main timings 6) Created an "Advaned memory settings" submenu in Jumperfree and moved subtimings there (Burst length, Idle Timer, Refresh Rate and ECC capability too) 7) Placed Microcode updation instead of "Max CPUID level 3" (who needed that one anyway?) in CPU configuration. ? Placed AGP 4x Override under "Graphic Adapter priority" in chipset settings. 9) Removed AI tuner menu So Jumperfree currently has frequency, voltage and timings on one page and that makes it close to AI tweaker. Keyboard input for FSB frequency - it was such a waste of time to set the required value by pressing + or -. Unhidden menus: 1) All strap & memory dividers available despite the FSB frequency and labled clearly (by Asus, not me) 2) Command Rate 3) Dual Channel Organization 4) Write to Read Command Delay 5) Write Recovery Time 6) Write-Read Command Spacing 7) Read-Write Command Spacing ? Read Delay 9) Dynamic Read Delay Adjustment 10) Microcode Updation 11) AGP 4x Override P4C800-E mod.zip16 points
-
OC eSports Link DISCORD LINK Intel Alder Lake CPU's only. In-house overclockers are not allowed to enter this competition. Participants must use commercially available components and Software ( Engineering Samples of CPU, memory and motherboard are not allowed). The Hardware must be available at the launch of the competition Bios version and OC Tools need to be readily available to others "at least 10 days before the stage ends". Hardware sharing is not allowed. All submissions must include the official Competition desktop wallpaper All submissions must include a picture of the working overclocking setup (MB, CPU cooler clearly visible). After the end of the competition, no more submissions or rectifications will be allowed. We expect fair play from everyone. HWBOT and INTEL reserve the right to remove results and/or participants who compete unfairly; The decision is final and will not be discussed afterwards; Examples of unacceptable behavior: Influence others’ submissions to profit your ranking, Deliberately make a mistake in the submissions process and ask later for change. Cheating on cooling method or Software hacking. HWBOT and INTEL reserve the right to reject any entry. HWBOT and INTEL have the right to ask for video proof if needed. Thus ensure you have footage available of your best scores! Hardware Must use commercially / retail available components. Intel Alder Lake CPUs only. One stage is limited to the Intel Pentium G7400! Software Windows 10 submissions only. No Windows Server or Windows 11 versions allowed. CPU-Z 2.01 or newer version only. BenchMate 0.10.9.2 Stage 1: Geekbench 5 Single Core 26th June till 24th July Maximum core/cache frequency of 6505 MHz. A VALID Geekbench link is required registered on your HWBOT username. HWInfo monitoring is required during the run, min - avg - maximum CPU clocks must be visible in the screenshot! Include pictures of your overclocked setup. Prepare Video verification. Stage 2: SuperPi 32M by BenchMate 10th July till 08th August Maximum core/cache frequency of 6505 MHz. Maximum memory Frequency of 4800 MT/s A CHECKED CPU-Z 2.01 (or newer) Validation link is required, registered on your HWBOT username. (no XOC mode) HWInfo monitoring is required during the run, min - avg - maximum CPU clocks must be visible in the screenshot! Include pictures of your overclocked setup. Stage 3: CB R11.5 by benchMate - Pentium Gold G7400 24th of July till 21th of August Pentium Gold G7400 CPUs only Maximum CPU Multiplier of 34, Maximum CPU/Cache frequency of 5500MHz CPUZ 2.01 or newer CHECKED Validation link is required, registered on your HWBOT username. HWInfo monitoring is required during the run, min - avg - maximum CPU clocks must be visible in the screenshot! Include pictures of your overclocked setup. Prepare Video verification. Stage 4: X265 4K 7th of August till the 4th of September All out CPUZ 2.01 or newer Validation link is required, registered on your HWBOT username. Include pictures of your overclocked setup. Prepare Video verification. Final Notes In case of a tie, Stage 3 score is the tie breaker. Points per Stage 50-47-45-43-41-39-37-35-33-31-29-27-25-23-21-19-17-15-13-11-9-8-7-6-5-4-3-2-1 Prizes: Contest Winners Thanks to the generosity of our partner INTEL the overall winners at the end of the contest will receive the following prizes: 1st Place : $10000 USD 2nd Place: $5000 USD 3rd Place: $3500 USD 4th Place: $2000 USD 5th Place: $1500 USD 6th Place: $1250 USD 7th Place: $1000 USD 8th Place: $500 USD 9th Place: $400 USD 10th Place: $250 USD - On the 10th July we check who is the fastest overall. This person gains (another) $1000 USD [checked in the afternoon between 3 and 6 pm CET]: RAUF - On the 24th July we check who is the fastest overall. This person gains (another) $1000 USD [checked in the afternoon between 3 and 6 pm CET] In case of a tie , Stage2 is the tie breaker: RAUF - On the 7th August we check who is the fastest overall. The person gains (another) $1000 USD [checked in the afternoon between 3 and 6 pm CET] In case of a tie Stage3 is the tie breaker: RAUF Official Masters of the 12th Gen wallpaper:

 16 points
 -
Hey everyone, it's time for another freebie! I was going through my hardware recently and came across the KPC Venom container. This is such an iconic and legendary CPU pot but I just don't use it anymore. It's still one of the best all around pots and is especially good for 'fullpot' LN2 or Dry Ice. Rather than let it collect dust or sell it, I'd like to just give it away to someone who will use it and love it the way I did. The container has been lapped and it's in excellent condition. Other than the base sanding, it's in OEM condition with no mods done. I am including a KPC thermal probe and all original hardware except the back plate. Unfortunately the back plate has been used to death and butchered up for other projects, so it wont be included with the freebie. Shipping: I will pay USA shipping, but international people will need to pay the entire shipping bill, and it could be over $50 USD Who's eligible: Everyone in good standing at Hwbot! However, I really do want to see it put to use, so only enter if this is something you would use. How to enter: Just make a post in this thread. Winner selection process: The freebie will be open for about 4 weeks. I have asked @Leeghoofd to conduct the drawing on my behalf from the entries. I will 'close' the event and then turn it over to him to randomly select a winner.
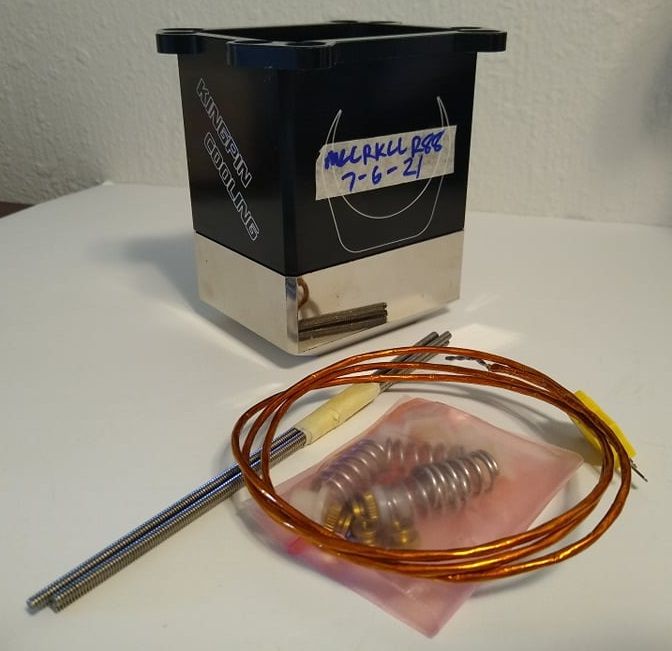
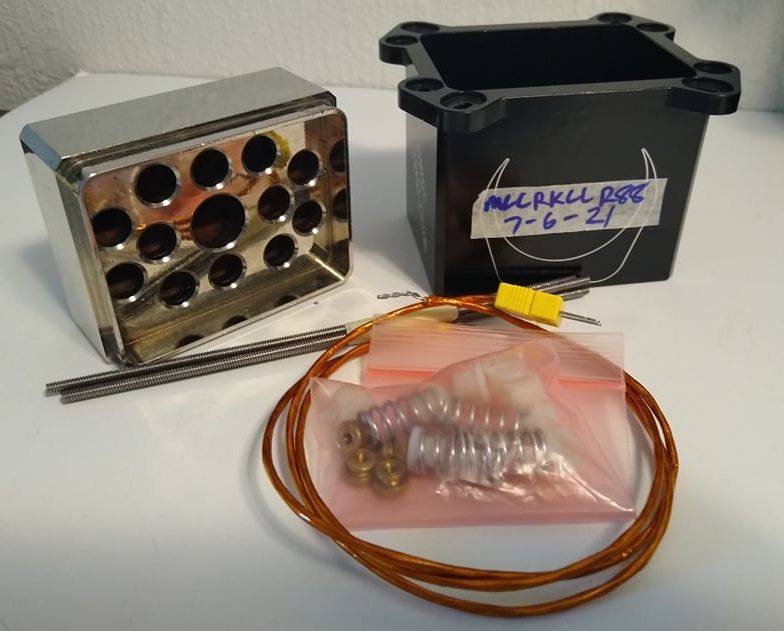
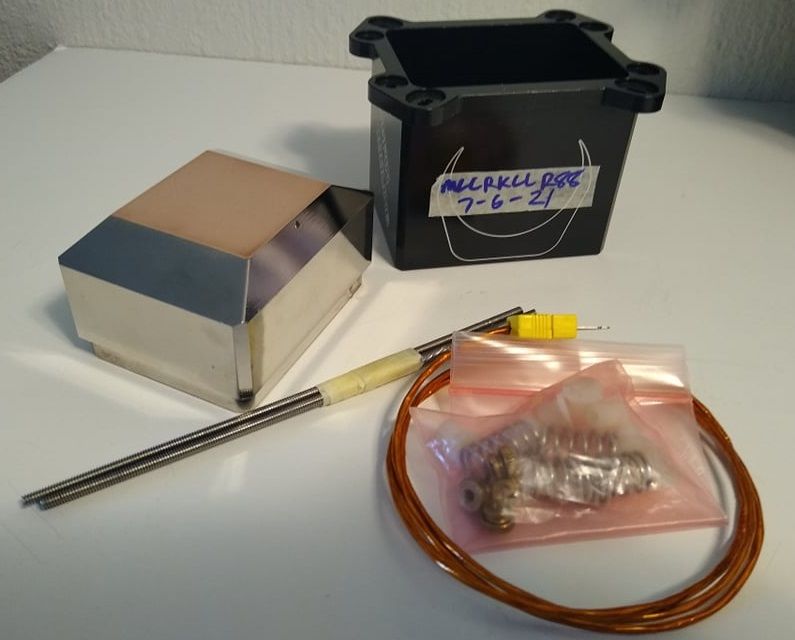 16 points
 -
The past is the past, noone wants you to forgive nor forget, I would just like all of us to move on.... Nothing me nor the new management or whatever you want to call them are affiliated with. PJ's dream was big and this resulted in some great events like Gamers Assembly in Poitiers and the ones at Computex. Some events were labelled overrated and maybe in the eyes of many not even worth to be present at all.Nevertheless it allowed people from e.g. Australia, Brazil and Indonesia to participate at the Grand OC Final in Berlin. An experience for them, that otherwise would never had been possible. PJ had great ideas, but I guess the site couldn't keep up the pace. For your info the last years the Bot was running break even, meaning Frederik could just cover the server costs. This thx to the great overclocking friendly companies like G.Skill and Galax. This lack of extra budget is probably the explenation that not much development or bug fixing happened. I don't need to tell you that in 2020 Frederik nearly payed most of the server costs himself, as most events got cancelled. Kuddos to Frederik for doing that. Without him I would not be typing at this forum right now. Also people still believe what they want to believe, but there are or were no big contracts with any CPU brand for the last 2 years. If they have real proof than just here-say, let them play their cards... Bussiness plan? What bussiness plan are you referring too.... I heard I got payed big cash too, suuuuure. I nearly payed all of my trips to Taiwan just to hang out with the crazy OC people. All my free time goes into this place, I don't even have time to bench anything myself. We need to bring the HWBOT back on the rails and improve it. This will take probably at least till the end of Q1 or even Q2. Improvements are required before we can engage ourselves to host big vendor competitions again or look for sponsorship. Most important of this long reply is that Roman and his associate Eike are giving this site a second chance. I'm more than gratefull for this opportunity as we are making big progress behind the scenes. To be honest I was more than done with the self destructive attitude from some people here, that it made me nearly quit this scene. The same bad vibes that made icons like Ney and Websmile leave the building. However I came out stronger thx to Roman and co. The latter is one of the reasons I will moderate all crap talk like there was before in this thread. Let it be a warning for the members that bring their real life frustration to our place of fun. I won't call names, but if you think this is the place to ventilate your personal issues or just want to blow things up for shits ang gigglez, you are dealing with the wrong old guy. I will remove it once, 2nd time you get an official warning and strike three you are out. There's no room for negativity Alex, life is already hard enough, just relax bro. The people you are upset with are not calling any shots anymore. Let it go... Me, Roman and Eike want this site to properly work again and allow OCers to have fun again and especially preserve the great Database. Fluck the past, we are moving forward bro!!!!16 points
-
Hey there I hope everyone is doing good so far and you had a decent start into 2021. As you've probably seen there is some movement right now with our coder understanding more and more how things work on the bot. Albrecht is in good contact with him and I'm sure we're getting there. Right now our priority is still to fix stuff which is not working and work on the most important updates. There are few things I want to address quickly: Benchmark Updates: Albrecht created a power point for us to see what kind of changes the community wants to see regarding benchmarks. Personally I'm totally open and we can just follow whatever the community wants to see. You guys eventually have to play on the field so you can also give feedback on it. Finances: Financially we currently have costs of about 4000€ per month which we have to cover somehow. I'm not trying to earn any money of this project and just want to keep it alive and improve things if possible. About 900-1000 € per month is the hosting cost right now to pay domains and keep the servers running. The rest is to pay the coder and the taxes/health insures and all this stuff we have to pay for him. I'm trying to be as transparent as possible. Besides that there are no additional costs we have to cover at this point. There are multiple ways we can cover the ~4000€. At a certain point we will try to form partnerships again with e.g. G.Skill, ASUS, Intel or whoever wants to join. Right now as long as the site is not 100% fixed we will just try to get some parts back by hosting competitions but also due to corona it's very difficult to see how things evolve with Computex and so on. As I mentioned in my initial Post from earlier 2020 I'm going to set up a Patreon page for HWBot within this week and hope that some can help us keeping this project alive. Thinking about how much we all spend on hardware and LN2 per month I hope we can find some guys to donate monthly in a range of like 10-25€. I hope we can cover some good part of our cost this way and stay independent. Nothing of this will be mandatory and you will not get benefits for donating. Well you can have fun on here which is a cool thing I guess Annual Ranking - Overclocker League 2021/2022/2023...: Albrecht told me there is a good interesting in keeping an annual ranking which is also fine to me. Eike and me will change the way this ranking works to make it more interactive, easier to understand for newcomers. More details on this once we have tested our idea. Tweaking/Cheating: This is probably the only part where we're taking a decision some of you might hate but this is also a major part for constant trouble in our community. As long as I've been part of OC this always lead to drama, confusion and anger. The general issue is that we have to decide which part is considered a cheat and which part is considered a tweak. Objectively speaking both things are pretty much the same. In an ideal world all overclockers would tweak their hardware and press start on benchmarks instead of finding every loophole to somehow receive a higher score even though the hardware is still performing on the same level. We all know this is never going to happen because overclockers are overclockers. If there is a grey zone or a loophole it will always be used (I did the same in the past) Right now we have such complex rules and have to use tools such as benchmate because we all made our own lifes harder and harder every single year. Instead of adding a new rule every few weeks to limit the damage we will take a different approach: Only tweaks which are known to moderators will be allowed. If there is a new tweak which has not been discussed with moderators and it is used it will automatically be considered cheating followed by a temporary or permanent ban. Everything which measurably changes the performance will be considered a tweak. It doesn't matter if it's 0.5% or 20%. What you have to keep in mind is that we want to make this hobby more appealing to new people and if you need to know 300 tweaks for each benchmark in order to be competitive it won't improve things! I will keep you updated on the Patreon page and ofc whenever the new rule will be activated. Thanks! Roman16 points
-
Elmor recently started taking orders for the AMPLE 20A power card. It’s a simple little single-phase VRM that can be used to replace a broken VRM or simply overcome that pesky OCP/OVP. The most common potential usage would be for a GPU memory rail. However, with an output voltage from 1.0-3.4 V it could be used for many different applications. I obtained a test sample of this new device and I intend to put it to the ultimate test. I have an RX 580 GPU with a damaged memory voltage rail, but otherwise the GPU is in perfect condition. The plan is to solder on the AMPLE power card and observe the impact on the memory overclocking. I know what the card was capable of before the memory VRM died, so it’s the perfect test case for this little device. So follow along as I put this thing to the test and find out if it’s capable of delivering sufficient power to 8 GB of GDDR5. The AMPLE Device The device ships in an anti-static bag with the 6-pin connector added in as an accessory. This gives you the flexibility to power up the AMPLE from any qualifying voltage source you desire. Product Specification Output voltage adjustable 1.0-3.4 V using the on-board potentiometer (range can be increased by adding your own potentiometer) Nominal input voltage 12 V (functional from 4.5 V up to 16 V) Max output current 20 A (thermally limited). Active cooling may be required to achieve high output current. Efficiency at max output 91.5% (3.4 V, 20 A, 750 KHz) Switching frequency selectable between 300 KHz and 750 KHz OVP (+20%), OCP (24A) and OTP (Tj = 150*C) Output voltage can be monitored and adjusted using the EVC2 VMOD1-header Ships with a PCIE 6-pin power connector which can be soldered on by the user Source Credit: elmorlabs.com There is one switch on the device which acts as a mode selector. There are a total of 4 different combinations you can set, which change the output delivery settings. Switch 1 OFF = 750 KHz switching frequency Switch 1 ON = 300 KHz switching frequency Switch 2 OFF = PSM = Power Saving Mode, higher ripple but lower loss at low loads Switch 2 ON = CCM = Constant Conduction Mode. The PMIC is always regulating to the best of its ability, for the tightest possible voltage regulation. In some cases, for example with this project at 3.0V+, that will create a high loss in no-load or low-load situations. For controlling the voltage there are multiple different methods you can choose from. To make things simple, there is a potentiometer on the power card for direct control. For more advanced control, you have the ability to integrate the device with an EVC2 module using the vmod connection. Mounting the Power Card Before you just hastily solder on the AMPLE device, you should take the time to power it on and make sure it works. I would suggest powering it up and setting the desired voltage before you attempt to solder it on a GPU. The underside of the AMPLE has power and ground planes. In my particular case I won't need these connections so I decided to insulate them with a few layers of Kapton tape. This is an unnecessary step, but in my case there were a few components on the card which were extremely close to shorting on the AMPLE device. I chose to mount mine with 0.8 mm copper plate. I kept the plane-to-plane distance as short as possible. Furthermore, I always prefer to make my ground connections on the front of the card after where the main connection is. In the picture below you can see both ground connections come after the memory plan connection. In my testing this provides the best realized MHz whether it be core or memory external VRM replacement. Test Setup The overall goal is to compare stock PCB memory overclocking with AMPLE power memory overclocking. To make the test consistent, I will use the same load voltage for both test conditions. The test methodology is to overclock memory and record the passable frequency in Fire Strike GT1. I will start at 2280 MHz, increase +10 MHz until it becomes unstable PowerColor RX580 8GB Golden Sample Z490 test platform AMPLE VRM on memory rail Memory IC: Micron D9VVR 1625 MHz strap timings copied to 2000 MHz strap (Most efficient timings possible without diminishing returns on frequency) In order to get a realistic look at the voltage response of the device, I have placed voltage test points (TP1-3) at various distances away from the main inductor. During the load tests, I will also be conducting thermal tests of the mosfet heatsink. Ambient temperature for all tests around 24c The voltage read points are as follows: TP1 = AMPLE power voltage at C10 cap TP2 = GPU plane voltage at solder connection TP3 = Memory IC voltage at MLCC cap on back of card, at least 100mm distance from AMPLE Vout solder connection Test Results Voltage droop is the enemy of external VRM mods. It’s important to know exactly where the voltage droop occurs because it can narrow down the cause. The voltage test point results indicate that the droop is not caused by the solder connection. The voltage droop is present at the C10 capacitor so therefore it’s coming directly from the AMPLE VRM. This makes me happy because the solder connection is relatively perfect, but it’s mildly concerning to see the AMPLE being stressed under load. Regardless of any droop, the card was still able to pass FS GT1 test at the highest possible memory frequency. There is effectively no difference between the stock VRM and the AMPLE VRM for this test application. The temperature reached a peak at the end of GT2 and was still climbing. With the Fire Strike test, GT3 is CPU based so it had a cooldown period. The max temp of around 50c seems reasonable but further testing may be needed. Sustained loads of 1hr might show a different result. SW1 Test results proved inconclusive. Disregarding experimental error, there was effectively no difference in the realized MHz or voltage response. Conclusion Overall I am extremely pleased with this little device. It performed exceptionally well and the end result is that I was able to achieve the same overclocking performance as the stock PCB. The AMPLE single-phase power card has been validated for benchmarking purposes. In terms of the switch options, my expectation was that CCM mode with 750 KHz would be the optimal configuration. The switch test results showed that the various combinations didn't have any noticeable effect on realized Mhz or voltage response. The 10 mV voltage droop is a mild concern because it’s coming directly from the AMPLE, however, it did not affect the overall overclocking result. With a price tag of just $20,, it’s an absolute must-have tool for extreme overclockers. My RX580 is the perfect use case. The card was effectively dead and useless, but the mighty little AMPLE device brought it back to life and it still holds gold in TIme Spy. Even if the price was tripled, I would still recommend it because of its potential value. This was just my first test, stay tuned for more tests to come.16 points
-
16 points
-
A little bit of progress, this is already quite a few revisions in...
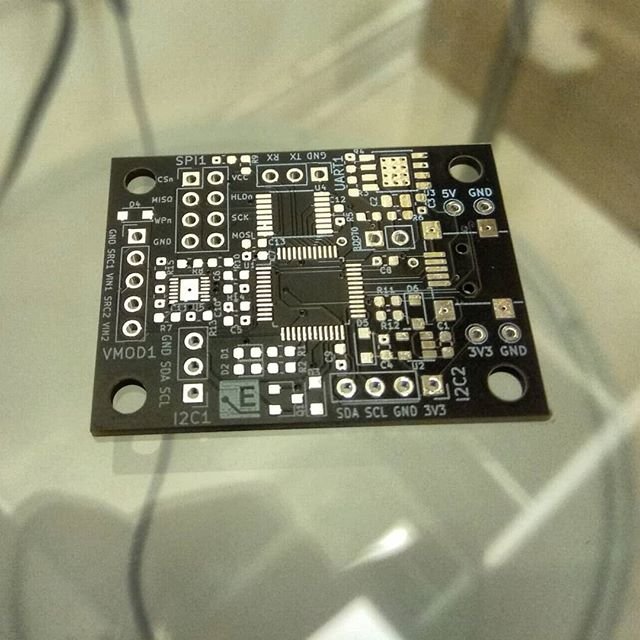 16 points
 -
Come on man, dont quit we need you. Make your decisions and stand by them. You are the mod not the user16 points
-
3D benching as we know it is broken. Plain and simple. What are we going to do about it? RTX-4090's are great cards but they also bug very easily. We need to be better users. If you see your score jump 1k point after raising your mem clock 15mhz that is not normal and not a "lucky" run. When your entire screen is tan from an artifact spanning your entire monitor and your score increases 10% it is not a "lucky run." In my opinion after a first warning we should issue a vacation for the user. After 2 minutes of research it is quite easy to see a bugged run. Which 2 look normal, which 2 look equally strange? Going from the pictures alone is easy but when I add the clock frequencies maybe it can help you even more. I propose that: 1. If you post a known bugged run you get a warning, then a vacation. 2. If you are "unsure" then ask a mod or even me if it seems out of line. It is quite easy to read. 3. We require monitoring already in 3dMark benches, I propose we show the FPS and FPS average graph section in the result screenshot, if you cant fit it add a second screenshot with it. 4. Always welcome to video / disclose tweaks to mods for doubters. With the blessing of Roman/Albrecht, people have a week to remove results that "oh maybe it did have a lot of artifacts, or maybe it does seem too high" before we dive in and hand our warnings, or vacations for multiple infractions. Im sorry if you feel like I am always the one exposing this stuff, but why do I always have to be the one to do it? We all work hard on this stuff and an even playing field is the of the utmost importance. Without it this places means nothing. Let's do better, and be better.

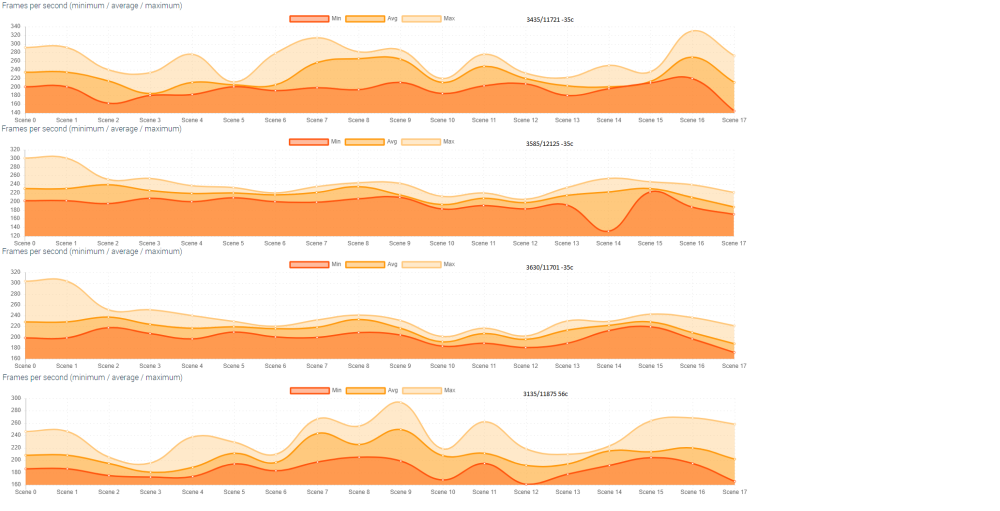 15 points
 -
Small recap of the day: I removed a certain score and hate account today in a blink of an eye. Not even being remotely interested who's behind it or what games one wants to play. To make it clear: if there's something you don't like about BenchMate, no need to continously flame about it, one simple advise: just don't use it ! To ensure that everybody is on the same page: If this trend continues I will continue on my spree and will issue warnings, temp ban users from the forum and if the attacks & nagging continues it will ultimately lead to blocking your account. FYI BenchMate is here to stay , it allows us to use AMD CPUs on modern Operating Systems. For the current gen of OCers the easy submitting via the wrapper is a huge bonus and on top of it all, BM adds additional layers of security so the moderation Team has an easier task. Thus some respect to the developer and his team are in order. Question yourself: Did you pay one cent for the hours they invested to make our benching experience easier? Once more, If it is not for you as it is doesn't live up to your requirements or if it does make your blood boil or that you are sure it limits your OC endaveours, just continue to bench on older Windows versions for AMD and let it be. Similar accounts for specific bashing of competitor's scores, we know who you are, question is do you realize it that the universe doesn't rotate around you? The choice is fully yours, just don't waste my precious time nor harras other members of HWBot or the BenchMate team. Trolls are not appreciated and will be adressed accordingly... This infantile behavior has to stop Maybe a tip: Just go and hide in your fav tree...
 15 points
 -
Well I’m giving this initial post a little update for everyone. The server formally called LN2 Haven has been swapped over to being the Official HWBOT discord server. The server is geared towards HWBOT and it’s members. You will find multiple staff members inside the server along with multiple benchmark developers. we are here for you guys. Share feedback, bench reports, experience, etc. what does this mean for current members? Nothing. Same great community with just a new branding. for new members I would like to extend a huge welcome and enjoy your stay. The Official HWBOT Discord Server15 points
-
Apparently CPU-z wasn't bin to win enough as is. So next are we gonna ban maxmem for memory frequency valids and require all mem channels instead of just 1?15 points
-
No, I bought it to increase my personal points by +10.000 without having to bench15 points
-
I browse old rankings a lot so I thought I'd use this time to also pick out some notable retired OCers - there's no bombproof way of telling whether someone is retired so if any of you are still around just reply here and accept my apologies! @knopflerbruce - one of the few to run AM2 on LN2, almost 3,000 hardware golds - most ever. No subs since 2017 @Christian Ney - memory OC legend and of course one of only 6 people to get the Aquamark achievement @Mad222 - King of AM3 with the only sub 10 mins SP32M. No subs since 2013 but possibly doing some work under the @GalaxOCLab group account? @fredyama - similar to Mad, still occasionally active on group/manufacturer accounts . SP32M records in the 3770K, 7700K and 9900K eras. @AndreYang - I can't believe he hasn't subbed on his personal account since the Haswell era! His 980X Pifast WR may be the result with the most comments (127) @alibabar - First in the hardware masters rankings by over 10,000 pts even though there are no subs since early 2018. @dhenzjhen - owner of absolutely nuts scores like 7x Titan X Pascal GPUpi and quad-Xeon setups. No subs since 2017. @Massman - knows for being one of the few to be crazy enough to bench iGPUs and APUs on LN2 outside of comps @8 Pack - owner of multiple 3D global podium spots even though he has been inactive since 2017. @Vivi - still has the 780ti and 290x '03 records after all these years. @S_A_V - owner of the PCMark '04 record on LN2, on Phenom! Still ranked 5th in Russia after years of inactivity @Ananerbe - strong AMD bencher in the AM2/AM3 era with many 1M/32M podiums and 8.3+ GHz on Vishera @michel90 - still ranked Top 30 Extreme and #1 in Switzerland after almost 2 years of inactivity. Master of Geforce 200 series legacy 3D and 775 SuperPi @CherV - Not sure how I could miss her in my initial list! By far the top female overclocker of all time and hugely infuential around the FM2 / Ivy Bridge era @The_Game - Expert on the LGA775 socket, still holding two major Wolfdale 1M golds and being in the very small 725 MHz+ BCLK club @Aristidis - Part of the Greek XOC "gang", particularly strong 3D bencher during the Ivy Bridge era @TaPaKaH - King of 775 benching and binning but also a hugely influential figure in the overclocking community for more than decade. @Xtreme Addict - What to say about this larger-than-life figure? He made excellent LN2 OC guides and benched both 2D and 3D (all the way up to 4-way) at a very high level. Suggested by other members (thanks @zeropluszero, @Fasttrack, @suzuki, @Bullant and @Achill3uS): @dinos22 - for some reason the first thing to come to mind was that sick G3258 32M and also the 4-way '03 that stayed GFP for 5+ years. Aussie OC will miss you! @sofos1990 - so many insane 3D scores but the sub that sticks in my mind was the full-on crazy scientist DDR3 alltime frequency record with oscilloscopes in the rigpic. @hipro5 - 3D heroics are a little too far in the past for me to judge how amazing they were but that 680+ FSB E8600 all-time LGA775 SP1M record is ridiculous @SF3D - Only one to push the REX to over 700 MHz BCLK valid, but that's a silly achievement to point out here Extremely influential bencher with his own line of pots @poparamiro - very prolific classic 3D bencher on chiller, his scores are so ubiquitous in the rankings that I didn't even realise he was retired! @chew* - owner of the all-time Thuban 32M SP32M record and one of only 2 (besides Mad22, mentioned above) to achieve sub 12 mins @K404 - multi-GPU LN2 God who ran everything and anything around the GTX8000 / 9000 era @nachtfalke - the LN2/Cascade/SS version of poparamiro @robbo2 - one of only 5 benchers to do 8 GHz on both AM3+ and FM2 Who am I missing? It's kind of weird how so many of them stopped in 2017.15 points
-
Yes - here it is15 points
-
This. I know i have no voice here plus i lack the knowledge to help Frederick, but one thing i know: the way team points team rankings will be in rev.8 more people will abandon this ship. Please take this words that i'm writing in consideration before moving to rev.8. @richba5tard Frederick i can imagine how busy your life is, i have "only" two small kids here to spend time and money + job + wife attention + second graduation + family, not easy i know, but even with all this i'm able to find some time to do my only hobby: overclock, from 386sx to z270, i love this, and i really want to keep doing it here with Hwbot.15 points
-
A recent discussion in the Team Cup 2018 thread unearthed a rather peculiar performance boost in GPUPI with Llano CPUs. The boost happens with all BIOS versions below AGESA 1.1.0.3 and shows nearly twice the performance in GPUPI while other benchmarks are not significantly affected. Thanks to @mickulty I was able to look into this issue to help the moderation of this Team Cup stage. My first step was reproduce the performance boost. I tried Windows 7 SP0 and SP1 and both showed the boost on a GIGABYTE GA-A75-UDH4 with BIOS version F4. Flashing to F5 or F8a removed the performance advantage again. This can be reproducable every time without a single exception or variation. The next point on my todo list was to check if GPUPI "does the work". I validated that by using GPUPI's intermediate result dumping feature, that creates a dataset which is normally used for virtual devices to test the implementation without actually calculating anything. Side note: These virtual devices are needed to test GPUPI's thread scheduler and its scaling. The intermediate results were 100% valid and showed that the benchmark is calculating 100M correctly without any shortcuts. Next up was OpenCL. Maybe the IGP of the APU helps with the work? Although theoretically impossible because Llano's integrated GPU does not support double precision calculations, this was a good opportunity to try the new native path of GPUPI 4 that's currently in its Alpha version. It is based on OpenMP, a threading model only compatible to CPUs. The resulting score is even better without using OpenCL: BIOS F4: BIOS F5: With the native path the calculation is completely transparent in my disassembler, so it is easy to statically analyze the involved instructions. I was able to narrow it down to the 64 bit integer Modular exponentiation. To make it even easier to work on test cases and optimizations I have a small toolset ready to create micro benchmarks with small parts of the code. I used these to show the following test cases: BIOS F4: BIOS F5 and F8a: What you see here are two micro benchmarks for the modular exponentiation as it is used in GPUPI. The left window (test-modpow-pibatches-dynamicdiv.exe) does multiple modpows with different base, modulo and exponent and shows more than twice the performance per batch for the F4 BIOS (~3 seconds VS 8.x seconds). The right window (test-modpow-pibatches-staticmoddiv.exe) calculates only the third modpow from the left window over and over. Although that should be the same calculation this time there is no difference between F4 and F5/F8a - both are ~1.4 seconds. That's where it starts to get interesting for us! Why is it so much faster to calculate only one batch over and over (8.8 VS 1.4 seconds) and where is the performance boost now? The devil is in the disassembly: What you see here are the inner loops of the modular exponentiations. On the left is the slow multi version and on the right the faster 3rd modpow. You need to know now that the modulo is calculated using the remainder of a division. When you search for a div instruction in the faster code on the right you won't find any. That's because we declared the batch with a static variable (more or less) the compiler was able to optimize the always horribly slow 64 bit div and filled in two multiplication, a bit shift right and a subtraction instead, which is way faster. So now we know that these instructions are not the problem, the perform equally on both BIOS versions. And that leaves us with the solution: The performance of the 64 bit integer div instruction. Finally I was able to write the micro benchmarks that exactly show the problem in numbers: BIOS F4: BIOS F5/F8a: From left to right: 64 bit integer multiplication: F4 ........... 0.84s F5/F8a ... 0.84s 64 bit integer modulo F4 ........... 13.7s F5/F8a ... 33.86s 64 bit integer division F4 .......... 13.69s F5/F8a ... 33.86s TL;DR: The performance difference is reproducable at any given time GPUPI does the work The 64 bit integer division instructions to calculate the modulos inside the Modular exponentiation of the GPUPI core are responsible for the performance difference Starting with AGESA 1.1.0.3 on FM1 presumably all APUs calculate 64 bit integer divisions about 2,5 times slower than it could be. ?15 points
-
BTW this is an endorsement for the seller14 points


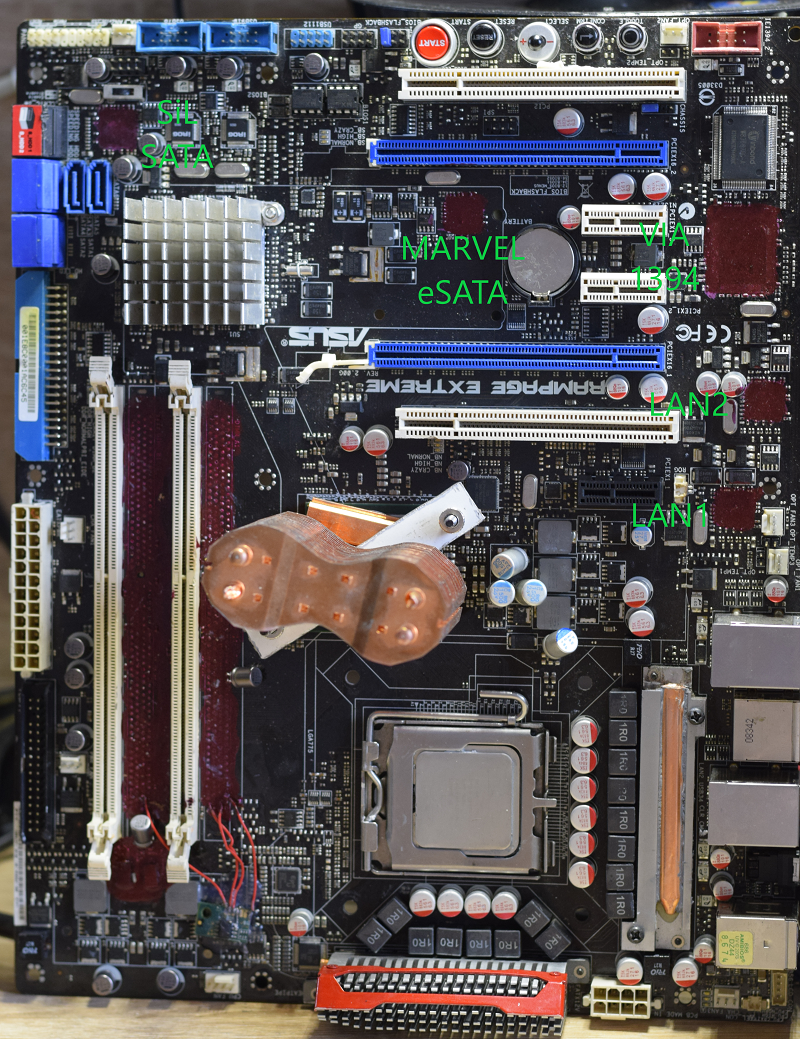


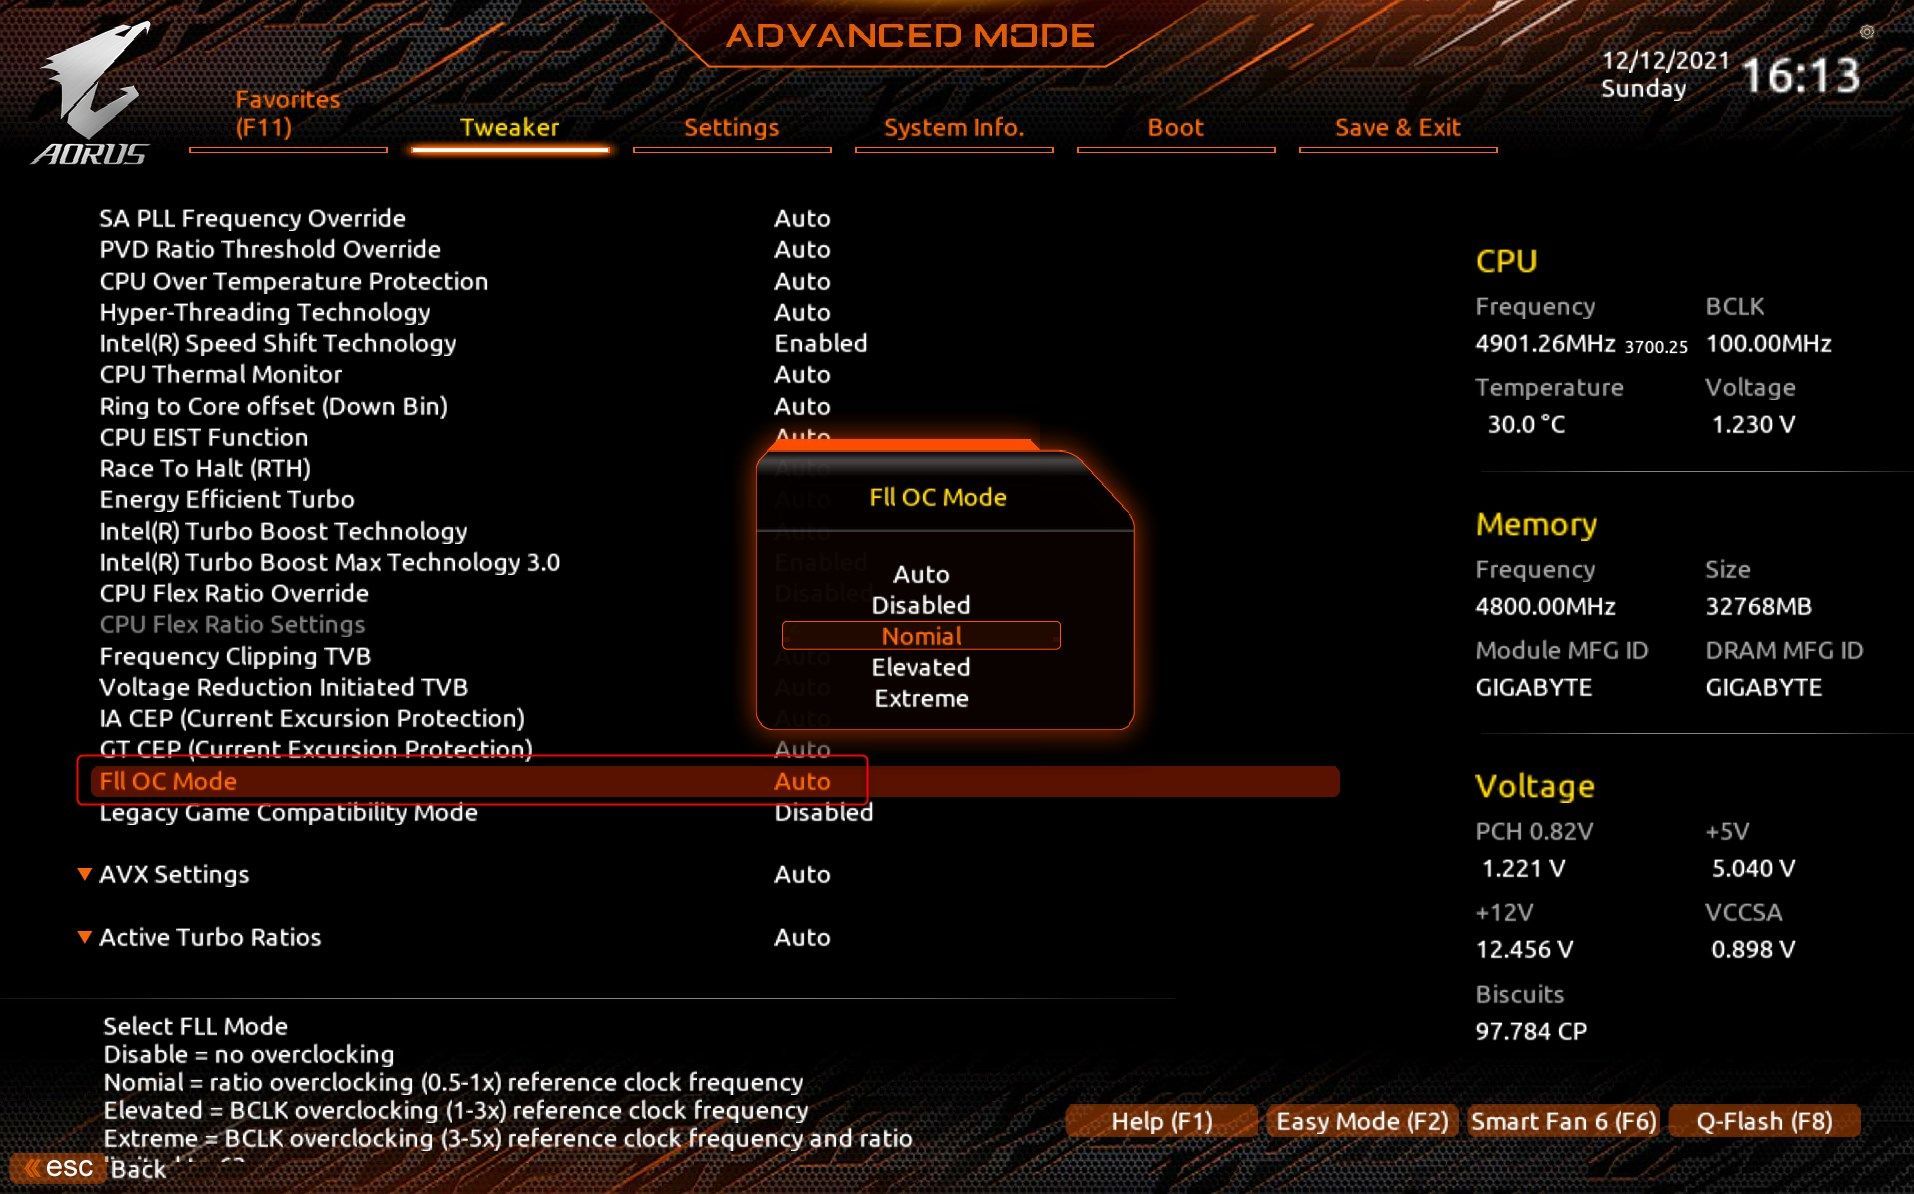
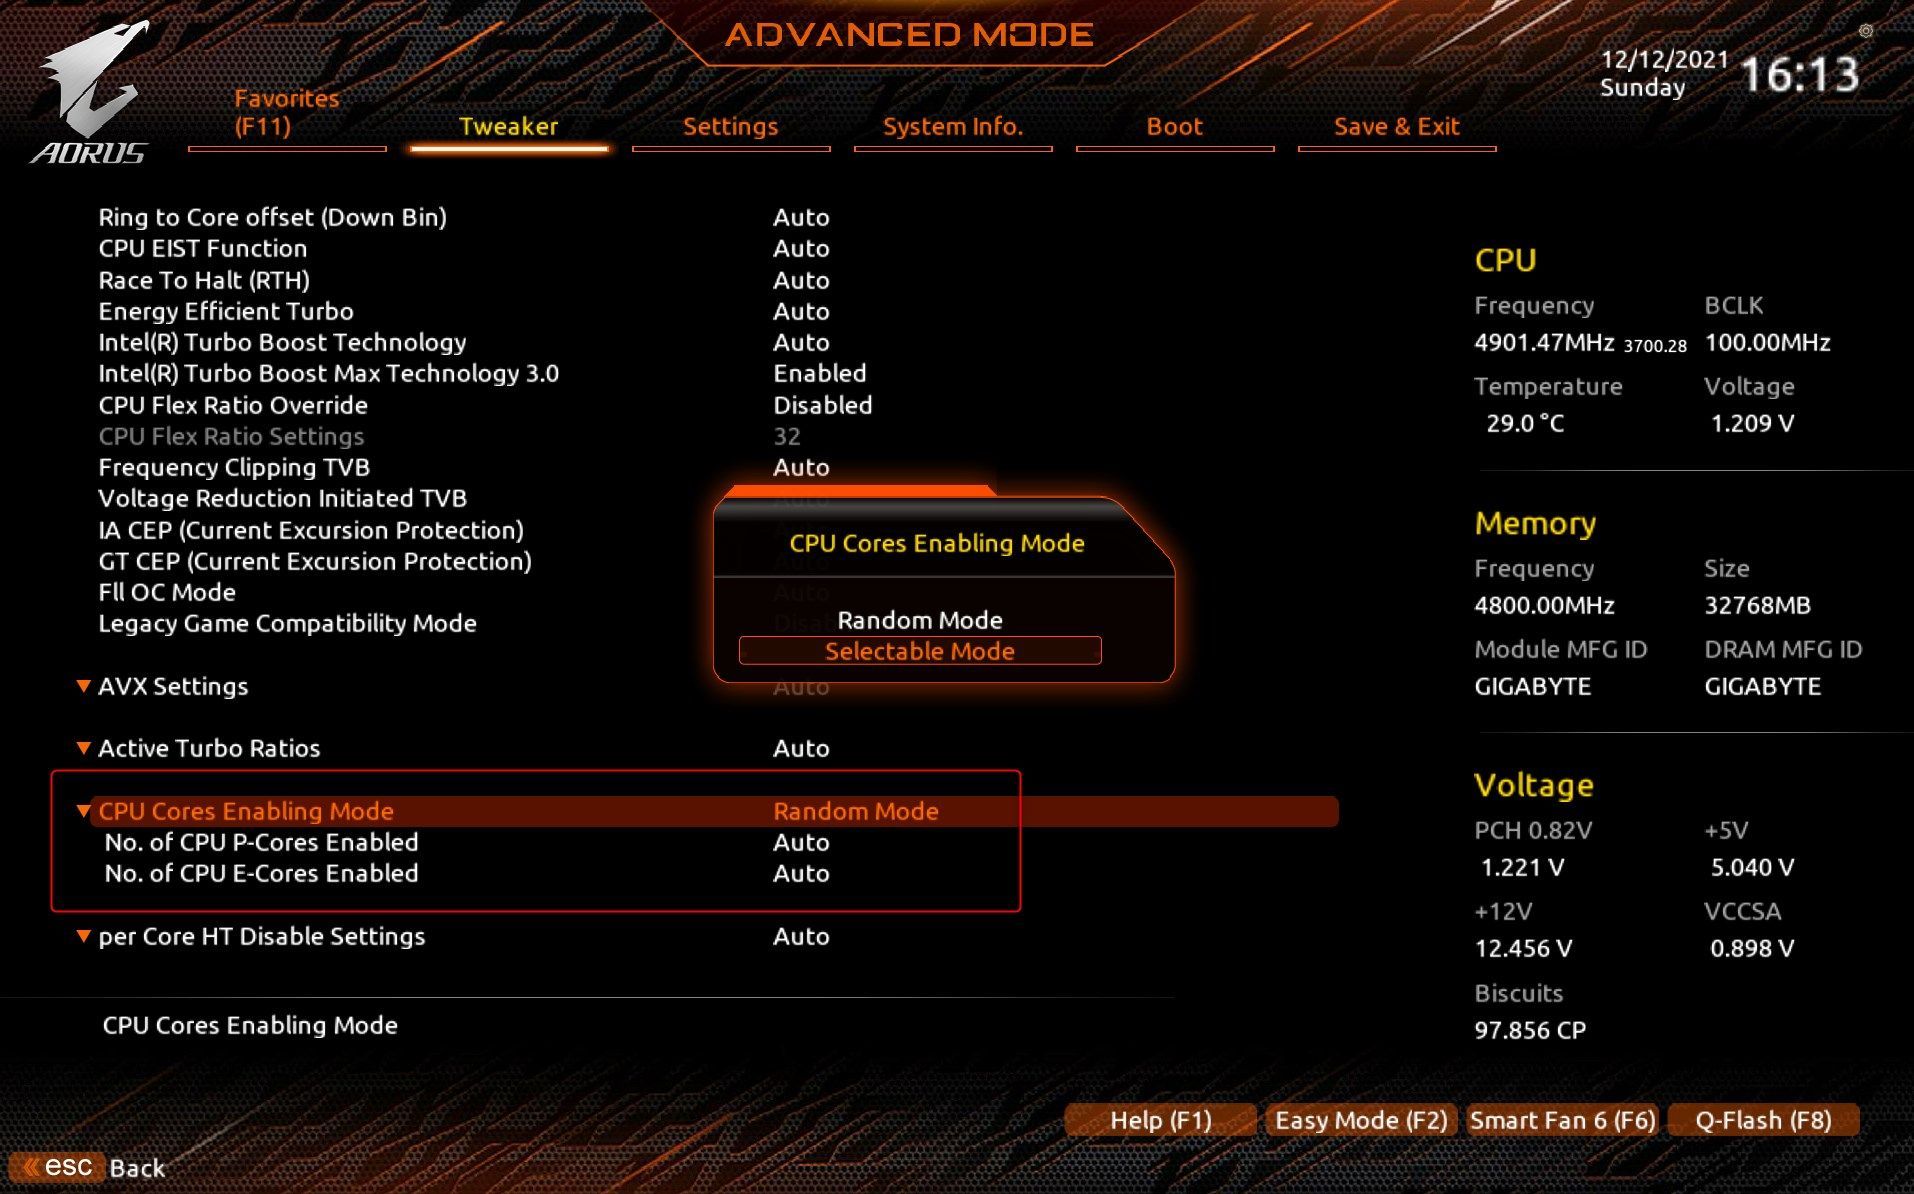


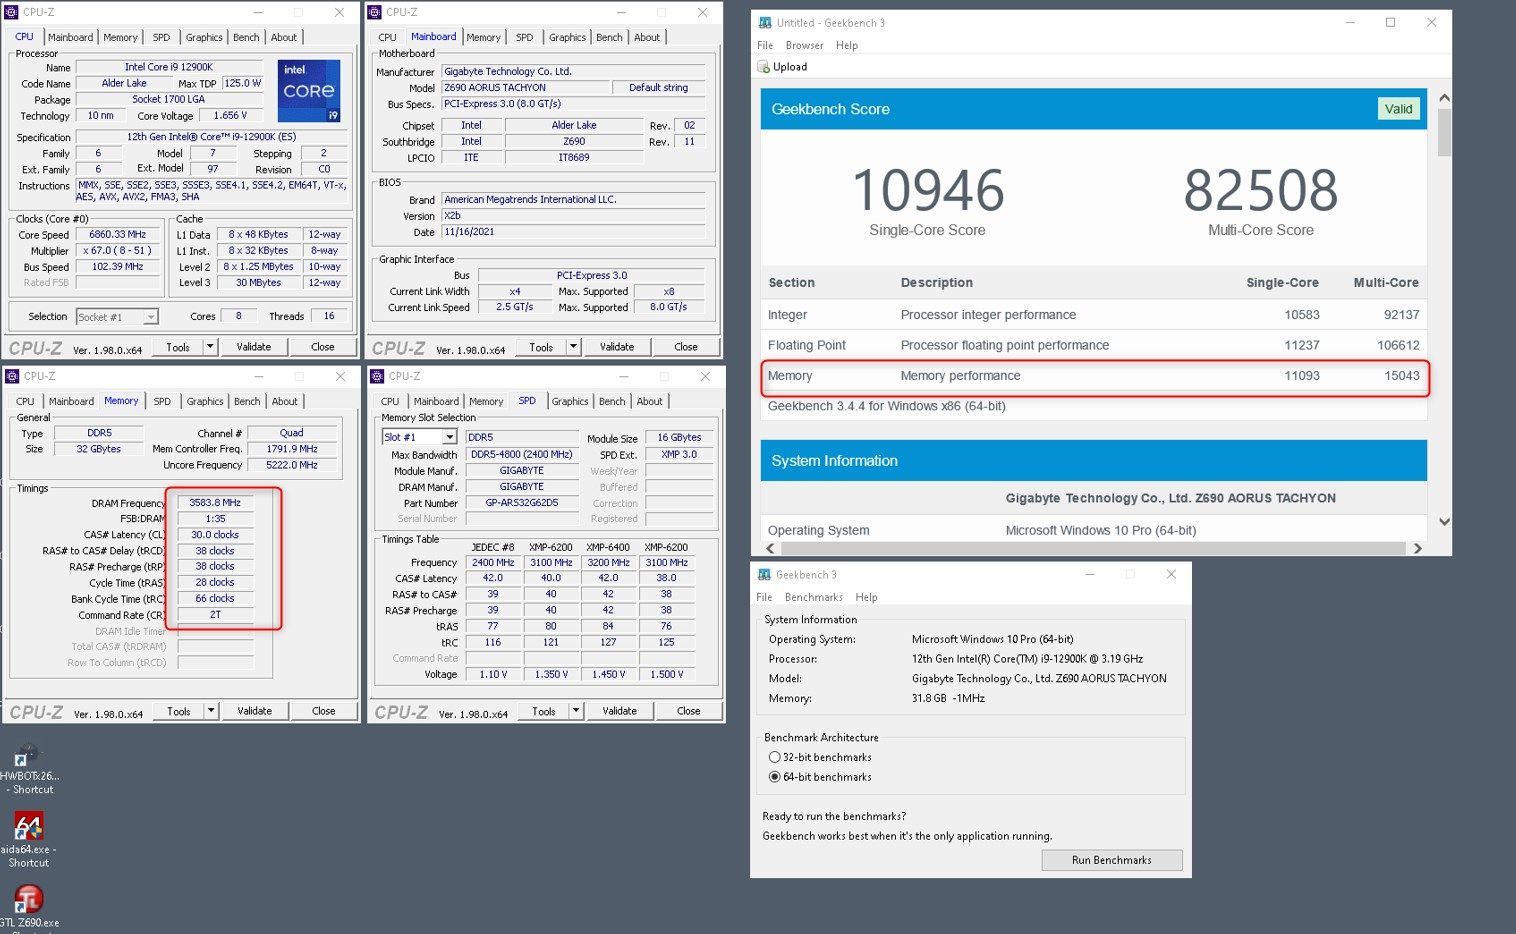
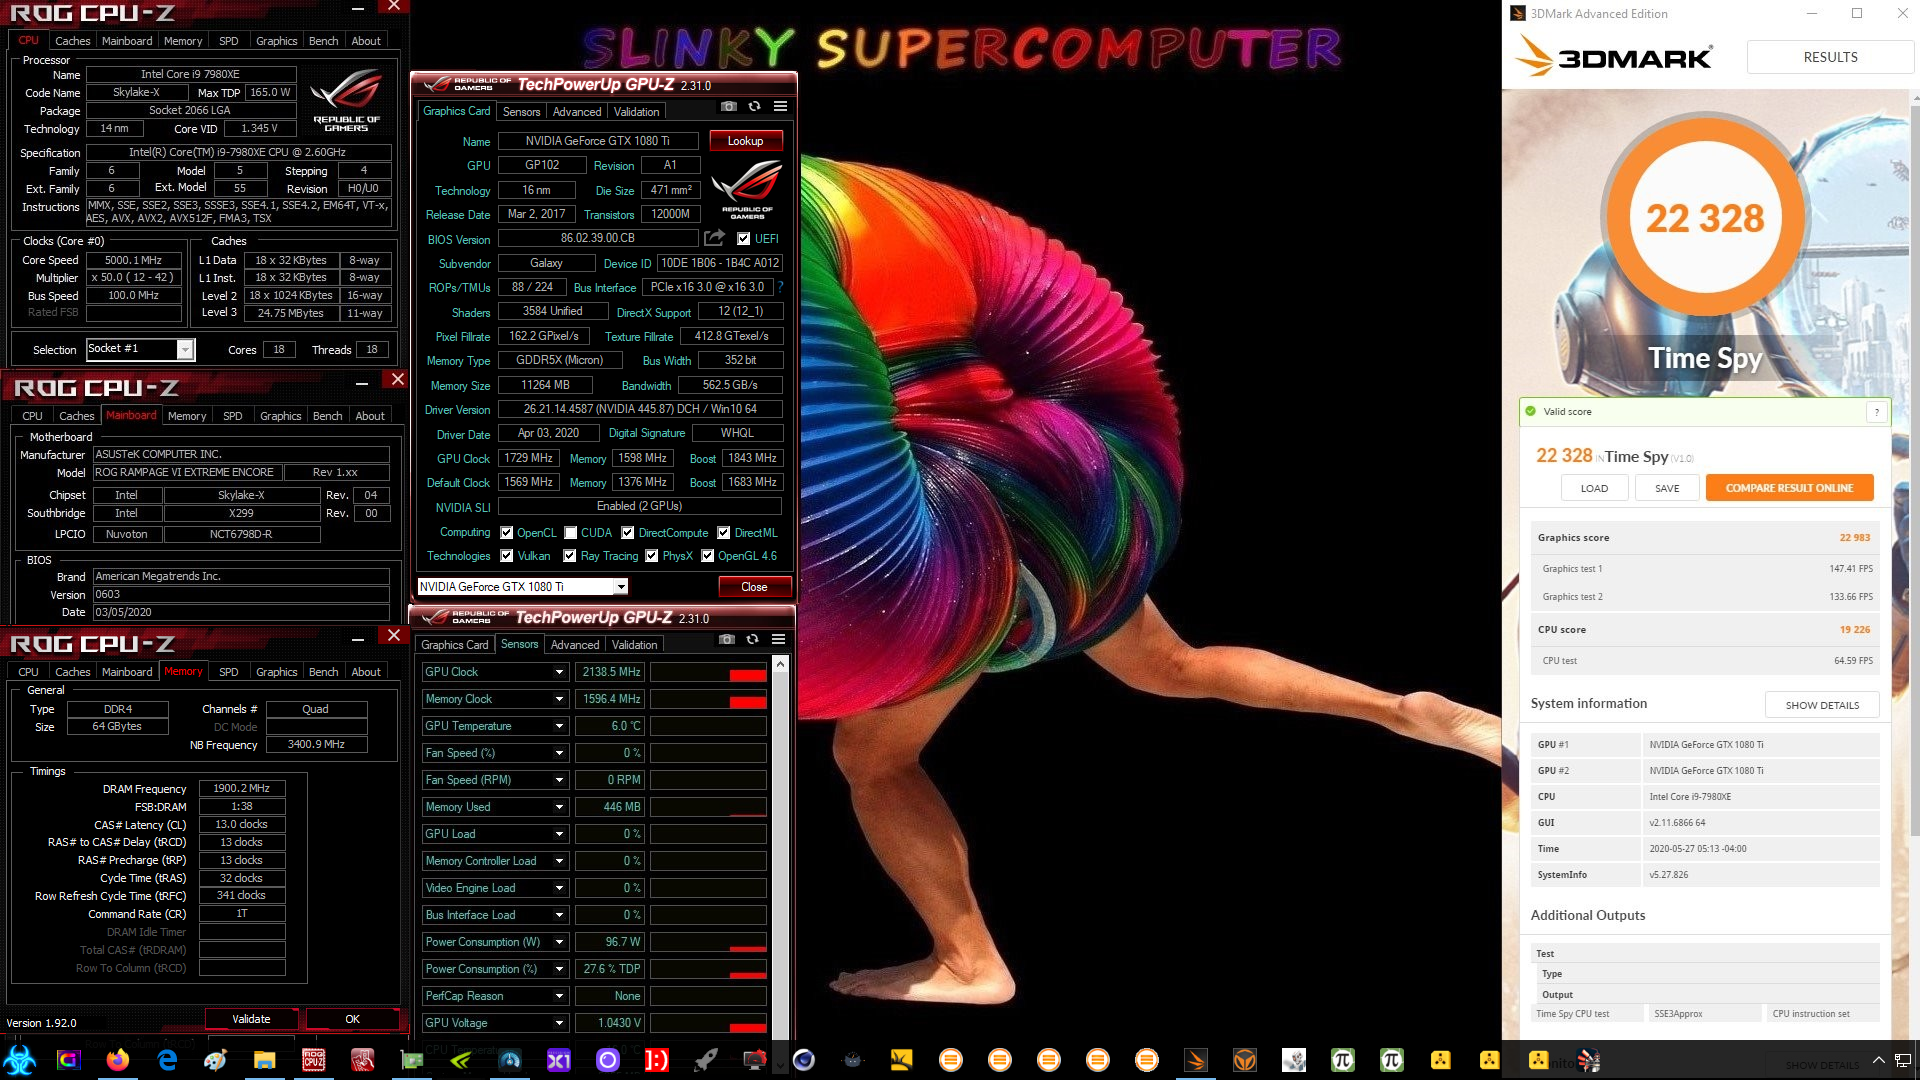

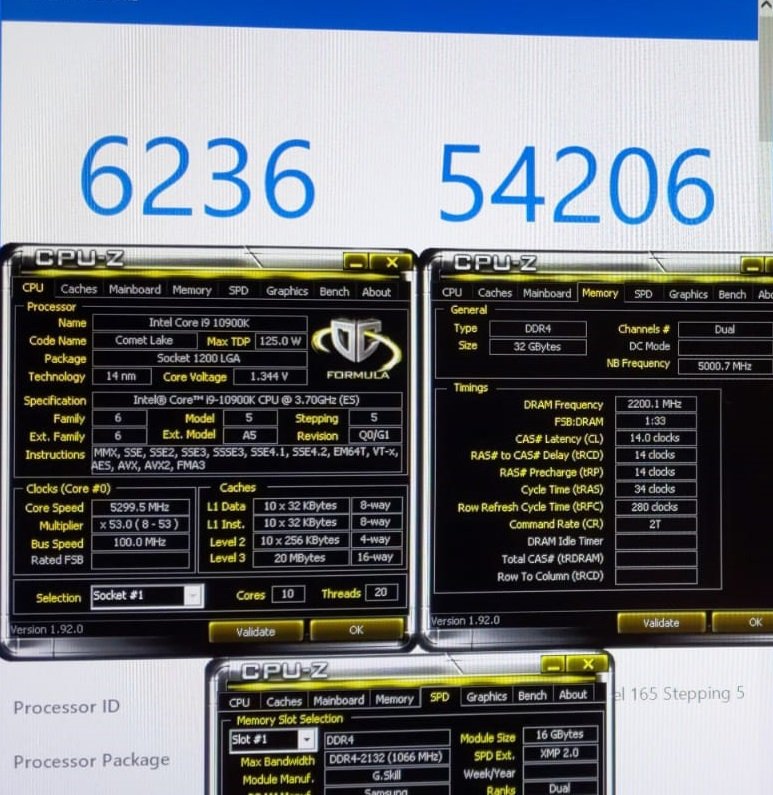


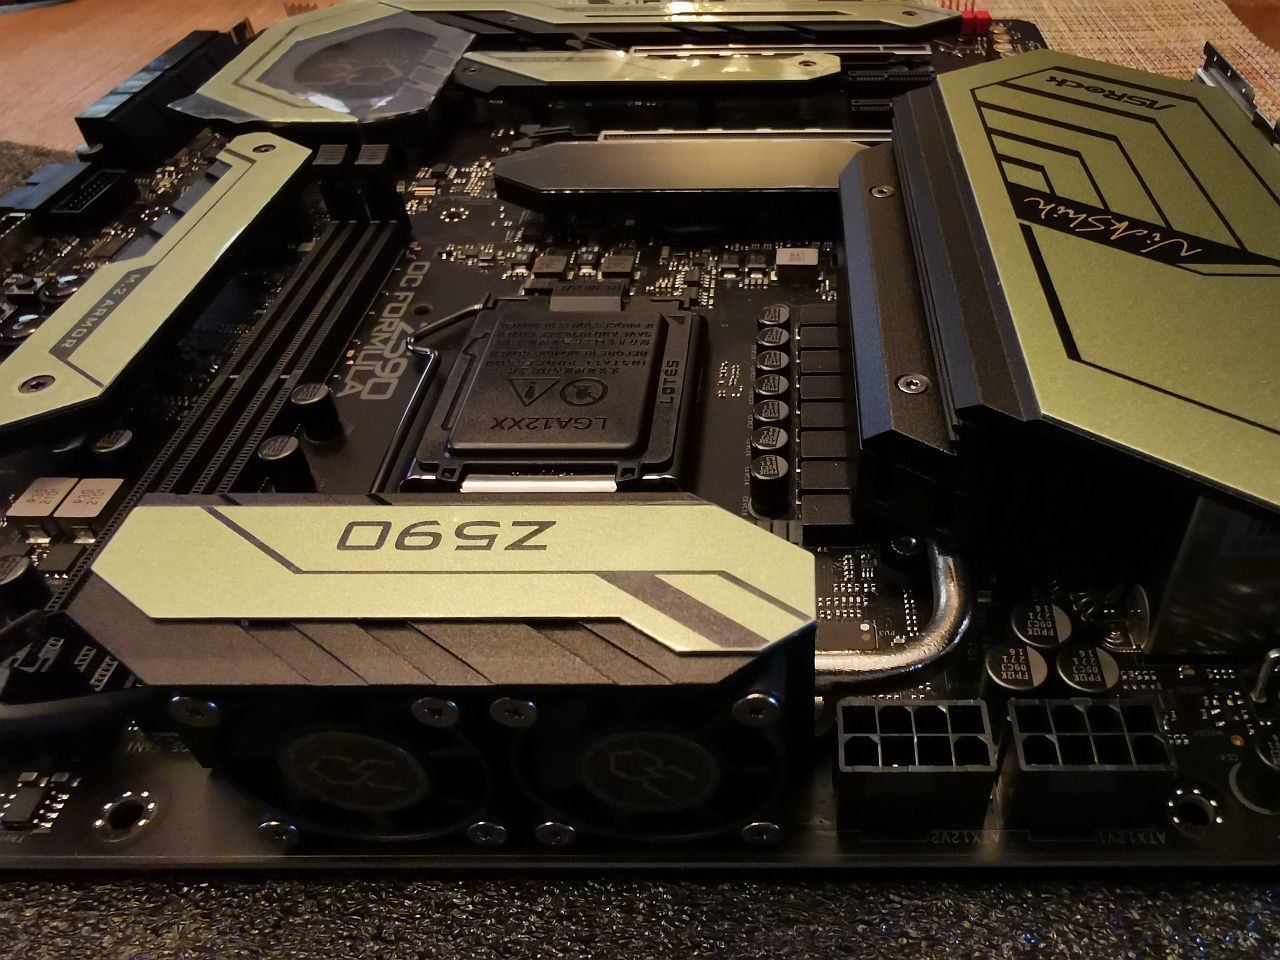
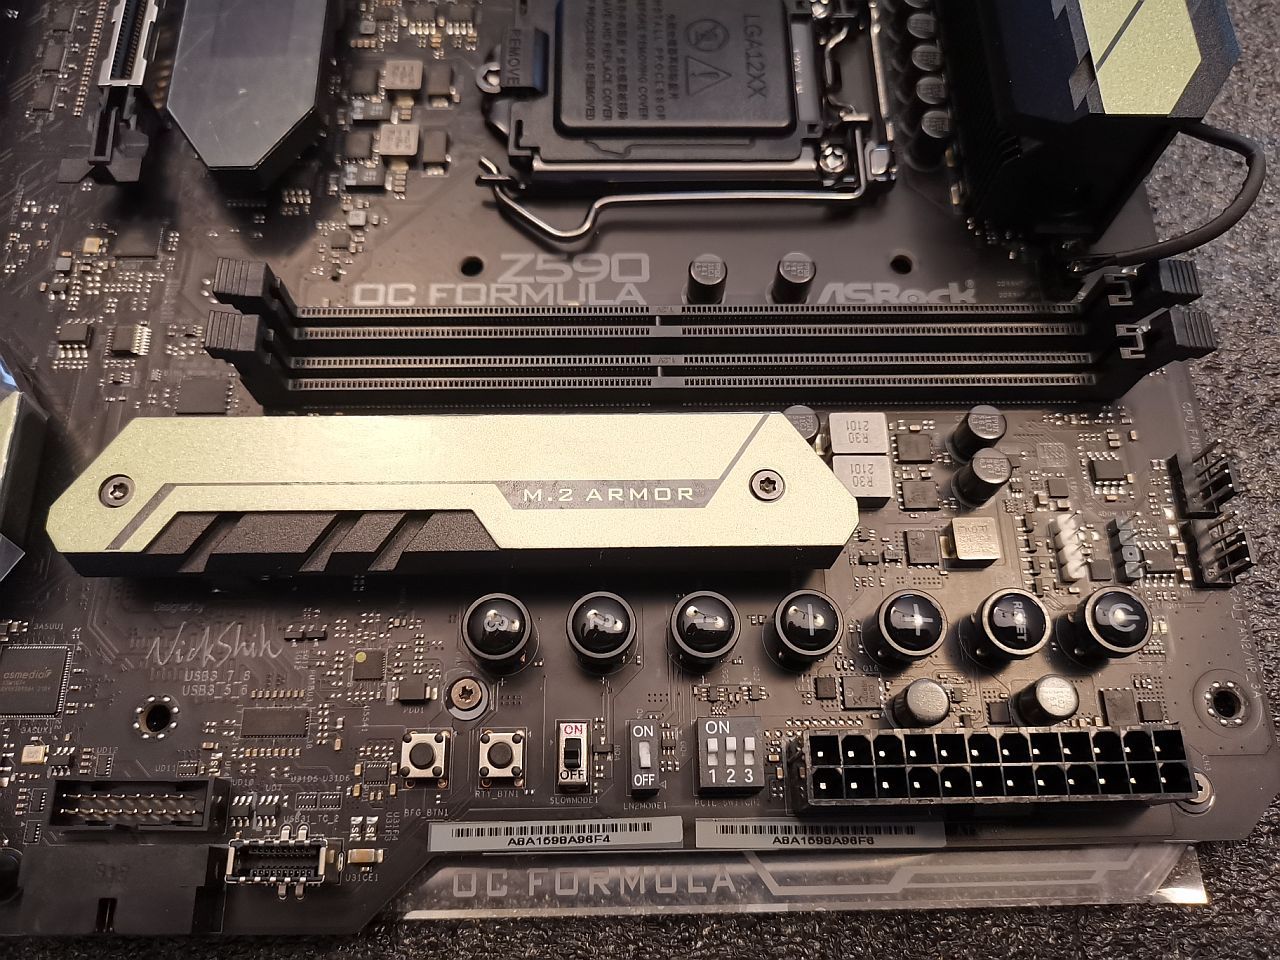
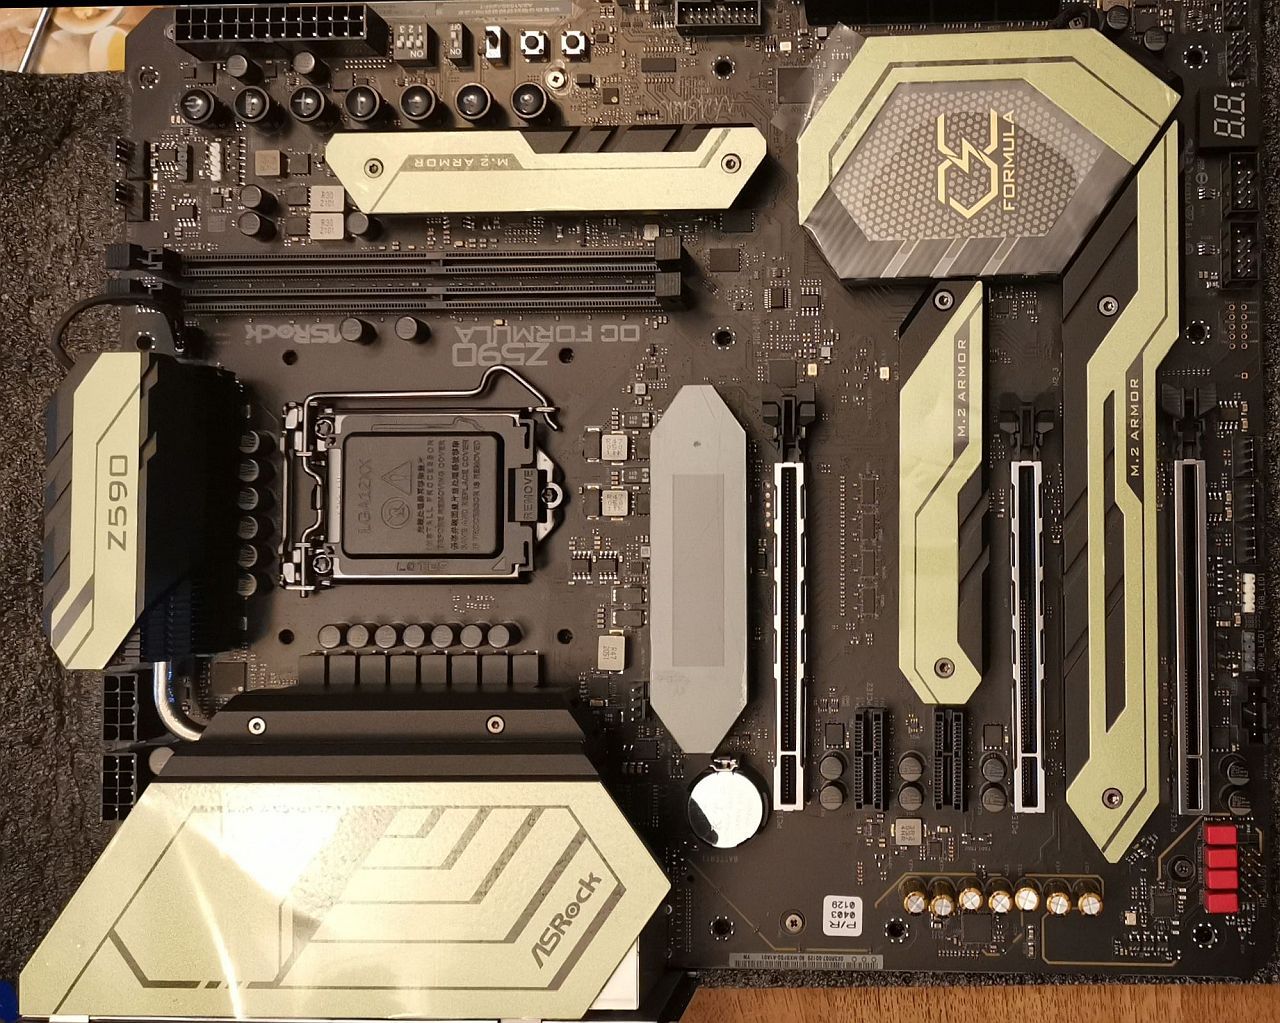
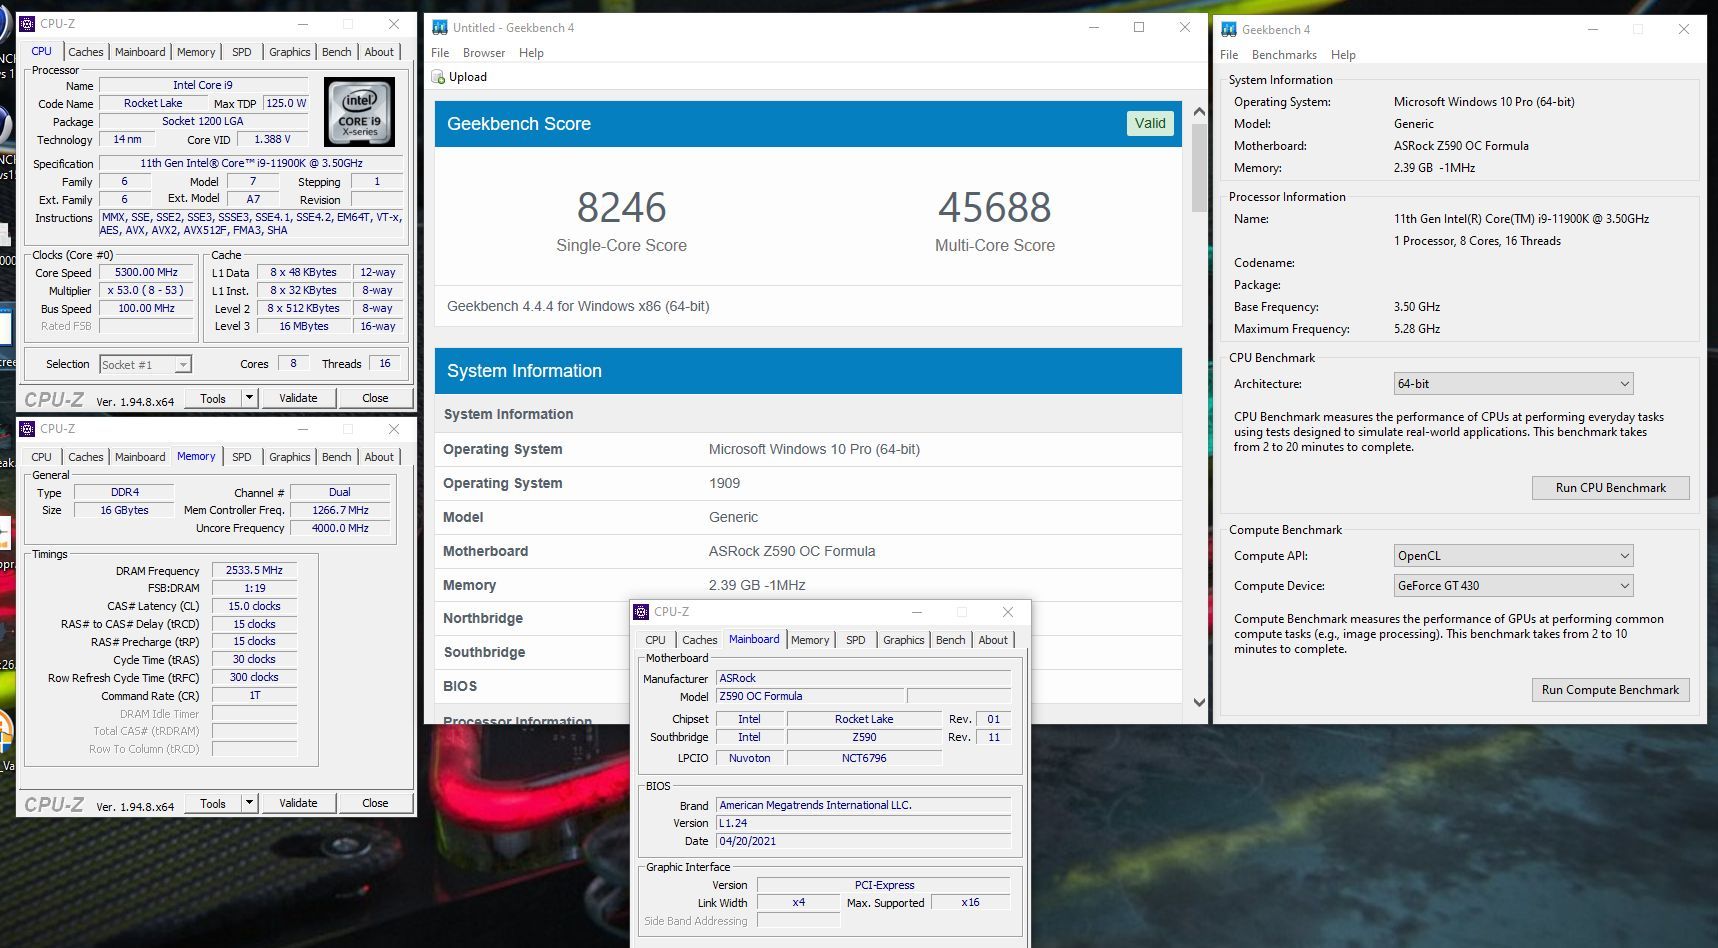


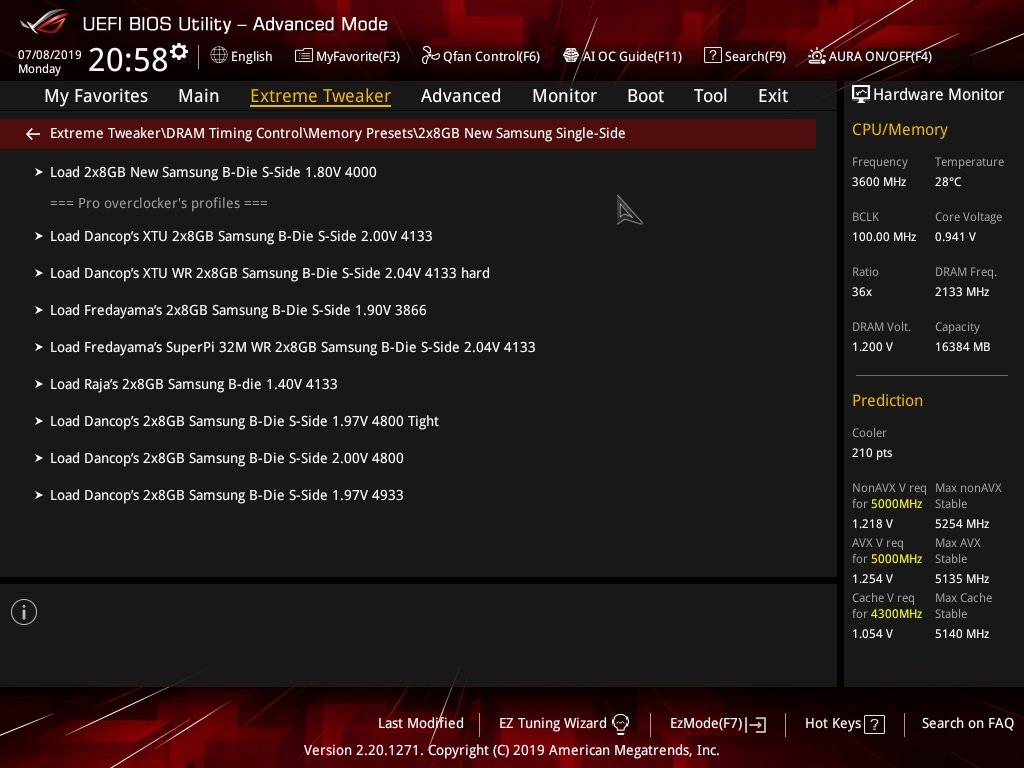


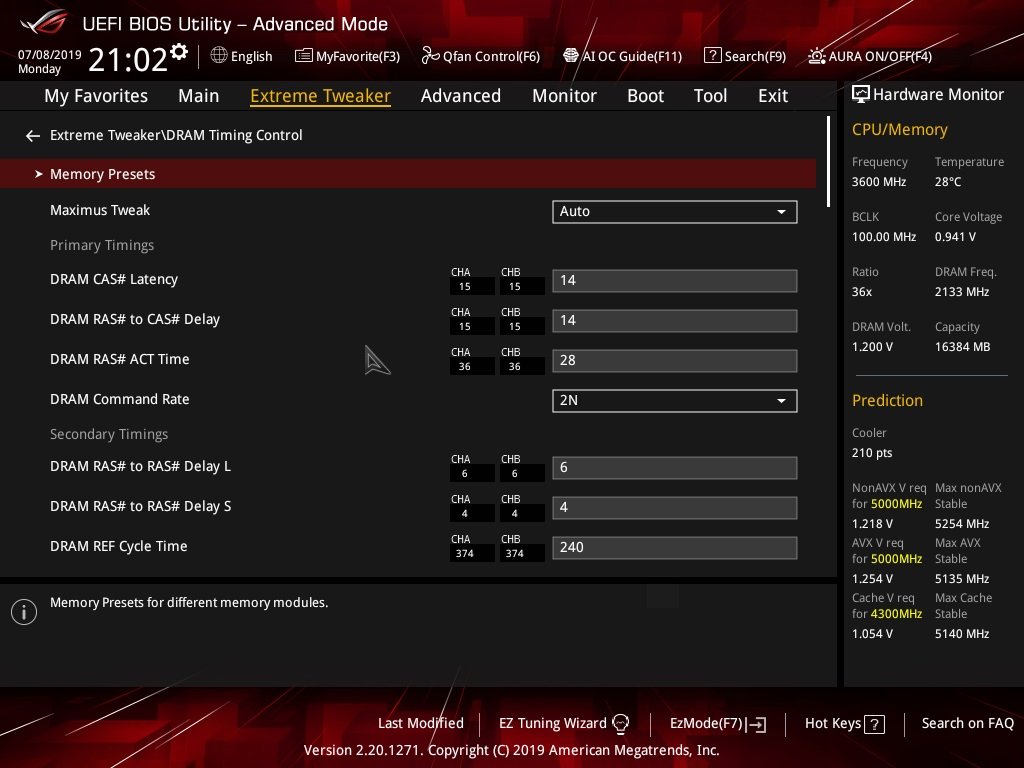
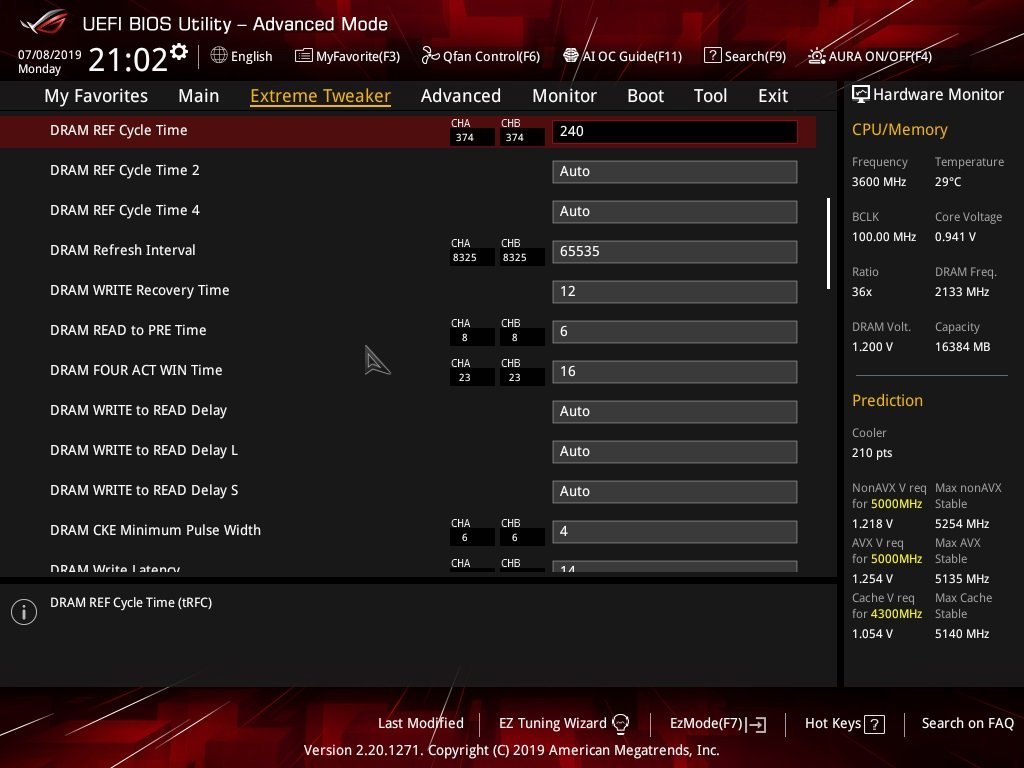
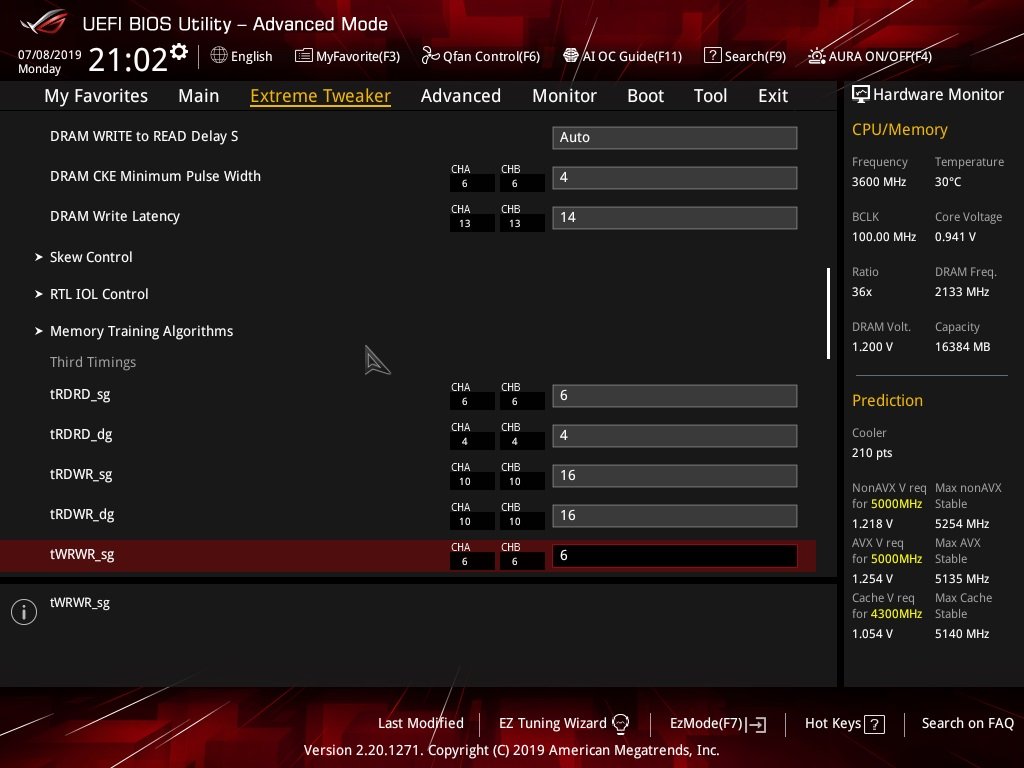
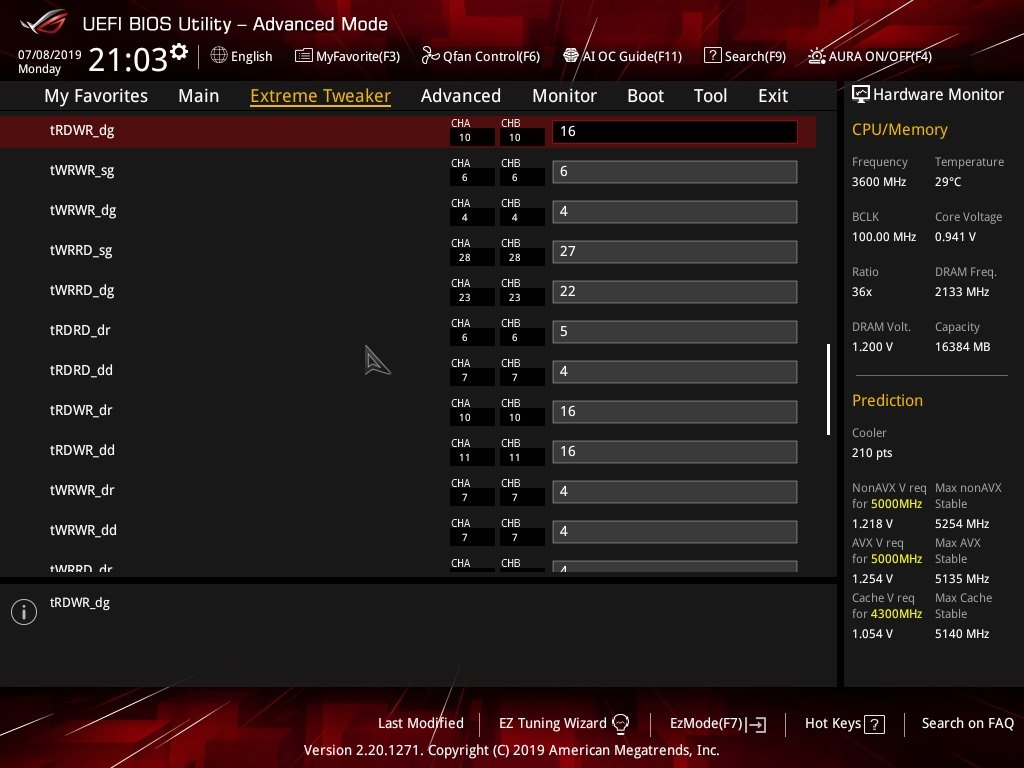
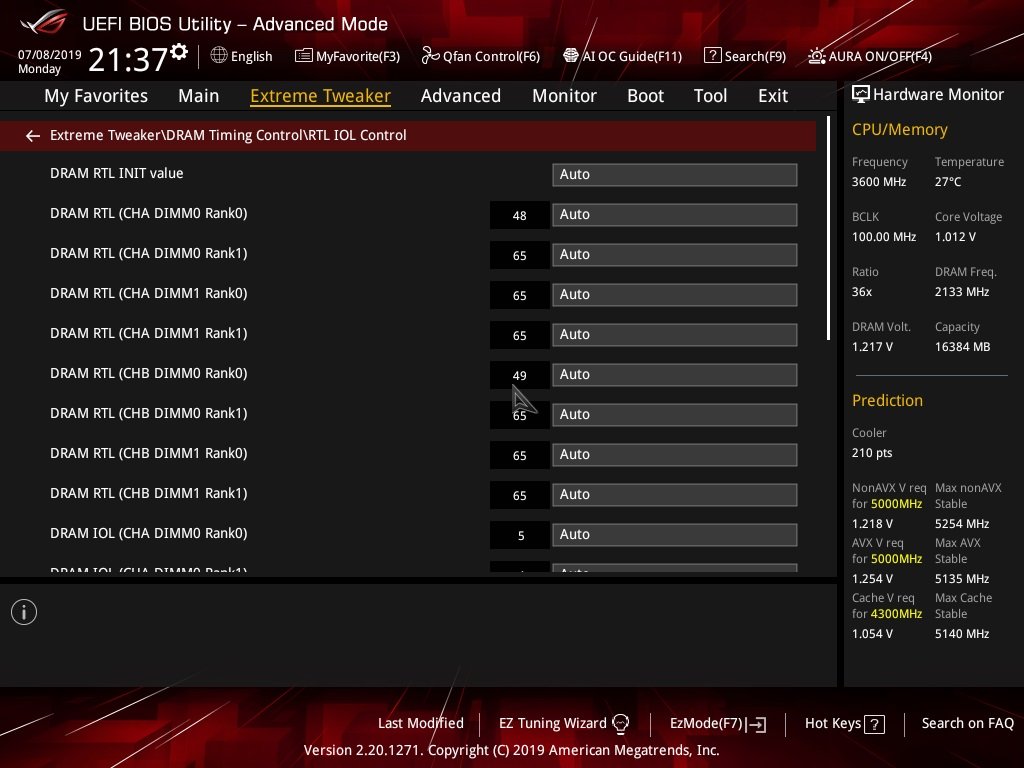
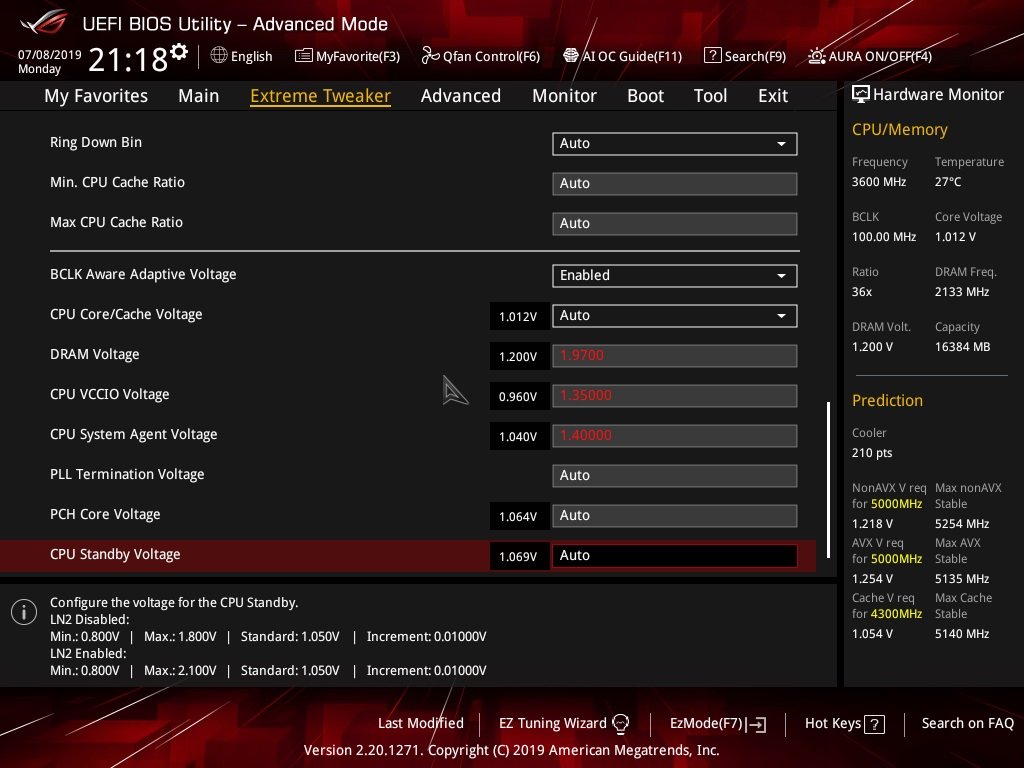


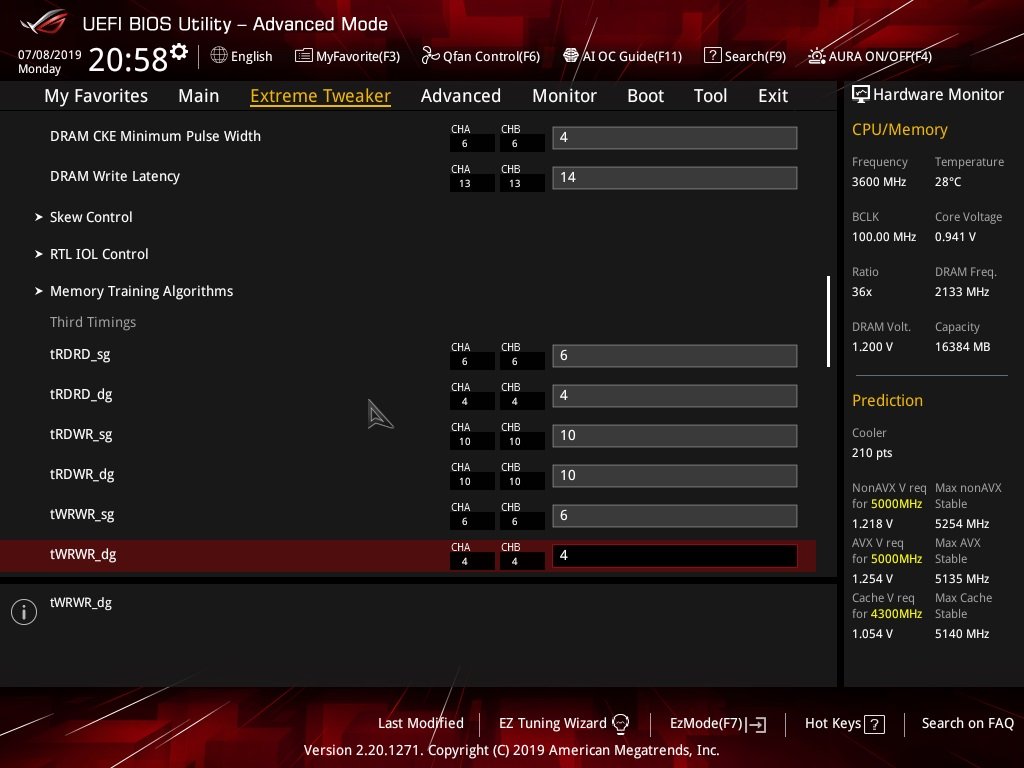


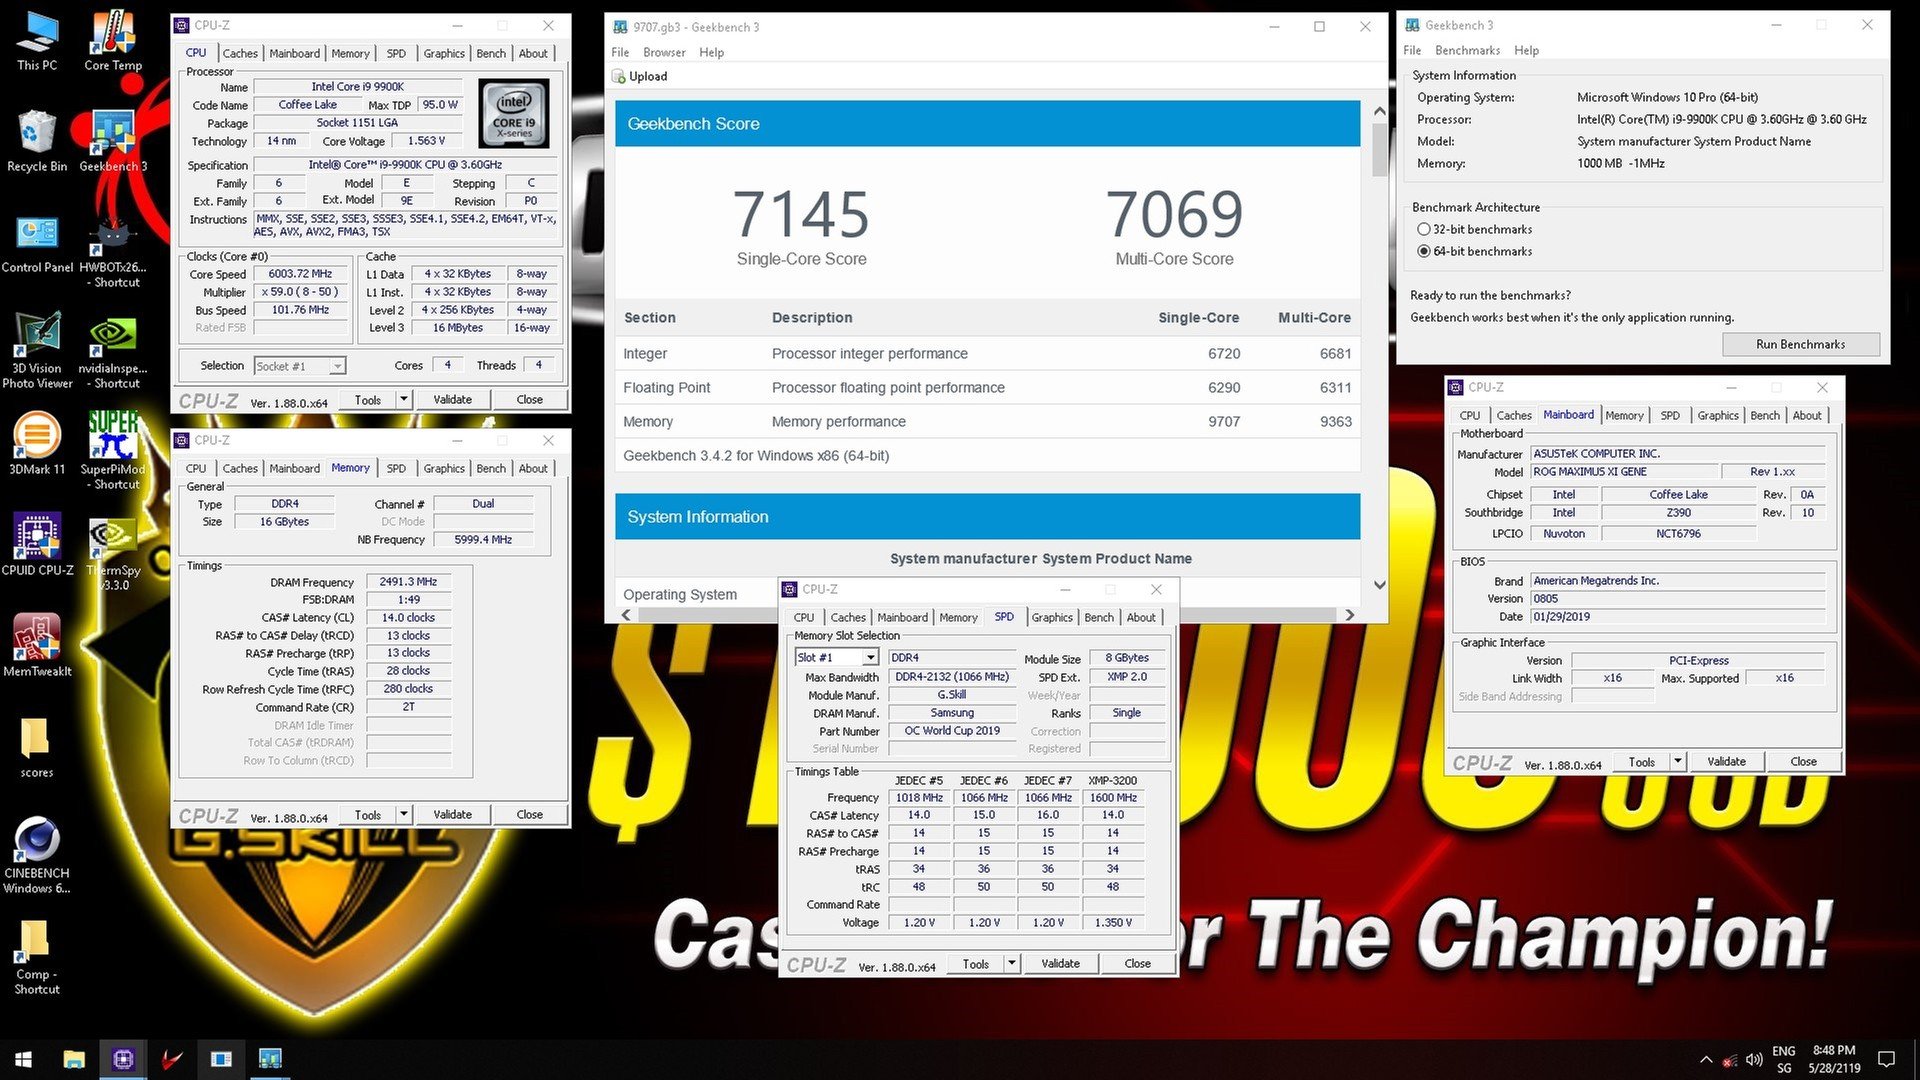


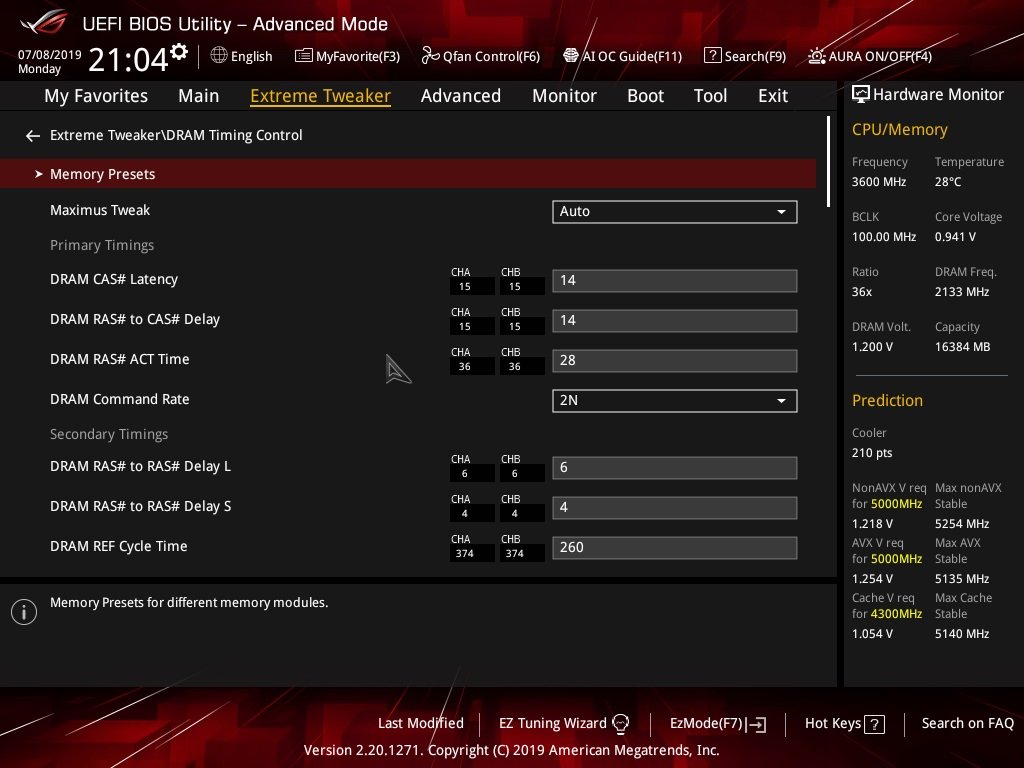
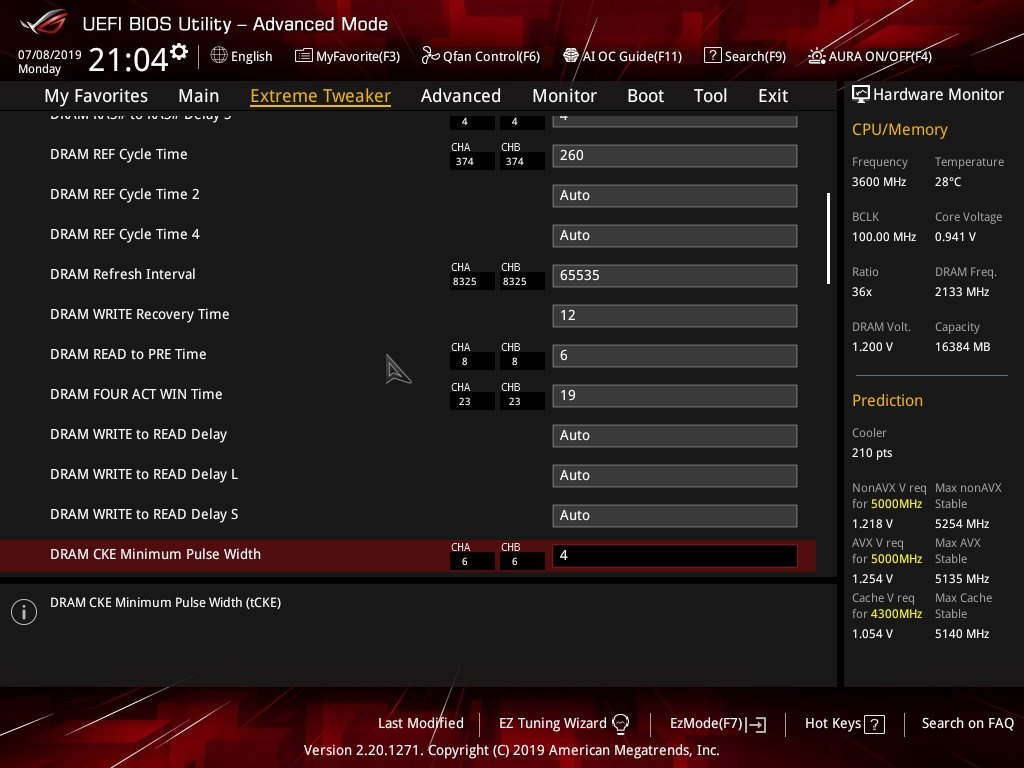
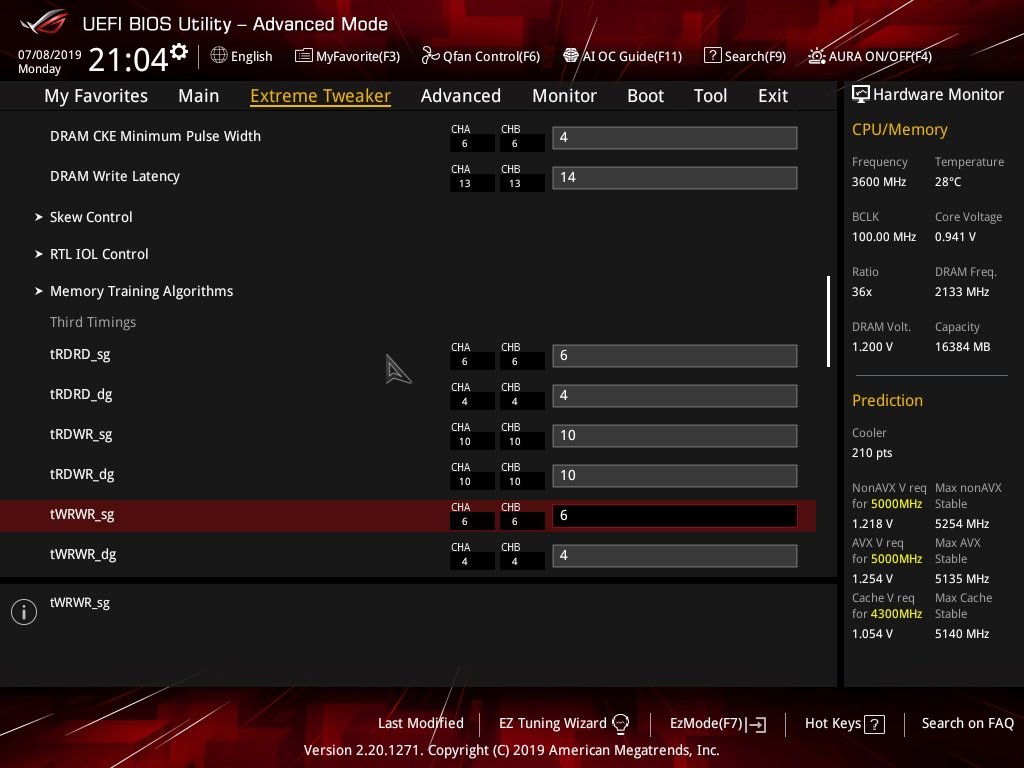

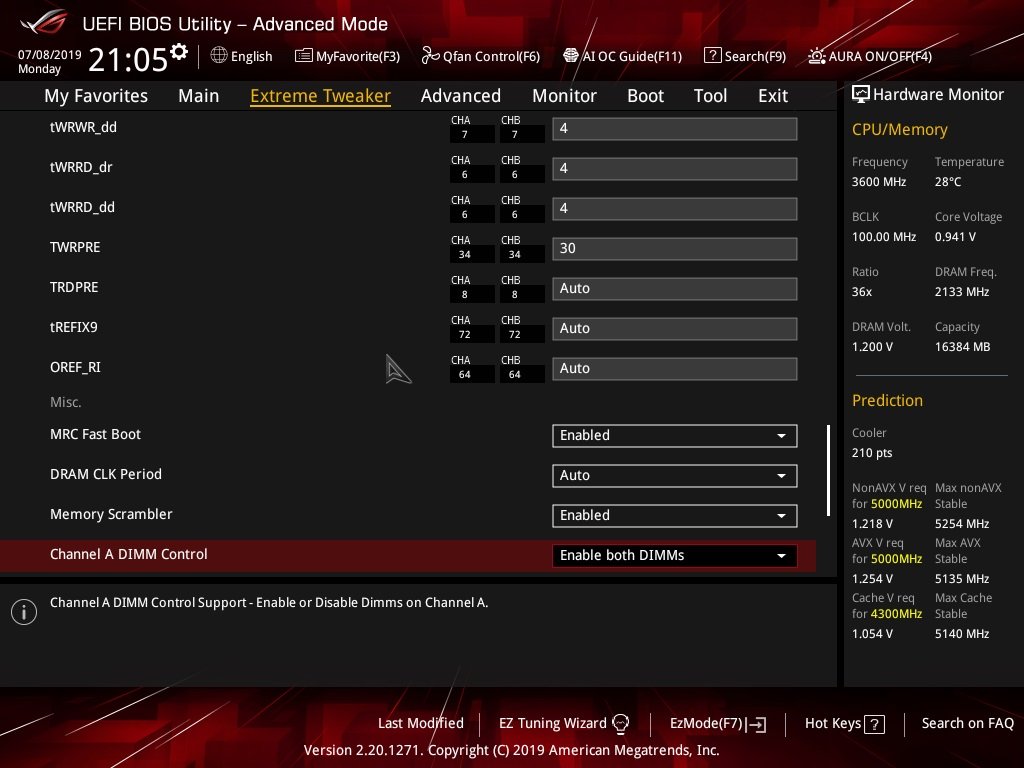
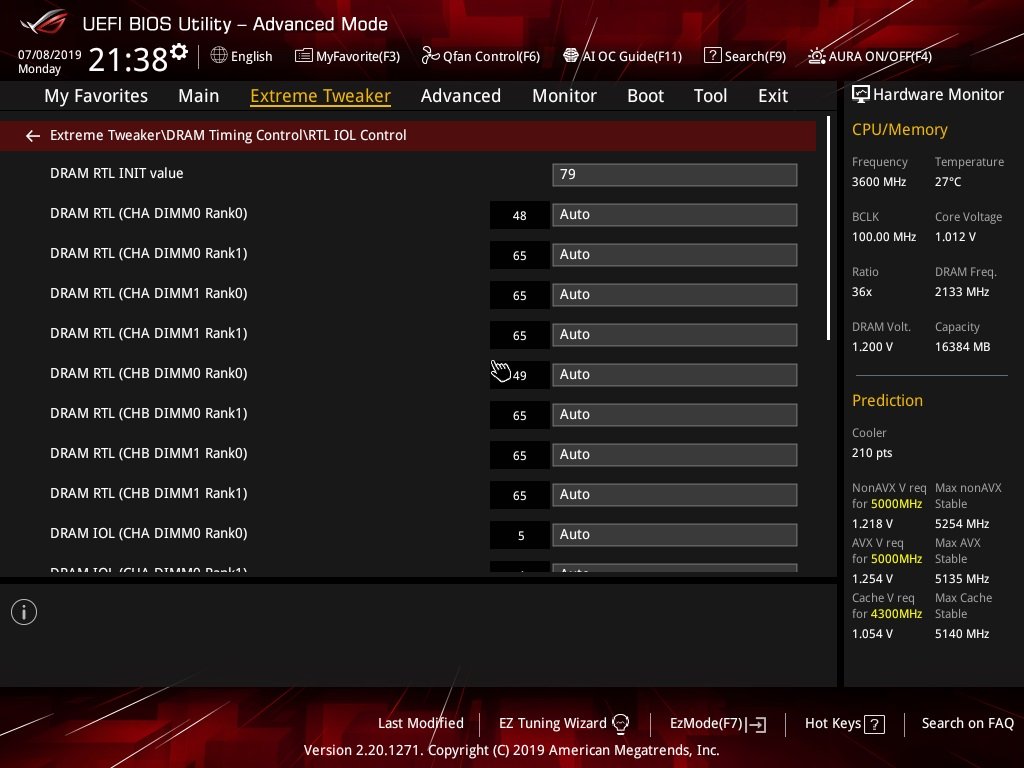
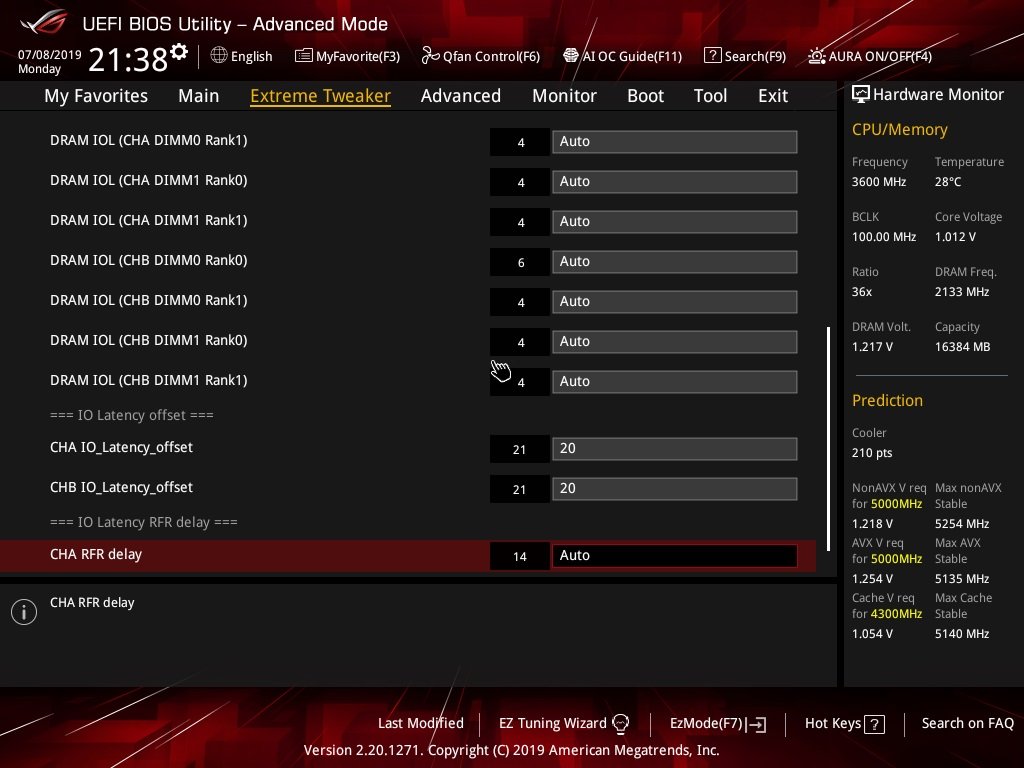


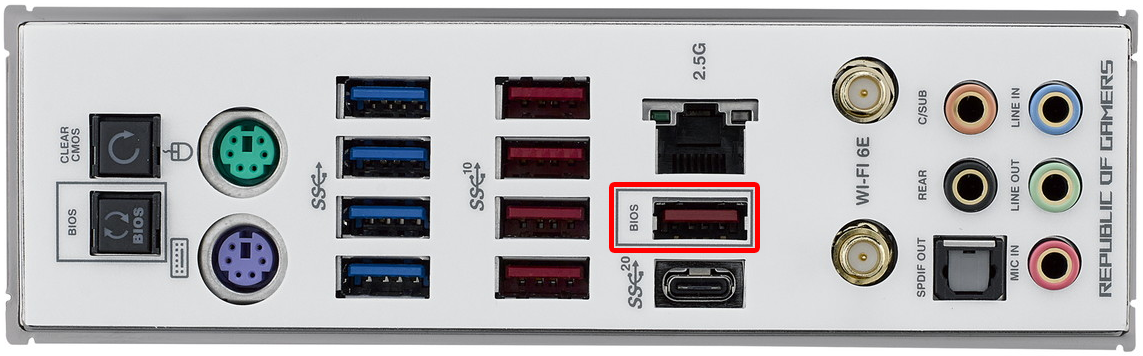
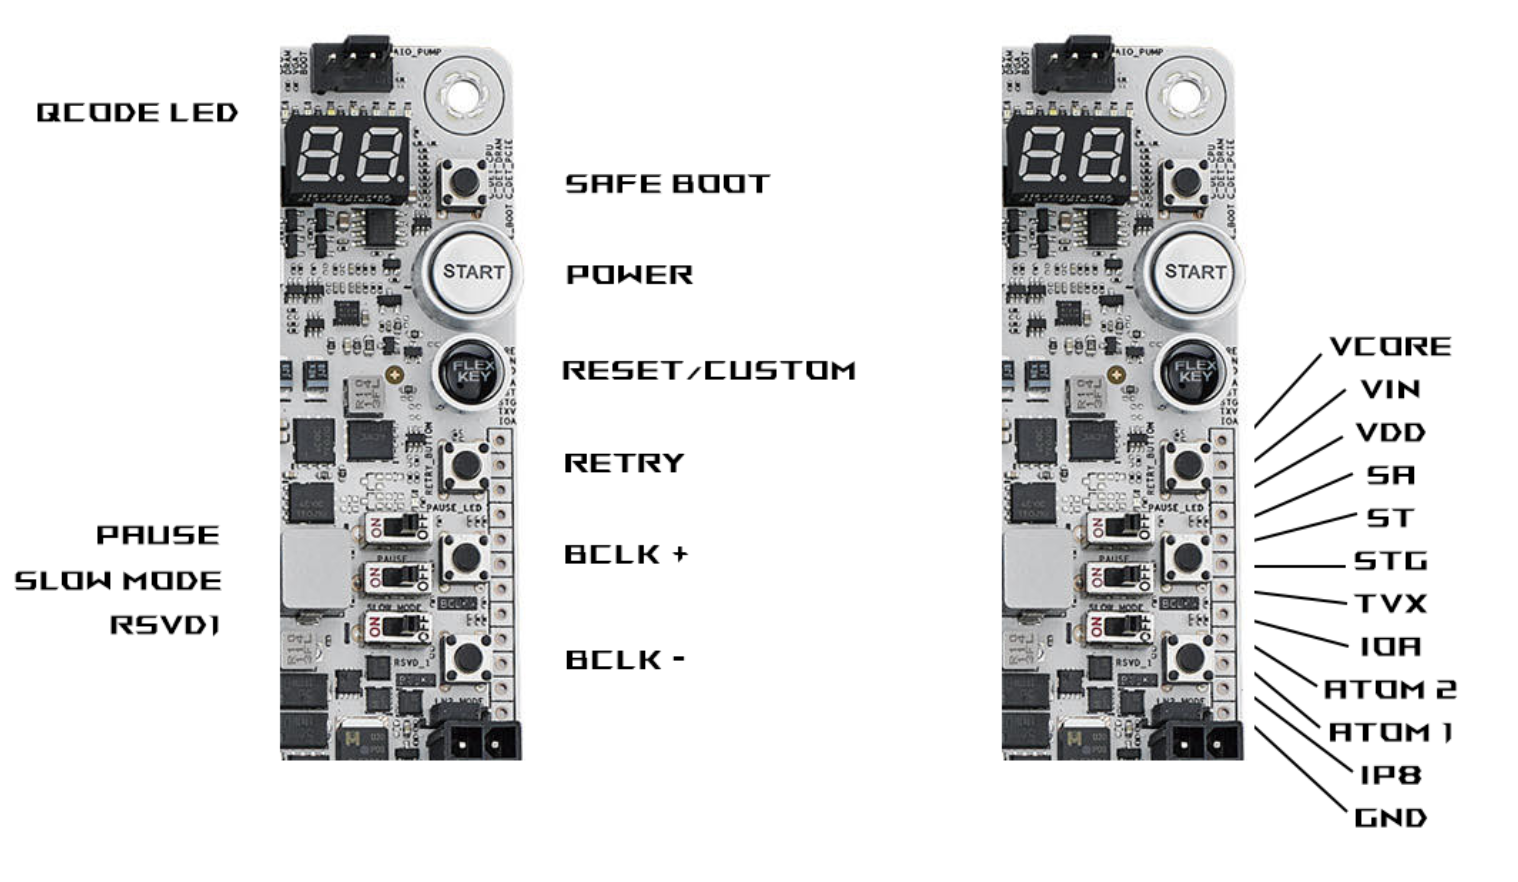
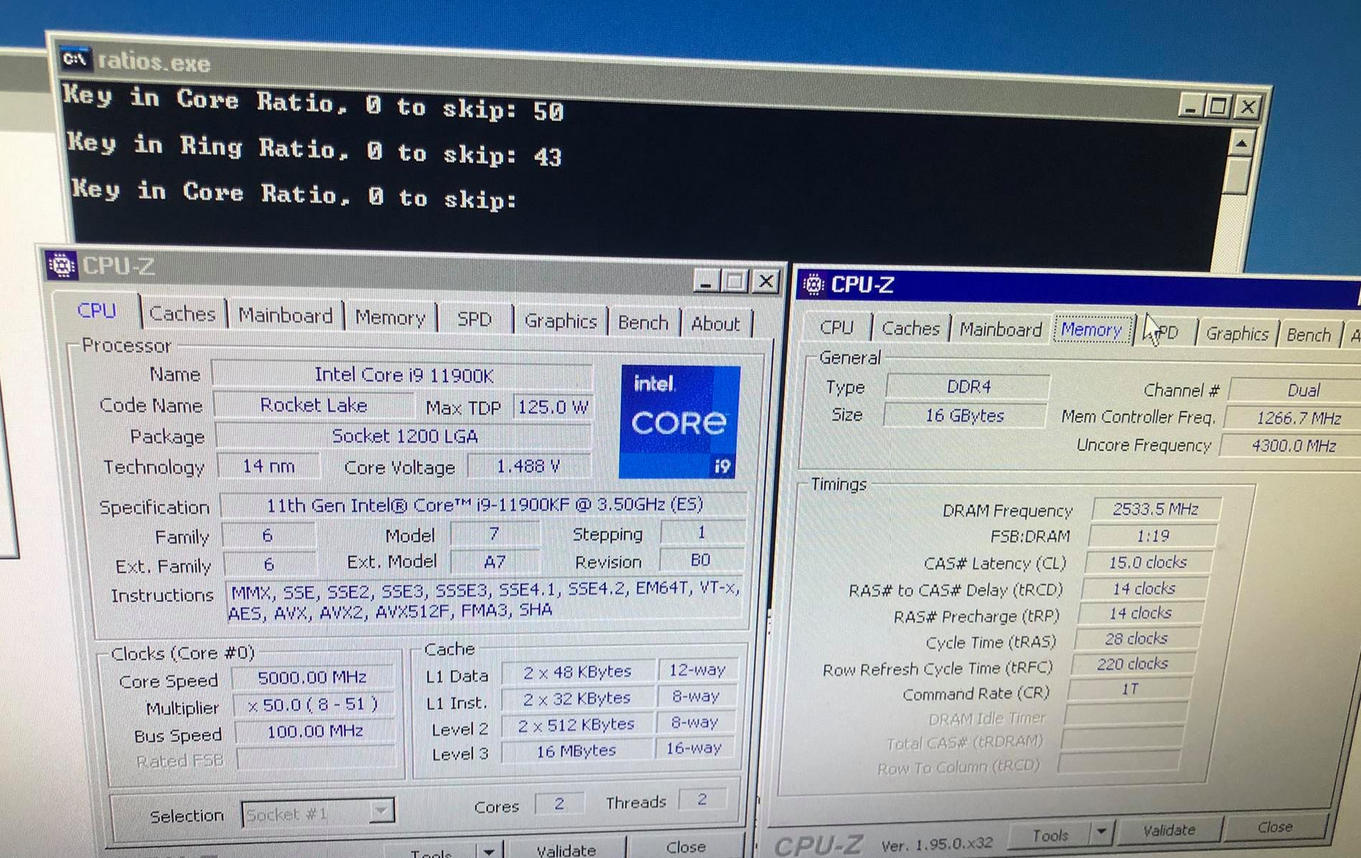

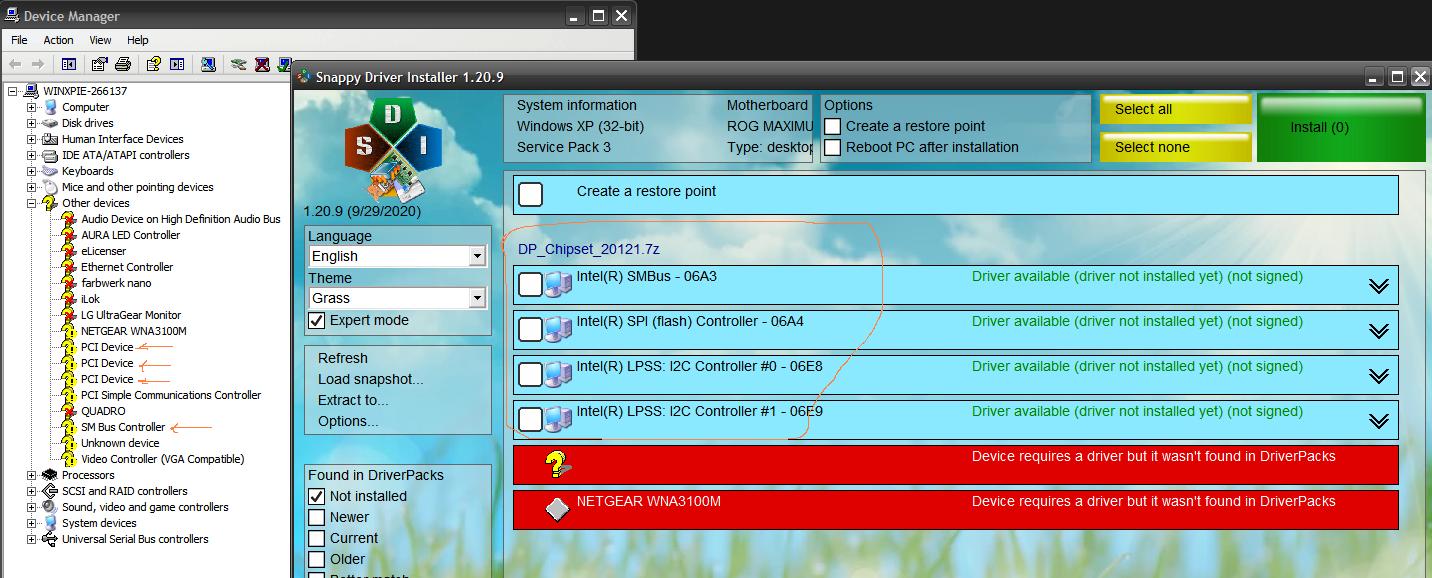
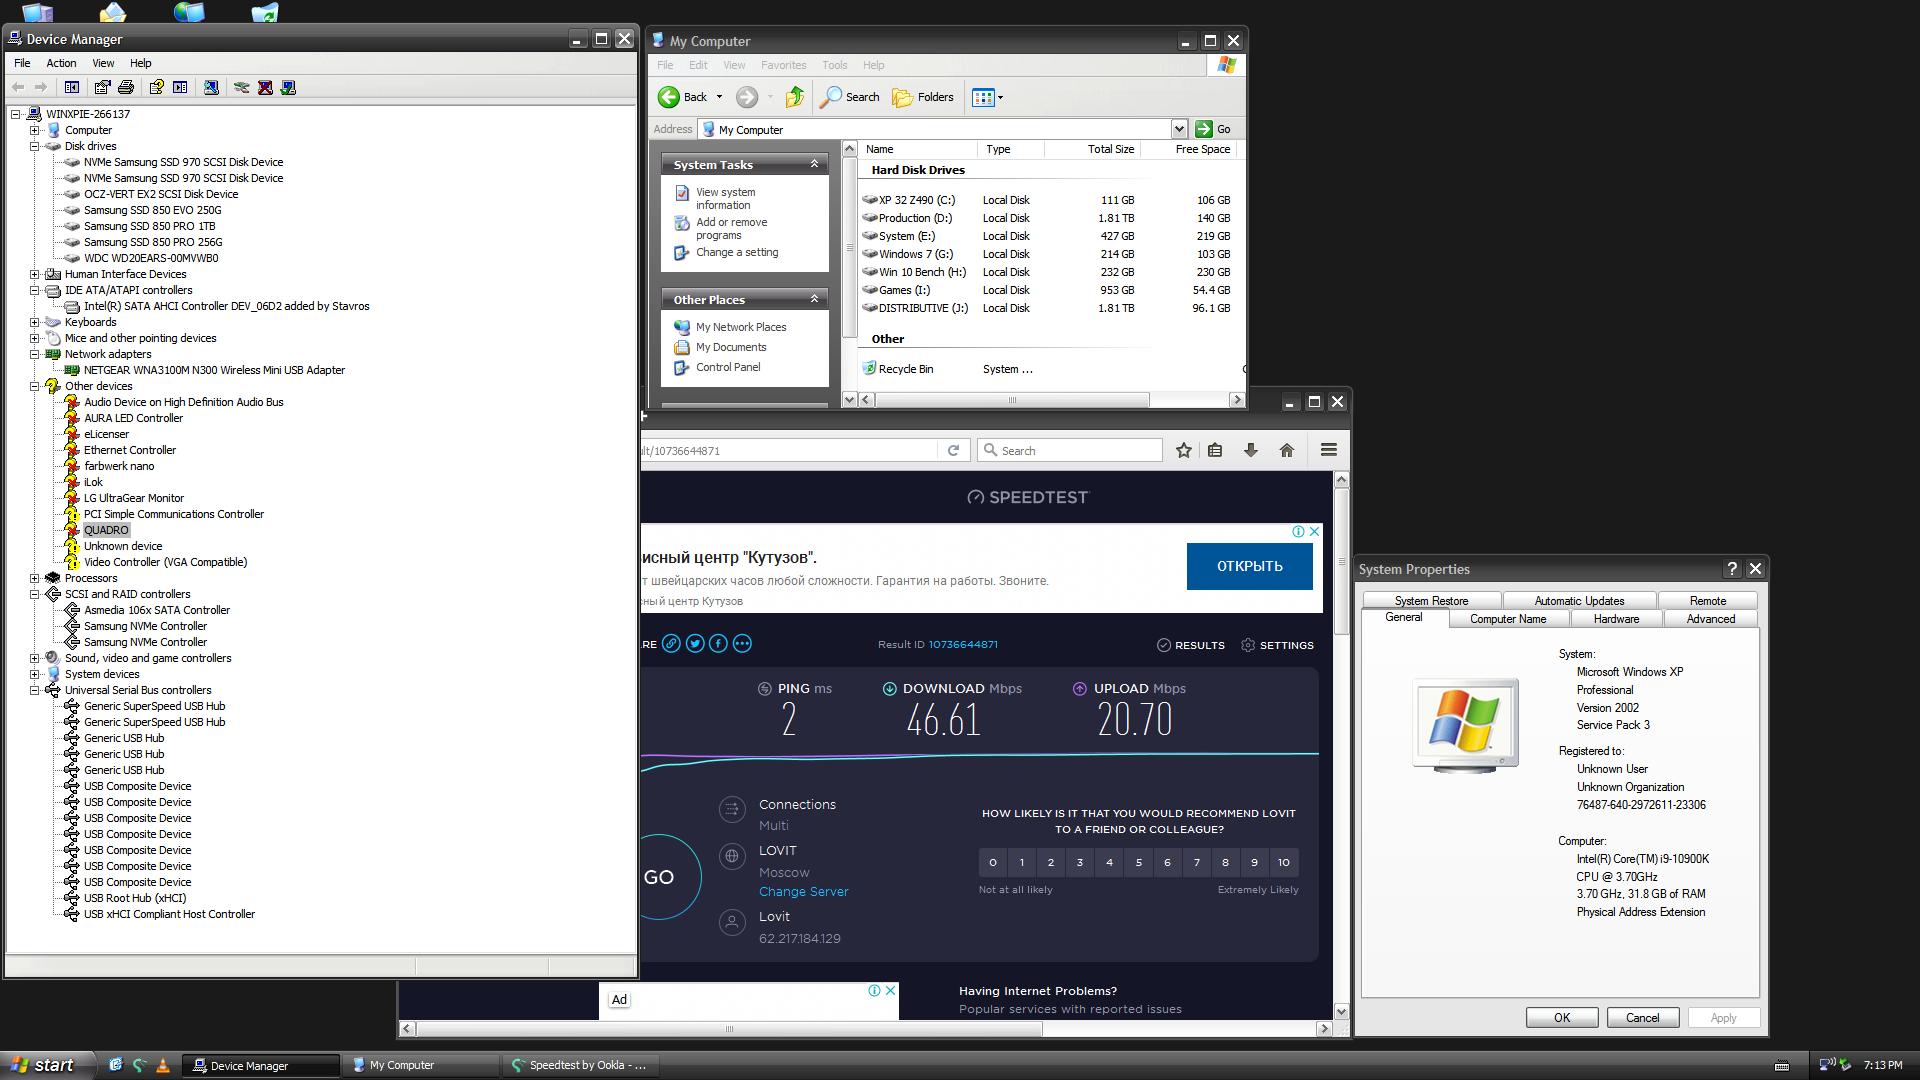
(1).thumb.png.f69554094d89ef2e79486c6b50cc1931.png)